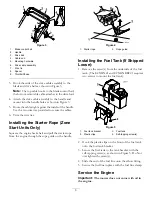
Figure 3
1.
Blade control bail
2.
Handle
3.
Drive bail
4.
Cable end
5.
Mounting hardware
6.
Drive cable assembly
7.
Wire tie
8.
Spacer
9.
Throttle/Choke
3. Hook the ends of the drive cable assembly to the
blade and drive bails as shown in Figure 3.
Note:
The top cable hooks to the blade control bail;
the bottom removable cable attaches to the drive bail.
4. Attach the drive cable assembly to the handle and
mount into the handle hole as shown in Figure 3.
5. Route the cables tight against the inside of the handle.
Use the two wire ties provided to secure the cables.
6. Trim the wire ties.
Installing the Starter Rope (Zone
Start Units Only)
Squeeze the engine brake bail and pull the starter rope
from the engine through the rope guide on the handle.
Figure 4
1.
Starter rope
2.
Rope guide
Installing the Fuel Tank (If Shipped
Loose):
1. Remove the screw(s) from the underside of the fuel
tank. (The ECXHN21 and ECXHNBBC21 requires
two screws to mount the fuel tank).
Figure 5
1.
Fuel tank bracket
3.
Fuel tank
2.
Plastic clips
4.
Self-tapping screw(s)
2. Hook the plastic clips on the front of the fuel tank
onto the fuel tank bracket.
3. Secure the fuel tank to the tank bracket with the
self-tapping screw(s) as shown in Figure 5. Do Not
overtighten the screw(s).
4. Slide the end of the fuel line onto the elbow fitting.
5. Secure the fuel line in place with the fuel line clamp.
Service the Engine
Important:
The mower does not come with oil in
the engine.
3


