3
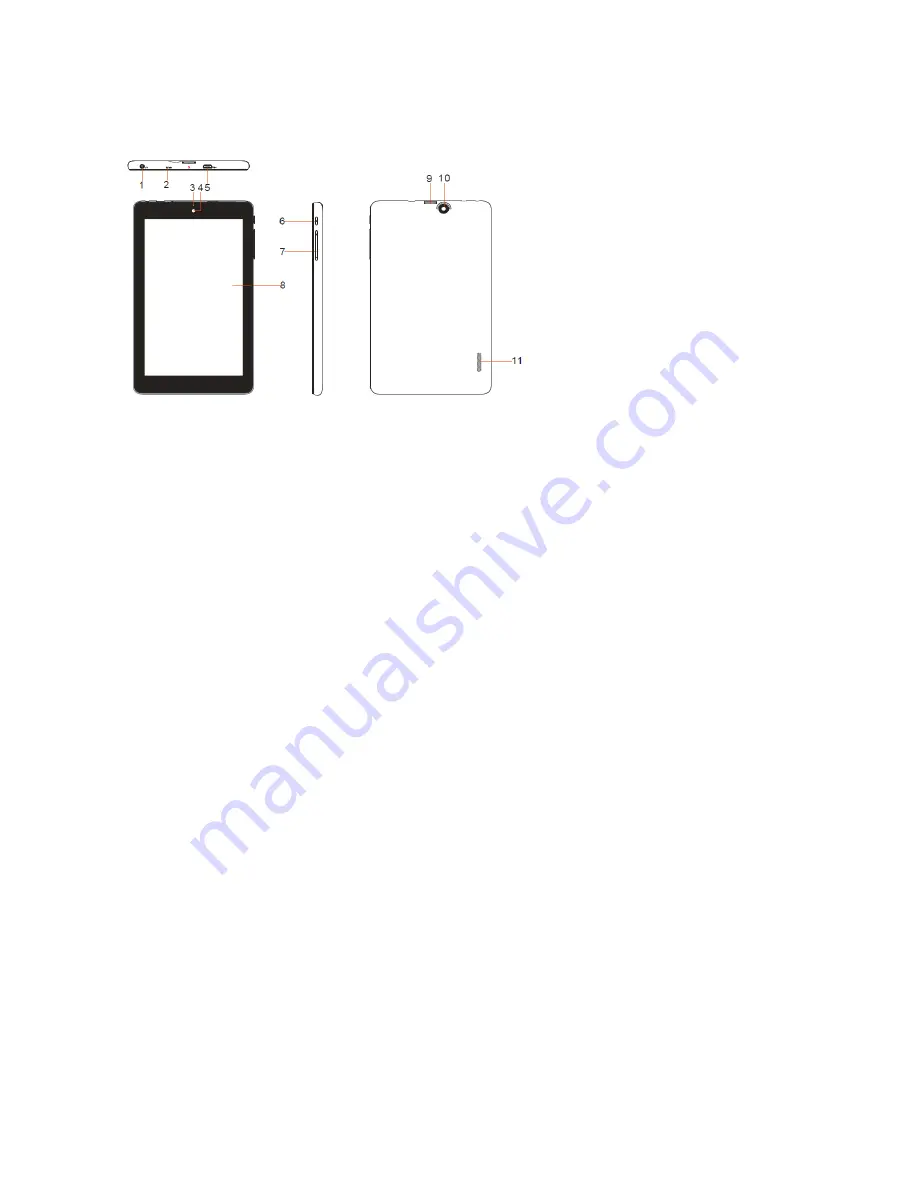
(3). Buttons and ports
1. Earphone socket
–
connects to stereo earphones.
2. Microphone
3. Charging Indicator LED
4. Front webcam
5. Micro USB Port
–
Connects to PC or power adaptor.
6. Power
–
Briefly press to lock or unlock the screen; press and hold to turn on or off the unit or reset it.
7. VOL+/-button
–
Increase/ decrease the volume.
8. Touch screen
9. Micro SD Card Slot
10.Rear webcam (optional)
11. Built-in speakers
(3). Charging the battery
The device has a built-in rechargeable battery. Charge the device when the battery level is low.
To charge the battery, connect the device to the dedicated power adaptor via the USB port. It takes about 4 hours to
fully charge the battery. While charging, you can watch the progress with the battery icon on the home screen.
Note:
a. You are prompted to charge the battery when the device warns that the battery is lower than 15%!
b. In the e event that the device shuts down automatically because of battery exhaustion, charge the battery for at
least 5 minutes before you can turn on the device.
(4). Switching on/off
To switch on the Tablet PC, press and hold the Power button. When startup window appears, release the button.
The system initialization may take several minutes. Please wait patiently.
To switch off the tablet PC, press and hold the power button, when "power off
"
message appears, release the
button. Touch the message, then press OK.
(5)Installing the Memory Card (TF card)
This device can read files directly from a memory card (TF card/Micro SD
card). To install a memory card, find the card slot on the top edge of device and then insert the card into the slot in
the correct orientation. To access the files stored in the memory card, enter the file explorer mode by tapping the File
Manager icon and select the “External_SD” directory.
Note: SD Card in this mode refers to the internal memory of the device, instead the SD card itself.
(6)Connecting to PC for transferring files
When using the tablet, you may need to transfer various files between a
PC and it.
(1) Connect the device to a PC with the supplied USB cable.
(2) Once the connection is done, two removable disks will appear on your PC.
Содержание Axis 7 HD
Страница 1: ...User manual Evolio Axis 7 HD...


