background image


12 

EvoHeat Solace Domestic Dehumidifier Manual 

8. Maintenance 

To ensure that the unit stays reliable and works to the best of its ability, it is suggested that the unit is maintained 

and cleaned every six months. 

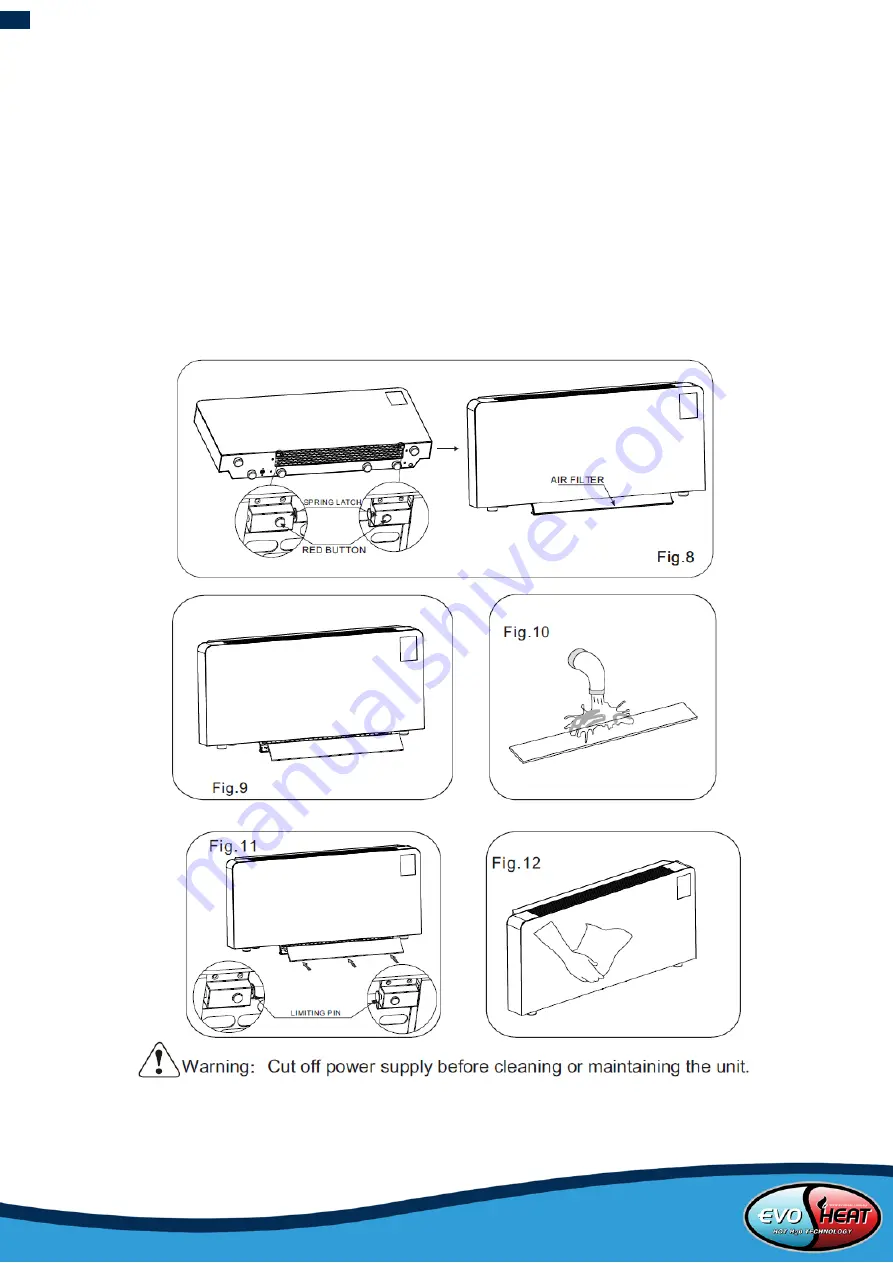
Please adhere to the following steps to clean the strainer regularly. 

1)


Press the two red buttons and drag it down slowly (Fig 8) 

2)


Separate the return air filter screen from the units as the image shown below (Fig 9) 

3)


Takeaway the return air filter screen and flush it with water (Fig 10) 

4)


Set the filter net and the air return grill to the original place and press the limiting pin (Fig 11) 

5)


Clean up the outer unit with a soft and damp rag (Fig 12). To protect the paint coat on the unit, don’t use a 

rough sponge or corrosive detergent. 


Содержание Solace Domestic

Страница 1: ......

Страница 2: ...ed Installation ___________________________________________________________________7 5 Operation___________________________________________________________________________________8 5 1 Main Controller...

Страница 3: ...rs are available for download on our website The Solace Domestic series dehumidifier is designed to remove the moisture from the air in the room without losing the warmth contained within The warm moi...

Страница 4: ...ew point temperature For best results we recommend that the room temperature is maintained within 5 degrees of the pool temperature 2 2 Hygrostat Control The dehumidifier is controlled by a built in h...

Страница 5: ...0 230V Rated Power Input kW 1 97 Rated Running Current A 8 7 Max Power Input kW 2 28 Max Running Current A 10 Relative Humidity RH 40 90 Temperature C 10 36 Dimensions L W H mm See 2 3 Net Weight kg S...

Страница 6: ...onnect the power of the unit Do not install the unit near flammable gas or spray flammable substances near it Ensure the unit is installed on a strong and stable platform A circuit breaker must be ins...

Страница 7: ...wall that the unit is installed does not have pipes or electrical wires passing through The wall is perfectly flat There are no obstacles around the unit that could interfere with the inlet and outlet...

Страница 8: ...f it is needed NOTE If the condensation water discharges directly into a container the condensate outlet should be located above the container to avoid it immersing in the container 4 4 Wall Mounted I...

Страница 9: ...rt up time by pressing this button When the unit is on you can set a shutdown time by pressing this button NOTE When the unit starts the user must wait 15 seconds until the unit shows the exact ambien...

Страница 10: ...for 30 seconds the unit will begin to dehumidify 2 If A actual relative humidity of the room air TRH target relative humidity 5 RH and the condition has lasted for 3 minutes the unit will cease dehum...

Страница 11: ...rt circuit Check or replace temp sensor Condenser outlet temp sensor failure P7 This temp sensor is broken or in open short circuit Check or replace temp sensor Humidity sensor failure P8 Humidity sen...

Страница 12: ...vaporator inlet outlet temp sensor 5 TEMP2 To condenser outlet temp sensor 6 HUMI01 To the build in RHS Refer to 7 2 7 HUMI02 To the external RHS optional 8 CN7 To high pressure protection switch 9 EE...

Страница 13: ...egularly 1 Press the two red buttons and drag it down slowly Fig 8 2 Separate the return air filter screen from the units as the image shown below Fig 9 3 Takeaway the return air filter screen and flu...

Страница 14: ...eighting or damage to the product in transit 4 If warranty service is required you should a contact Evo Industries Australia on 1300 859 933 or via our Contact page on our web site b provide a copy of...

Отзывы: