34000 Autry Street, Livonia, MI 48150 | 800.968.5530 | Fax 734.419.0209 | www.hamiltonengineering.com | LIT91127US REV 5/2018
Page 50
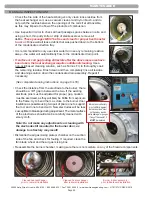
• Check the fire side of the heat exchanger: only clean loose residue from
the heat exchanger coil, use a vacuum cleaner and nylon brush, and do
not push the residue between the openings of the coils if at all possible,
as this may impede the flow of the products of combustion.
• Use inspection mirror to check all heat passage spaces between coils, and
using a short, thin putty knife or strip of stainless steel, remove all
debris.
These passages MUST be free and clear for proper heat transfer
to occur.
Rinse well all loose debris that was pushed down to the bottom
of the condensate collection tray.
• It is recommended to only use clear water to rinse any remaining residue
away—the water will automatically flow to the condensate drain point.
•
If surface or coil gap fouling still exists after the above measures have
been taken, the heat exchanger requires additional cleaning.
Use a
non-acid based cleaning solution, such as Fernox F3, to thoroughly soak
the remaining residue. Brush clean and then completely rinse all residue
and cleaning solution down the condensate drain assembly. Repeat if
necessary.
(See complete cleaning instructions on page 53–55)
• Check the distance from the electrode to the burner; there
should be a 3/8" gap in between the two. If the existing
electrode pins must be adjusted for proper gap, caution
must be exercised, as they will likely be brittle from exposure
to the flame; try to bend them as close to the burner door
insulation as possible using two pair of pliers; one to support
the rod, and one to bend with. New electrodes will be less
susceptible to breakage during adjustment. The metal surface
of the electrodes should also be carefully cleaned with
emery cloth.
Note: Do not make any adjustments or cleaning with
the electrode still mounted to the burner door, as
damage to refractory may result!
• Dismantle the air gas mixing plate or chamber on the suction
side of the fan and check for fouling. If required, clean the
fan blade wheel and the air gas mixing box.
• Reassemble the burner chamber, making sure there is no moisture on any of the fireside components.
MAINTENANCE
B. ANNUAL INSPECTION CONT.
Cleaned heat exchanger -
prior to rear wall installation
Cleaned heat exchanger -
after rear wall installation
Burner & door assembly -
prior to fiberboard installation
Burner door refractory
must sit firmly against
burner door and must
not have any cracks,
water damage, or gouges.
If any of these exist, it
MUST be replaced.


