background image


Once you have completed steps 1-4 you are ready to install a detection license in the device. The license is 
based upon the unique Hardware Code available in each device. You can find the Hardware Code of your 
device in the web interface. 
 
In the menu tree, select Activation 

 Activate 

 
You will find a Hardware Code similar to the example below: 
 

FA2ED17CDC8E49889D76460157EFB3CCEAEF3ACD83B66F1D11E61B862166A30E

Go to 

www.evido.info

 and click on “

Request license for EAD-series product

”. Enter your contact details 

together with the hardware ID in the form displayed on the web page. 
 
Once your request has been processed, a detection license will be created and sent in return to you by e-mail. 
Install the detection license received by entering the license code in the Activation Code field. 
 
When the license code has been installed, you can start configuring detection rules by clicking on the VCA 
menu item.  
 

Once the detection license has been installed in the EAD-device, you can connect it in your VMS and start 
receiving the alarms that has been set up. Documentation for how to connect the EAD-device in the VMS is 
available on 

www.evido.info

To learn more about the different detection licenses available, or to learn more about using other features and 
detection triggers of your device, refer to the manual, which is available at 

www.evido.info

.  


Содержание EAD-B1000

Страница 1: ...VideoSurveillanceSystems...

Страница 2: ...hen all cables have been connected to your device CCW CW SET SCREW LAN DC 12V Power Adaptor Connector DC 12V Set Screw For IRIS LENS Make sure the polarity is correct Incorrect connection may cause ma...

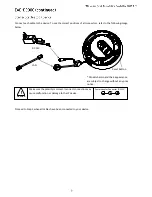
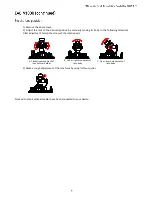
Страница 3: ...he following image Proceed to Step 2 when all cables have been connected to your device LAN DC 12V Power Adaptor Connector DC 12V Make sure the polarity is correct Incorrect connection may cause malfu...

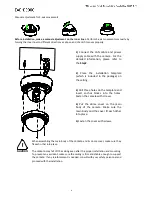
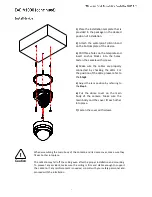
Страница 4: ...three holes on the template and insert anchor blocks into the holes Fasten the camera with screws 4 Put the dome cover on the main body of the camera Make sure the main body and the cover fit each ot...

Страница 5: ...roceed to Step 2 when all cables have been connected to your device LAN DC 12V Make sure the polarity is correct Incorrect connection may cause malfunction or damage to the IP device Caution Power Ada...

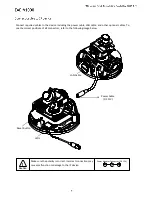
Страница 6: ...tional cables To see the correct positions of all connectors refer to the following image below LAN Cable Make sure the polarity is correct Incorrect connection may cause malfunction or damage to the...

Страница 7: ...r to the Step1 5 Adjust the lens position by referring to the Step 3 6 Put the dome cover on the main body of the camera Make sure the main body and the cover fit each other into place 7 Fasten the co...

Страница 8: ...tions After adjustment fasten the screw of the rotation axis 2 Make a rough adjustment of the lens focus by using its focus puller Proceed to Step 2 when all cables have been connected to your device...

Страница 9: ...u turn on the encoder Otherwise the device must be rebooted to see the normal display if the camera is NTSC because the encoder default setting is PAL without a video connection Proceed to Step 2 when...

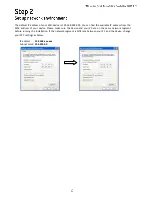
Страница 10: ...ss from the MAC address of your device Please make sure the device and your PC are on the same network segment before running the installation If the network segment is different between your PC and t...

Страница 11: ...need to install the ActiveX for displaying the images 4 Follow the instructions of the dialog boxes and complete the installation Then the live video is displayed on the main page of the web browser 5...

Страница 12: ...t TCP IP from the drop down menu 4 Input the data for the IP address configuration and click the Apply button on the bottom of the page To change the IP address please make sure to check and have the...

Страница 13: ...page Once your request has been processed a detection license will be created and sent in return to you by e mail Install the detection license received by entering the license code in the Activation...

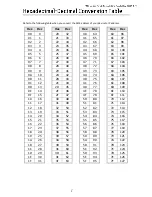
Страница 14: ...2B 43 2C 44 2D 45 2E 46 2F 47 30 48 31 49 32 50 33 51 34 52 35 53 36 54 37 55 38 56 39 57 3A 58 3B 59 3C 60 3D 61 3E 62 3F 63 Hex Dec 40 64 41 65 42 66 43 67 44 68 45 69 46 70 47 71 48 72 49 73 4A 74...

Страница 15: ...7 B2 178 B3 179 B4 180 B5 181 B6 182 B7 183 B8 184 B9 185 BA 186 BB 187 BC 188 BD 189 BE 190 BF 191 Hex Dec C0 192 C1 193 C2 194 C3 195 C4 196 C5 197 C6 198 C7 199 C8 200 C9 201 CA 202 CB 203 CC 204 C...

Страница 16: ...o info Reset can be carried out as follows 1 While the device is in use press and hold the Reset 2 Release the Reset button after 3 seconds 3 Wait for the system to reboot This will reset all paramete...

Отзывы: