Everlast 58Kgs Home Gym Скачать руководство пользователя страница 21

20

Assembly Instructions

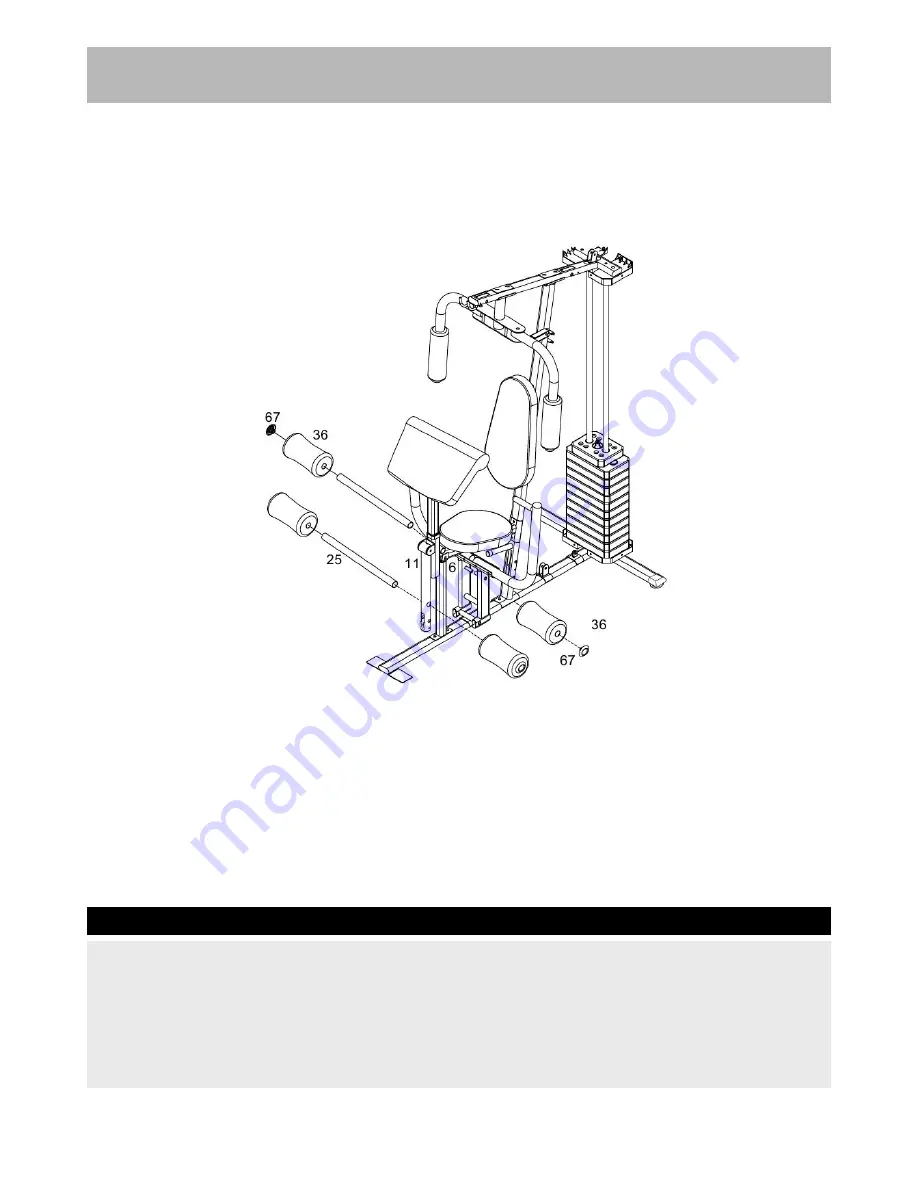
a. Insert 2 x Foam Roll Tubes (

25

) half way into the Seat Support (

6

) and Leg Developer (

11

)

respectively.

b. Push 4 x 22mm Foam Pads (

36

) onto each side of the Foam Roll tubes (

25

).

c. Align 4 x Ø25X1.2 Foam End Cap (

67

) with the Foam Roll Tubes (

25

).

Step 14

Содержание 58Kgs Home Gym

Страница 1: ...afe and correct assembly use and maintenance If you need help or have damaged or missing parts call the Customer Helpline 0345 640 2020 or visit www argos support co uk Assembly User Instructions Plea...

Страница 2: ...6 Assembly Instructions 7 25 7 17 Workout Area 26 18 Exercise Information 27 36 279 29 Before starting 27 279 Muscle Chart 28 20 Warming up and Cooling down 28 21 22 Using the home gym 31 35 23 27 Ho...

Страница 3: ...lead to situations and behavior for which the training equipment is not intended If children are allowed to use the equipment under supervision their mental and physical development should be taken i...

Страница 4: ...e contacting Argos regarding any missing components Total mass of the product is 103 kg Total size of the equipment is width 160 cm depth 97 cm height 192 cm Components Parts If you have damaged or mi...

Страница 5: ...racket x 1 Guide Rod x 2 Selector Rod x 1 Front Support Frame x 1 Swivel Pulley Bracket x 2 Double Floating Pulley Bracket x 2 Angled Double Pulley Bracket x 1 Foam Roll Tube x 2 Cable Pin Bracket x 2...

Страница 6: ...ase call the Customer Helpline 0345 640 2020 Please check you have all parts listed below Arm Curl Pad x 1 82 Seat Pad x 1 Clip Hook x 2 End Cap x 4 15 Joint Chain x 1 Weight Plate x 12 Pulley Cover x...

Страница 7: ...ssembly In some cases more hardware may be supplied than are required Some of the fixings are pre fitted to the larger components Please check carefully before contacting Argos regarding any missing f...

Страница 8: ...he Rear stabilizer 2 using 2 x M10X25mm Allen Bolts 44 and 2 x 10 Washers 56 b Attach the Rear Stabilizer 2 to the Main Base Frame 1 using 1 x U Bracket 15 2 x M10 Aircraft Nuts 57 4 x 10 Washers 56 a...

Страница 9: ...mbly Instructions Secure the 2 x Lower Fixed Frames 80 to the Rear Stabilizer 2 using 2 x M10 x 25mm Allen Bolts 44 and 2 x 10 Washers 56 then put 2 x Rubber Bumpers 82 through the 2 x Guide Rods 14 S...

Страница 10: ...14 b Insert the Selector rod 16 down through the centre holes of the weight stack Slide the Upper Weight plate 72 down Guide rods 14 c Insert the Selector Pin 30 in the hole of your desired Weight Pla...

Страница 11: ...x Upper Fixed Frame 79 through the Guide Rods 14 b Attach the Vertical Frame 3 to the Main Base Frame 1 using 1 x Bracket 40 2 x M10X50mm Carriage Bolts 42 2 x 10 Washers 56 and 2 x M10 Aircraft Nuts...

Страница 12: ...M10 x 50mm Carriage Bolts 42 2 x 10 Washers 56 and 2 x M10 Aircraft Nuts 57 b Attach the Upper Frame 4 to the Guide Rod 14 and Upper Fixed Frame 79 using 2 x M10X25mm Allen Bolts 44 2 x M10X50mm Alle...

Страница 13: ...ssembly Instructions Attach the Butterfly Frame 5 and 1 x Bracket 40 to the Upper Frame 4 using 2 x M10 x 50mm Carriage Bolts 42 2 x 10 Washers 56 and 2 x M10 Aircraft Nuts 57 Notes 65 is pre fitted S...

Страница 14: ...e Front Press Base 9 using 4 x M10 X 68mm Allen Bolts 48 8 x 10 Washers 56 and 4 x M10 Aircraft Nuts 57 b Attach the Front Press Base 9 to the Main Base Frame 1 using 1 x Axle 24 2 x 10 Washers 56 and...

Страница 15: ...14 Assembly Instructions Attach the Front Support Frame 17 to the Main Base Frame 1 using 2 x M10X25mm Allen Bolts 44 and 2 x 10 Washers 56 Step 8...

Страница 16: ...e 3 using 1 x Bracket 40 2 x M10X50mm Carriage Bolts 42 2 x 10 Washers 56 and 2 x M10 Aircraft Nuts 57 b Attach the Seat Support 6 to the Front Support Frame 17 using 1 x M10X68mm Allen Bolt 48 2 x 10...

Страница 17: ...16 Assembly Instructions a Fix the Leg Developer 11 to the Seat Support 6 using 1 x M10X25mm Allen Bolt 44 1 x 10 Washer 56 Notes 66 78 59 26 43 are pre fitted Step 10...

Страница 18: ...17 Assembly Instructions Insert the Arm Curl Support 18 into the hole of the Seat Support 6 and secure with 1 x M18 Lock Knob 77 Step 11...

Страница 19: ...18 Assembly Instructions Attach the Left Right Fly Arm 7 8 to the Butterfly Frame 5 using 2 x Connecting Rods 23 2 x 10 Washers 56 and 2 x M10 Aircraft Nuts 57 Notes 66 is pre fitted Step 12...

Страница 20: ...ng 4 x M8X18mm Allen Bolt 53 and 4 x 8 Washers 55 b Attach the Backrest Pad 38 to the Vertical Frame 3 using 2 x M8X40mm Allen Bolt 54 and 2 x 8 Washers 55 c Attach the Arm Curl Pad 39 to the Arm Curl...

Страница 21: ...t 2 x Foam Roll Tubes 25 half way into the Seat Support 6 and Leg Developer 11 respectively b Push 4 x 22mm Foam Pads 36 onto each side of the Foam Roll tubes 25 c Align 4 x 25X1 2 Foam End Cap 67 wit...

Страница 22: ...tical Frame 3 using 1 x M10X68mm Allen Bolt 48 2 x 10 Washers 56 and 1 x M10 Aircraft Nut 57 b Attach 2 x Cable Pin Brackets 22 to the Left and Right Fly Arm 7 8 respectively and secure using 2 x M10X...

Страница 23: ...ulley Bushes 31 and 1 x M10 Aircraft Nut 57 c Cover 1 x 78 Pulley 70 with 2 x Pulley Covers 60 push 2 x Double Floating Pulley Brackets 20 on both sides of the pulley assembly and secure with 1 x M10X...

Страница 24: ...0 then fix the pulley assembly to the Angled Double Pulley Bracket 19 using 1 x M10X40mm Allen Bolt 45 2 x 10mm Washers 56 and 1 x M10 Aircraft Nut 57 d Thread the cable through the Swivel Pulley Brac...

Страница 25: ...ft Nut 57 e Thread the Lower Cable 28 through the Vertical Frame 3 and fix 1 x 78 Pulley 70 using 1 x M10 x 85mm Allen Bolt 50 2 x Pulley Bushes 31 and 1 x M10 Aircraft Nut 57 f Thread the Lower Cable...

Страница 26: ...ons a Connect the Lat Bar 12 to the hook on the Upper Frame 4 using 1 x 15 Joint Chain 62 and 2 x 6 Clip Hooks 63 b Fix 2 x Weight Stack Cover 41 using 12 x ST6X20 Phillips Screws 58 Notes 69 are pre...

Страница 27: ...a space where you can safely dismount without obstruction in case of an emergency Where two pieces of equipment are positioned adjacent to each other the free area may be shared Only one person shoul...

Страница 28: ...The intensity level can be found by using your heart rate as a guide For effective aerobic exercise your heart rate should be maintained at a level between 65 and 85 of your maximum heart rate as you...

Страница 29: ...tine Weight training helps tone build and strengthen muscle If you are working above your target zone you may want to do a lower number of reps Targeted Muscle Groups The exercise routine that is perf...

Страница 30: ...plan three workouts each week with at least one day of rest between workouts After a few months of regular exercise you may complete up to five workouts each week if desired Remember the key to succe...

Страница 31: ...Quadriceps stretch With one hand against the wall for balance reach back and grasp one foot with your other hand Keeping your bent knee pointing directly down towards the floor gently pull your heel...

Страница 32: ...our body with easy stretching without bouncing and light callisthenic for several minutes Exercise Information Using the home gym Pectoral Fly Developing the Pectoralis Select the desired weight Sit f...

Страница 33: ...hts Intermediate 10 Reps 3 sets Advanced 10 Reps 4 sets with gradually increasing weights Developing the Outer Thigh Select the desired weight Wrap Ankle strap around leg to be exercised Attach Ankle...

Страница 34: ...ur ankles against lower Foam rolls Extend your legs forward pivoting from the knees to full extension Return to the start position in a slow and controlled manner and repeat the exercise Beginners 10...

Страница 35: ...equipment and position either knee slightly below the top Foam rolls Place back of your ankle behind the outer Foam rolls Curl your leg upward towards your buttocks Return to the start position in a...

Страница 36: ...for support Grasp Lat bar at the extreme ends Pull Lat bar down towards your upper chest Return to the start position in a slow and controlled manner and repeat the exercise Beginners 10 Reps with li...

Страница 37: ...ket 15 on the Rear stabilizer 2 Weight Resistance Chart Weight Plate Front Press Butterfly Lat Pull Low Pulley 1 4 5 6 9 2 8 9 10 13 3 10 12 15 17 4 14 13 20 22 5 17 15 25 28 6 19 18 28 30 7 22 21 34...

Страница 38: ...ntil repair Pay special attention to components most susceptible to wear 4 The equipment can be cleaned using a damp cloth and mild non abrasive detergent Do not use solvents 5 Do not attempt to repai...

Страница 39: ...ley Cover 12 19 Angled Double Pulley Bracket 1 61 50x25x1 5 End Cap 4 20 Double Floating Pulley Bracket 2 62 15 Joint Chain 1 21 Swivel Pulley Bracket 2 63 6 Clip Hook 2 22 Cable Pin Bracket 2 64 30X7...

Страница 40: ...r consumable items The product must be correctly installed and operated in accordance with the instructions contained in this manual It must be used solely for domestic purpose The guarantee will rend...

Отзывы: