background image


EQH5202 Box Camera


17 

NTSC / PAL 

Press to select a video format for your connected monitor. 


5.2.8    Reset 

Enter to the submenu to reset all the OSD functions to the default settings. 


5.2.9    Exit 

Press to save all the settings and exit the OSD menu. 


Содержание EQH5202

Страница 1: ...EQH5202 Box Camera User s Manual Lens not included Copyright EverFocus Electronics Corp Release Date May 2012 ...

Страница 2: ...hands Touching a wet power cable with your hands or touching the power cable with wet hands may result in electric shock 5 Never install the camera in areas exposed to oil gas or solvents Oil gas or solvents may cause equipment failure electric shock or in extreme cases fire 6 Cleaning For cameras with interchangeable lenses do not touch the surface of the sensor directly with your hands Use lens ...

Страница 3: ... receiver is connected Consult the dealer or an experienced radio TV technician for help FCC Caution Any changes or modifications not expressly approved by the party responsible for compliance could void the user s authority to operate this equipment This device complies with Part 15 of the FCC Rules Operation is subject to the following two conditions 1 This device may not cause harmful interfere...

Страница 4: ...ENT 5 3 3 TOP BOTTOM MOUNT 6 4 BASIC CONNECTION 7 5 CONFIGURATION IN THE OSD MENU 8 5 1 CONTROLLING THE JOYSTICK 8 5 2 OSD MENU 9 5 2 1 LENS 9 5 2 2 EXPOSURE 9 5 2 3 WHITE BALANCE 11 5 2 4 DAY AND NIGHT 12 5 2 5 NOISE REDUCTION NR 13 5 2 6 SPECIAL 14 5 2 7 ADJUST 16 5 2 8 RESET 17 5 2 9 EXIT 17 6 SPECIFICATIONS 18 7 APPENDIX 19 7 1 OSD MENU STRUCTURE 19 ...

Страница 5: ...as it traverses the outer portions of the lens EverFocus Enhanced Contrast Technology EFECT Dramatically improves imaging in reduced visibility conditions cutting through smoke and fog that would blind other camera systems Polestar SENS UP Low light enhancement for full motion color images in low light conditions without ghosting combines with EverFocus Adaptive Luminance Compensated Optimized Noi...

Страница 6: ... to use OSD setup menu with an array of digital signal processing a feature control o Super high light sensitivity is achieved through a sensitivity increase setting of up to 60x o ETR EverFocus Tone Reproduction to deliver properly exposed images despite bright light sources deep shadows and or unbalanced lighting in the same scene o Electronic lens Shading Compensation to offset diminished light...

Страница 7: ...Lens Connector If the varifocal lens is in use plug the iris control cable to the connector 5 HDcctv Output Connects to a HD device using a 75 Ohm BNC type coaxial cable 6 Power LED Glows red then power is present 7 Power Terminal Block Connects to a 12V DC 24V AC power source 8 Test Out Connects to a SD monitor for setting image aim and focus 9 Reset Button Restarts the camera 10 OSD Menu Joystic...

Страница 8: ...40 mm DC IRIS F 1 5 IR CS Mount 5 Megapixel EFV M0940IR 1 2 9 40 mm Manual IRIS F 1 5 IR CS Mount 5 Megapixel EFV M1803DCIR 1 2 1 8 3 mm DC IRIS F 1 8 IR CS Mount 5 Megapixel EFV M1803IR 1 2 1 8 3 mm Manual IRIS F 1 8 IR CS Mount 5 Megapixel EFV M1600DCIR 1 2 5 1 67 mm DC IRIS F 1 8 IR CS Mount 5 Megapixel EFV M1600IR 1 2 5 1 67 mm Manual IRIS F 1 8 IR CS Mount 5 Megapixel EFV M2806DCIR 1 3 2 8 6 ...

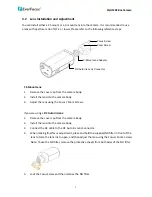
Страница 9: ...all the lens into the camera body 3 Adjust the lens using the Focus Zoom Screws If you are using a DC Auto Iris lens 1 Remove the cover cap from the camera body 2 Install the lens into the camera body 3 Connect the DC cable to the DC Auto Iris Lens Connector 4 When making final focus adjustment place and hold the supplied ND filter in front of the lens to force the lens iris to open and then adjus...

Страница 10: ...pter 3 Adjust the lens using the Focus Zoom Screws Warning Installing a C mount lens without the C mount lens adapter may damage the camera sensor 3 3 Top Bottom Mount You can use the supplied mounting bracket and screw it on the top of the camera body to suspend the camera or on the bottom of the camera body to support the camera Top Mount Bottom Mount ...

Страница 11: ...e camera to a 12V DC 24V AC power source using the supplied Power Cable You can optionally use the supplied Power Pigtail Cable or a power adapter to connect the Power Cable to the power source The power LED will be lit in red 3 Connect the camera to a CVBS portable monitor for setting image aim and focus before mounting the camera ...

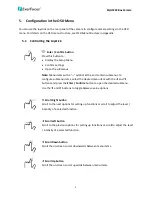
Страница 12: ...s To configure submenu items select the desired menu item with the and buttons and press the Enter Confirm button to open the desired submenu Use the and buttons to toggle between value options Scroll Right button Scroll to the next options for setting up functions or scroll to adjust the level intensity of a selected function Scroll Left button Scroll to the previous options for setting up functi...

Страница 13: ... lens is selected 5 2 2 Exposure Press the Enter Confirm button to enter the submenu Shutter Use the and buttons to adjust the shutter speed The options include 1 30 1 50000 x2 x60 FLK and AUTO Any selection other than AUTO and 1 30 will disable the SENS UP function AGC Auto Gain Control The higher the AGC value the brighter the screen but the level of noise will also be increased The options incl...

Страница 14: ... contrast and increase image clarity by reducing effects due to dispersion of light caused by fog smoke and similar conditions The options include Off Low Middle and High Backlight Adjust the backlight values The options include Off BLC and HSBLC BLC Backlight Compensation GAIN Select from low to high Video gain is adjusted automatically to correct the exposure of subjects that are in front of a b...

Страница 15: ...Again to set up the position and size for the area again or click Return to return to the BLC setup page Level Increase or decrease the HSBLC value for all area blocks The lower the value the more intense the HSBLC Mode Choose between ALL DAY mode and NIGHT only mode NIGHT mode will activate HSBLC only when light levels fall to levels associated with nighttime Black Mask Turn on or off the black m...

Страница 16: ...cise adjustments Increase and or decrease the Red Gain and Blue Gain values to suit the light in the surveillance area 5 2 4 Day and Night The options include AUTO B W Color and External A submenu can be entered if you select AUTO or B W AUTO Automatically switches to a B W feed in low light conditions and then switches back to a Color feed in the daytime Set up the delay time in seconds for the c...

Страница 17: ...he front of the camera body 5 2 5 Noise Reduction NR The Noise Reduction function is designed to reduce digital recording size by reducing the video noises 2D NR Switch to On Off to enable disable noise reduction on static recordings 3D NR Switch to On Off to enable disable noise reduction on dynamic recordings You can further set up the AGC level in the submenu to automatically start stop the 3D ...

Страница 18: ...cial settings CAM Title Switch to On and then enter the submenu to set up a camera name displayed on the screen Press to move the on screen cursor left or right for setting up the letters numbers or symbols CLR Press to clean the letters POS Press to place the name on the screen END Press to confirm the camera name and exit D Effect Enter the submenu to set up the following options Freeze Turn it ...

Страница 19: ...ted detection zone Enter the submenu to set up the position or size of the selected detection zone Sensitivity Press to set up the sensitivity for the motion detection function Motion View Turn it on to enable this function Default Press to return to the default setting Privacy Enter the submenu to set up the privacy masks up to 8 zones can be created Select Press to select a privacy mask zone Dis...

Страница 20: ... the submenu to set up the following options Sharpness Turn it on to set up the sharpness level Resolution Turn it on to automatically raise the resolution Monitor Enter the submenu to fine tune the signal sent to the selected monitor type LCD Press to set up the Gamma rate blue gain and red gain for your LCD monitor CRT Press to set up the backlight blue gain and red gain for your CRT monitor OSD...

Страница 21: ...17 NTSC PAL Press to select a video format for your connected monitor 5 2 8 Reset Enter to the submenu to reset all the OSD functions to the default settings 5 2 9 Exit Press to save all the settings and exit the OSD menu ...

Страница 22: ... PAL 25 fps at 1920 x 1080p Shutter Speed Auto Manual S N Ratio 50 dB Max Gain Control Auto White Balance Auto OSD Joystick 5 axis control Lens Mounting Type C CS Lens Control Manual DC iris Day Night Yes with removable auto IR cut filter Connector HDcctv Output BNC Test Out Pin header connect to a CVBS portable monitor Power DC 12V 220mA AC 24V 155mA General Weight 410 g 0 90 lbs Dimensions H x W...

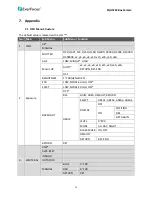
Страница 23: ...20 x30 x60 AGC LOW MIDDLE HIGH Sensor UP AUTO x2 x4 x6 x8 x10 x15 x20 x30 x60 RETURN RET END OFF BRIGHTNESS 1 100 default 25 ETR LOW MIDDLE HIGH OFF EFECT LOW MIDDLE HIGH OFF BACKLIGHT OFF BLC GAIN AREA DEFAULT RETURN HSBLC SELECT AREA1 AREA2 AREA3 AREA4 DISPLAY OFF ON POSITION SIZE RET AGAIN LEVEL 0 100 MODE ALL DAY NIGHT BLACK MASK ON OFF DEFAULT RETURN RET END RETURN RET 3 WHITE BAL ATW AWC SET...

Страница 24: ...T END EXT 5 NR 2DNR OFF ON 3DNR OFF ON S LEVEL 0 100 E LEVEL 0 100 RETURN RET END LEVEL 0 100 default 30 EFALCONR ON OFF RETURN RET END 6 SPECIAL CAM TITLE OFF ON CLR POS 0123456789 ABCDEFGHIJK LMNOPQRSTUV WXYZ END D EFFECT FREE OFF END MIRROR OFF MIRROR V FLIP ROTATE D ZOOM PIP OFF ON D ZOOM X2 X64 0 PAN TILT D ZOOM DEFAULT NEG IMAGE OFF ON RETURN RET END ...

Страница 25: ... SELECT AREA1 AREA8 DISPLAY OFF ON POSITION SIZE RET AGAIN COLOR 1 16 DEFALT RETURN RET END LANGUAGE ENGLISH CHINESE 1 CHINESE 2 JAPANESE DEFECT LIVE DPC OFF ON LEVEL 0 60 default 10 STATIC DPC OFF ON START CLOSE THE IRIS THE PRESS ENTER KEY LEVEL 0 60 default 20 SENS UP x2 x4 x6 x8 x10 x15 x20 x30 x60 VERSION RETURN RET END 7 ADJUST SHARPNESS SHARPNESS OFF ON LEVEL 0 100 default 20 RESOLUTION OFF...

Страница 26: ...OR CRT BLACK LEVEL 30 30 BLUE GAIN 0 100 RED GAIN 0 100 RETURN RET LCD GAMMA 5 0 80 0 85 0 90 0 95 1 00 BLUE GAIN 0 100 RED GAIN 0 100 OSD TEXT COLOR 1 8 default 1 OUTLINE OFF ON RETURN RET END LSC OFF ON NTSC PAL NTSC PAL RETURN 8 RESET FACTORY RESET RETURN RET END 9 EXIT ...

Страница 27: ...ww everfocus co jp info everfocus co jp EverFocus Europe UK Unit 12 Spitfire Business Park Hawker Road Croydon Surrey CR0 4WD UK TEL 44 20 8649 9757 44 845 430 9999 FAX 44 20 8649 9907 www everfocusuk co uk salesuk everfocus com EverFocus India Suite 803 Housefin Bhavan C 21 Bandra Kurla Complex Bandra East Mumbai 400051 India TEL 91 22 6128 8700 FAX 91 22 6128 8705 www everfocus in sales everfocu...

Отзывы: