


12
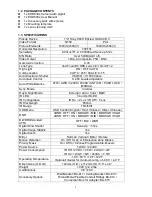
switch from DAY mode to NIGHT mode. Selectable values are 0~63.
•NIGHT
DAY
:
When the camera detects the current light level is higher than this
value, it’ll
switch from NIGHT mode to DAY mode. Selectable values are 0~63.
NOTE:
1. The difference in the selected values of DAY
NIGHT and NIGHT
DAY
should be more than 5, or else the camera will keep switching from DAY
NIGHT and NIGHT
DAY constantly.
2. It is not recommended to use an infrared illuminator when the camera is in
DAY/NIGHT >
AUTO
mode.
•DELAY TIME:
The Delay Time will keep the camera from unnecessarily switching
between Day and Night modes when there is a sudden and short change in
the light levels. The camera will switch from one mode to the other only if a
switch-inducing change in light levels stays the same for the selected
number of seconds. The selectable values are 0 to 255 seconds.
•BURST :
Turn the BURST function
off
to reduce the color noise when the camera
switches to B&W mode. If the camera cannot switch back to COLOR mode
from B&W mode, please turn the BURST function on.
NOTE:
The
BURST
function can also be switched on/off in the
B&W
mode’s submenu.
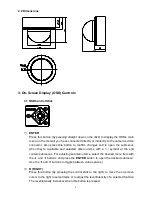
4.7 IMAGE
Scroll to the
IMAGE > SET
line and press ENTER to open the settings submenu.
RESOLUTION
Options are
HIGH, MIDHIGH, MID, MIDLOW, LOW, and OFF.
The IMAGE > SET submenu.
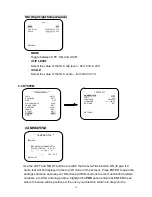
s Menu
** MAIN MENU **
LENS
AUTO<
┘
EXPOSURE
SET<
┘
WDR
OFF
WHITE BALANCE
ATW<
┘
2DNR & 3DNR
SET<
┘
DAY/NIGHT
AUTO<
┘
IMAGE
SET<
┘
EFFECT
SET<
┘
SYSTEM
SET<
┘
EXIT<
┘
** IMAGE **
RESOLUTION
MID
SHARPNESS
|||||||||||
|
||||||||| 010
SHARP. SUP.
|||||||||||
|
||||||||| 010
CONTRAST
|||||||||
|
||||||||||| 000
SATURATION
|||||||||
|
||||||||||| 000
HUE
|||||||||
|
||||||||||| 000
MIRROR
NORMAL
POS./NEG.
OFF
WHITE PIXEL COMP
SET<┘
RETURN
<┘


