background image


Stainless Steel 2MP/3MP/4MP Network Cameras 

11 


7.


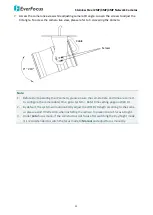
Access the camera live view while adjusting camera tilt angle. Loosen the screws to adjust the 
tilt angle. To access the camera live view, please refer to 5. Accessing the Camera.   

0° ~ 210°

Screws

Cable


Note:   
1.


Before start operating the IP camera, please ensure the camera date and time are correct. 
To configure the camera date/time, go to System > Date/Time setting page on Web UI. 

2.


By default, the system will automatically adjust the IR LED strength according to the scene, 
so please avoid IR reflection when installing the camera to prevent out-of-focus at night. 

3.


Under Auto focus mode, if the camera does not focus after switching the Day/Night mode, 
it is recommended to switch the focus mode to Manual and adjust focus manually. 


Содержание EDN288MS

Страница 1: ...68MS EDN468MS Copyright EverFocus Electronics Corp Release Date December 2017 All the images including product pictures or screen shots in this document are for example only The images may vary depend...

Страница 2: ...talling please check that your computer meets the following system requirements Operating System Microsoft Windows XP Vista 32 bit 7 32 bit Microsoft Internet Explorer 11 or later Chrome Windows versi...

Страница 3: ...IR LEDs for infrared illumination in night vision applications EZN Series 3 high power IR LEDs for infrared illumination in night vision applications 3 Lens Motorized 2 8 12mm lens 4 Video Output CVB...

Страница 4: ...insert a micro SD card to the card slot for recording videos Before inserting a micro SD card make sure you turn off the camera first Note This IP Camera supports micro SD SDHC SDXC card up to 128GB Y...

Страница 5: ...rd Slot on the camera module use the supplied Hexagon Wrench to unscrew the 4 screws on the rear side of the camera and then slowly pull out the camera module After inserting the SD card place a Desic...

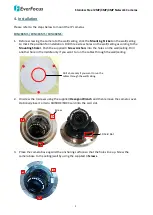
Страница 6: ...sh the supplied 3 Screw Anchors into the holes on the wall ceiling Drill another hole in the middle only if you want to run the cables through the wall ceiling Drill a hole only if you want to run the...

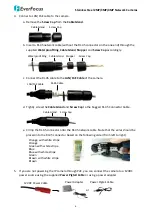
Страница 7: ...LAN PoE Cable d Tightly screw the Cable Gland and Screw Cap to the Rugged RJ 45 Connector Cable Screw Cap Cable Gland e Crimp the RJ 45 connector onto the RJ 45 network cable Note that the wires shou...

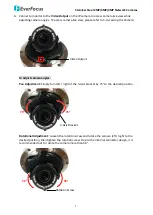
Страница 8: ...ng the Camera Video Output To adjust camera angles Pan Adjustment Simply turn left right of the 3 Axis bracket by 75 to the desired position 3 Axis Bracket 75 75 Rotational Adjustment Loosen the rotat...

Страница 9: ...Film Desiccant Bag Note 1 Before start operating the IP camera please ensure the camera date and time are correct To configure the camera date time go to System Date Time setting page on Web UI 2 By d...

Страница 10: ...ng to mark the position for installation Drill four screw holes on the wall ceiling according to the supplied Mounting Sticker and push the supplied 4 Screw Anchors into the holes on the wall ceiling...

Страница 11: ...LAN PoE Cable d Tightly screw the Cable Gland and Screw Cap to the Rugged RJ 45 Connector Cable Screw Cap Cable Gland e Crimp the RJ 45 connector onto the RJ 45 network cable Note that the wires shou...

Страница 12: ...ra please ensure the camera date and time are correct To configure the camera date time go to System Date Time setting page on Web UI 2 By default the system will automatically adjust the IR LED stren...

Страница 13: ...connect the IP camera on the same LAN of your computer 1 Save IP Utility Setup exe in your computer Double click the exe file and follow the on screen instructions to install the IP Utility 2 Click t...

Страница 14: ...rder to update the system to the latest Plugin version 2 If the Error window appears please be sure to close ALL the Web browser windows first and then click Retry When the Completing the ePlayer Setu...

Страница 15: ...he default user ID is user1 and the default password is 11111111 2 If you select more than one camera that has the same user ID password you will be able to log in several cameras at once c Right clic...

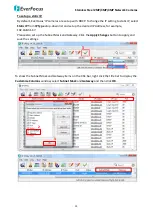
Страница 16: ...from IP Type drop down list and set up the desired IP Address for example 192 168 31 67 Please also set up the Subnet Mask and Gateway Click the Apply Changes button to apply and save the settings To...

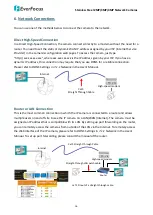
Страница 17: ...lease refer to DDNS Settings in 7 1 1 Network in the User s Manual Cat 5 Straight Through Cable High speed modem Internet Router or LAN Connection This is the most common connection in which the IP ca...

Страница 18: ...rk device visible to the PC See the diagram below Cat 5 Right Pinout of a crossed over cable 7 Upgrading Firmware You can upgrade the Firmware using the IP Utility software included in the software CD...

Страница 19: ...sword you will be able to log in several cameras at once 3 Up to 10 cameras can be simultaneously upgraded to the latest firmware If you connect the cameras to a PoE switch please make sure the Power...

Страница 20: ...EverFocus Japan 3F Kuramochi Building II 2 2 3 Koto Bashi Sumida Ku Tokyo 130 0022 Japan TEL 81 3 5625 8188 FAX 81 3 5625 8189 www everfocus co jp info everfocus co jp Your EverFocus product is design...

Отзывы: