background image


ED910F/ED930F eZ.HD Indoor Dome Camera


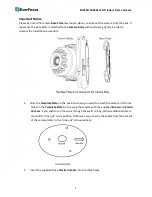
Important Notice 

Please be noted the camera 

Base Plate

 may loosen when you take out the camera from the pack.


It 

is because the Base Plate is attached to the

 Camera Body

 without twisting tightly in order to 

simplify the installation procedure. 


1.


Stick the 

Template Plate

 on the position where you want to attach the camera, drill three 

holes on the

 Template Plate

 for screwing the camera with the supplied 

Screws

 and 

Plastic 

Anchors

. If you wish to run the wires through the wall / ceiling, drill an additional hole in 

the middle “Line out” circle position. Otherwise you can wire the cables from the side cut 
of the camera (refer to the “Line out” arrow position).   


2.


Insert the supplied three 

Plastic Anchors

 into the three holes. 


Содержание ED910F

Страница 1: ...ED910F ED930F 1080p Full High Definition True Day Night Indoor Dome Camera User s Manual Copyright EverFocus Electronics Corp Release Date February 2016...

Страница 2: ...ay result in equipment failure electric shock or in extreme cases fire 6 Cleaning For cameras with interchangeable lenses do not touch the surface of the sensor directly with the hands Use lens tissue...

Страница 3: ...evision reception which can be determined by turning the equipment off and on the user is encouraged to try to correct the interference by one of the following measures Reorient or relocate the receiv...

Страница 4: ...4 Contents 1 Introduction 5 1 1 Packing List 5 1 2 Features 6 2 Cable Description 6 3 Installation 7 3 1 Installation and Adjustment 7 4 Configuration in the OSD Menu 13 5 Specifications 17...

Страница 5: ...enhances images in low light environments with guaranteed ZERO ghosting The cameras are equipped with 3 axis rotation mechanical design that delivers wall or ceiling mounting flexibility Users can tak...

Страница 6: ...analog signal output which can be easily switched using OSD Joystick The flexible angle viewing with its 3 Axis rotation design allows wall or ceiling mounting Easy lock installation by screwing the b...

Страница 7: ...ED910F ED930F eZ HD Indoor Dome Camera 7 3 Installation 3 1 Installation and Adjustment ED910F without LED ED930F with LED Camera Breakdown...

Страница 8: ...dure 1 Stick the Template Plate on the position where you want to attach the camera drill three holes on the Template Plate for screwing the camera with the supplied Screws and Plastic Anchors If you...

Страница 9: ...pull to remove the liner Note Hold the liner with one hand then press and pull to remove the liner refer to the arrow marked on the liner 4 Push the inner click outward and rotate the base plate coun...

Страница 10: ...using the supplied three Screws 6 To screw the camera body back to the base plate aim the arrow label of the camera body to the arrow label of the base plate and rotate the camera body clockwise A cl...

Страница 11: ...onally connect the camera to a monitor using the supplied Test Lead to adjust camera angles focus zoom and configure OSD menu a Connect one end of the Test Lead to the camera and the other end to a mo...

Страница 12: ...between 1080p and 720p Default 1080p Press Upward for 5 Seconds Switch from HD 1080p 720p to 960H Press Left for 5 Seconds Switch from 960H to HD 1080p 720p Press Right for 5 Seconds Switch between NT...

Страница 13: ...00 1 5000 1 10000 1 50000 PAL 1 50 FLK 1 200 1 400 1 1000 1 2000 1 5000 1 10000 1 50000 Iris Speed 0 15 Manual 2 Exposure Shutter NTSC 1 30 1 60 FLK 1 240 1 480 1 1000 1 2000 1 5000 1 10000 1 50000 X2...

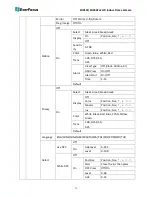
Страница 14: ...55 Default 4 White Balance ATW AWC SET Indoor Outdoor Manual Blue 1 500 Red 0 100 AWB 5 Day Night Ext D N Delay 0 60 N D Delay 0 60 Auto D N AGC 1 255 D N Delay 0 60 N D AGC 1 255 N D Delay 0 60 Color...

Страница 15: ...All OSD View On Off Alarm Out On Off Time 1 15 Default Privacy Off On Select Area1 Area2 Area3 Area4 Display Off Color Position Size Mosaic Position Size Inv Position Size Color White Black Red Blue...

Страница 16: ...ay Off On Baud Rate 2400 4800 9600 19200 38400 8 Adjust Sharpness Off Auto Level 0 10 Start AGC 0 255 End AGC 0 255 Monitor CRT Blue Gain 0 100 Red Gain 0 255 LCD Gamma User 0 45 0 50 0 55 0 60 0 6 5...

Страница 17: ...S BLC Selectable AGC 0 15 Levels White Balance ATW AWC SET INDOOR OUTDOOR MANUAL AWB Sync Mode Internal Day Night Ext Auto Color B W IR LED N A 18 Units IR Distance N A Up to 30m 100ft range depending...

Страница 18: ...everfocus com sales everfocus com EverFocus Japan 3F Kuramochi Buildingll 2 2 3 Koto Bashi Sumida Ku Tokyo 130 0022 Japan TEL 81 3 5625 8188 FAX 81 3 5625 8189 www everfocus co jp info everfocus co jp...

Отзывы: