


EFN Series Fisheye IP Camera
74
【
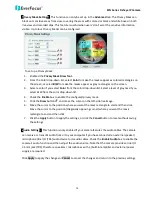
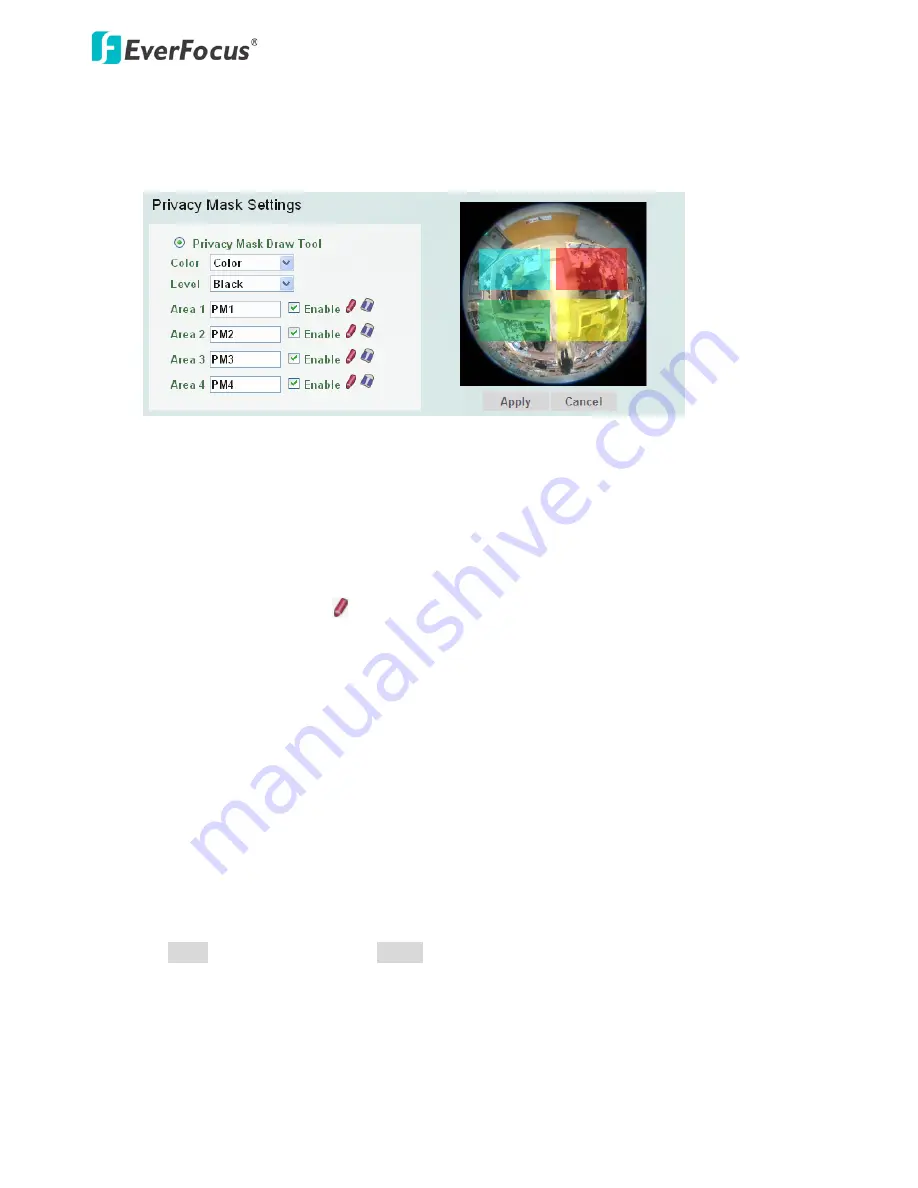
Privacy Mask Settings
】
This function can only be set up in the Advanced tab. The Privacy Mask can
block out sensitive areas from view, covering the areas with colored or black and white boxes in both
live view and recorded clips. This feature is useful when users’ don’t want the sensitive information
visible. Up to four Privacy Masks can be configured.
Area1
Area3
Area2
Area4
To set up a Privacy Mask:
1.
Enabled the Privacy Mask Draw Tool.
2.
From the Color drop-down list, select Color to make the masks appear as colored rectangles on
the screen; or select B/W to make the masks appear as gray rectangles on the screen.
3.
Select a color if you select Color from the color drop-down list. Select a level of grayness if you
select B/W from the color drop-down list.
4.
Check the Enable box to enable the configured privacy mask.
5.
Click the Draw button and move the cursor on the left-side live image.
6.
Move the cursor to the position where you want the mask rectangle to start and then click.
Move the cursor to the position (diagonally opposing corner) where you want the mask
rectangle to end and then click.
7.
Click the Apply button to apply the settings, or click the Cancel button to reset without saving
the settings.
【
Audio Settings
】
This function is only enabled if your camera features the audio cables. The camera
can receive or transmit audio from or to your computer if you have connected an external speaker /
microphone (line I/O (TRS) audio device to its audio cables. Check the Enable Audio box to enable the
camera’s audio function and then adjust the audio volume. Note that the camera provides a line I/O
3.5mm jack (TRS), therefore, speakers / microphones with a (built-in) amplifier and external power
supply are required.
Click Apply to apply the changes or Cancel to cancel the changes and return to the previous settings.


