background image

CloudBook

 User Guide


40 


Typewriter keys


Typewriter keys (also called 

alphanumeric

 keys) are used to enter text and 

characters. Keys with blue print on them behave differently when 
combined with control keys. 

B

ASIC 

K

EYBOARD 

F

UNCTIONS


Keypad 

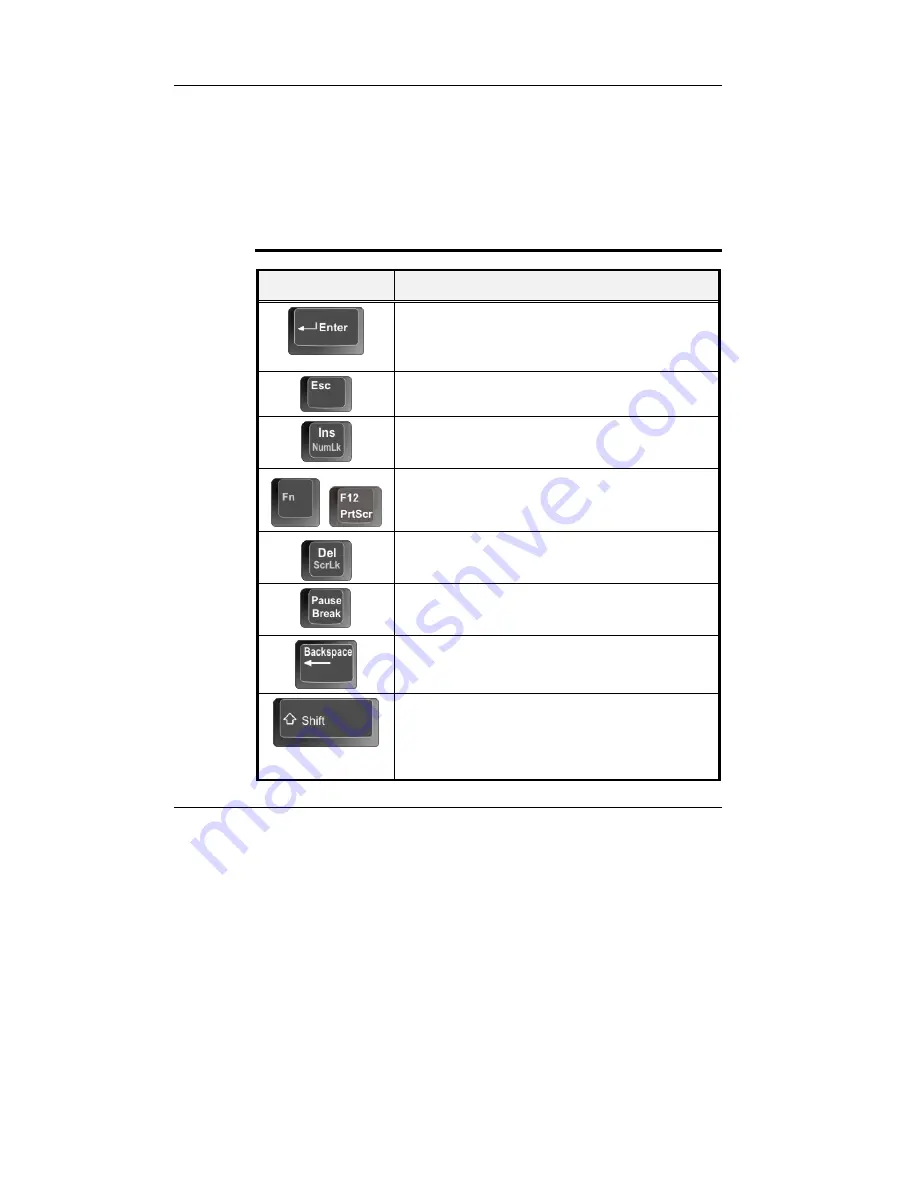
Function Description 


<

Enter

> key. Execute a command. Within many 

text editing application programs, the <Enter> key 
inserts a hard carriage return, just like what ordinary 
typewriter does. 


<

Esc

> key. Press this key to cancel or escape from 

a command or function. 


<

Ins

> key. Known as the Insert key. Press this key 

to toggle the keyboard data entry from insert to type 
over mode. 

+


<

Fn

> + <

PrtScr

> key. Known as the Print Screen 

key. Press this key to map the whole screen to share 
memory for your specific usage. 


<

Del

> key. Known as the Delete key. Press this key 

to delete the character to the right of the cursor, or 
delete marked texts or items. 


<

Pause

> key. Press this key to temporarily halt 

execution of a command. Pressing any other key to 
resume execution of a command. 


<

Backspace

> key. Press this key to delete the 

character to the left of the cursor. 


<

Shift

> key. Press this key in combination with 

alphabet letters to produce uppercase letters in 
typing. Use this key in combination with those two-
character keys (found on the second row of the 
keyboard) to produce the upper marked keys. Also 

Содержание CloudBook CE1200V Series

Страница 1: ...User Guide CloudBook CE1200V...

Страница 2: ...therwise without prior written permission Trademarks Product names used herein are for identification purposes only and may be the trademarks of their respective companies VIA C7TM M is registered tra...

Страница 3: ...demark of Wikimedia Foundation Apple and iPod are trademarks of Apple Inc registered in the U S and other countries GIMP TotemPlayer and RhythmBox are Open Source projects produced by their respective...

Страница 4: ...to provide reasonable protection against harmful interference in a residential installation This equipment generates uses and can radiate radio frequency energy and if not installed and used in accord...

Страница 5: ...be installed and operated with a minimum distance of 20 centimeters between the radiator and your body 15 247 b 4 the EUT meets the requirement that it be operated in a manner that ensures the public...

Страница 6: ...his Wireless LAN device must be in strict accordance with the instructions included in the user documentation provided with the product Any changes or modifications including the antennas made to this...

Страница 7: ...attached to this equipment Operation with non certified peripherals is likely to result in interference to radio and TV reception Optical Disk Drive Notice The optical disk drive is Class 1 Laser Pro...

Страница 8: ...Laws of the Member States relating to Electromagnetic Compatibility 89 336 EEC Lowvoltage Directive 73 23 EEC and the Amendment Directive 93 68 EEC the procedures given in European Council Directive 9...

Страница 9: ...Restrictions European standards dictate maximum radiated transmit power of 100mW EIRP and frequency range 2 400 2 4835GHz In France the equipment must be restricted to the 2 4465 2 4835GHz frequency r...

Страница 10: ...BookUser Guide 10 About Your CloudBook Congratulation for having purchased your new CloudBook This CloudBook incorporates the newest technology features to serve your daily computing needs anywhere yo...

Страница 11: ...pts of your new CloudBook This manual is divided into eight chapters Chapter 1 Introduction Chapter 2 Getting Started Chapter 3 Using Your CloudBook Chapter 4 Multimedia Setup Chapter 5 Connecting Ext...

Страница 12: ...OK 24 1 5 THE RIGHT SIDE OF THE CLOUDBOOK 25 1 6 THE UNDERSIDE OF THE CLOUDBOOK 27 1 7 CLOUDBOOK ACCESSORIES 28 2 GETTING STARTED 29 2 1 USING THE BATTERY PACK 30 Extending Battery Life 32 2 2 CONNECT...

Страница 13: ...M FEATURES 52 4 3 SETTING UP THE AUDIO DRIVER PROPERTIES 53 Using an External Microphone 53 4 4 PLAYING AUDIO AND SOUND 53 4 5 PLAYING VIDEO AND MPEG FILES 53 5 CONNECTING TO PERIPHERALS 55 5 1 USING...

Страница 14: ...TY INSTRUCTIONS 76 8 2 CLEANING YOUR CLOUDBOOK 78 8 3 MAINTAINING THE LCD QUALITY 79 8 4 MAINTAINING YOUR HARD DISK 79 8 5 BATTERY CARE GUIDELINES 80 8 6 WHEN YOU TRAVEL 81 APPENDIX A SYSTEM SPECIFICA...

Страница 15: ...Notebook User Guide 15 Weight and Dimension 86...

Страница 16: ...CloudBookUser Guide 16 This page is intended to be blank...

Страница 17: ...sleek ultra portable computer This device matches all the demands for high performance computing and multimedia technology Your CloudBook runs a wide variety of software to meet your personal product...

Страница 18: ...Fully compatible with an entire library of PC software based on operating systems such as Linux Memory This CloudBook provides one memory slot for installing DDRII SDRAM 200 pin SODIMM modules up to...

Страница 19: ...stem Management Mode on system chipset that shuts down components not in use to reduce power consumption Closing the CloudBook lowering the cover allows you to suspend the system operation instantly a...

Страница 20: ...thing is missing and or damaged Be sure to save the shipping materials and the carton in case you need to ship the CloudBook or store for an extended period of time 1 3 The Inside of the CloudBook The...

Страница 21: ...ook comes with a color LCD that you can adjust for a comfortable viewing position The LCD is a 7 TFT color LCD with 800 x 480 Wide XGA with ratio 16 10 resolution panels The features of the Color LCD...

Страница 22: ...ouchpad to control the position of the cursor Use the selection buttons at the top left side of the keyboard to select menu items LED Indicators Keeps you informed of your CloudBook current power stat...

Страница 23: ...nate the system status 1 Caps Lock 2 Drive Access 3 Battery Charging Caps Lock When the LED turns on it indicates that the Caps Lock key on the keyboard is activated When activated all alphabet keys t...

Страница 24: ...S Wireless LAN Button Push this button to activate or inactivate the Wireless LAN Function When you activate the wireless LAN function it will search the wireless LAN signal automatically if you had i...

Страница 25: ...on of Digital Video Interactive Integrated 4 in 1 card slot The card slot supports SD MMC MS Memory Stick and MS_Pro flash memory card format You can use either of the 4 types flash memory cards for e...

Страница 26: ...sound recording directly into your CloudBook Headphone Jack Lets you plug in a stereo headphone powered speakers or earphone set with 1 8 inch phono plug for personal listening USB 2 0 Port The Unive...

Страница 27: ...ying continuous power to your CloudBook and recharging the battery 1 6 The Underside of the CloudBook The bottom of the CloudBook offers the following features 1 Battery Release Latch 2 Battery Lock L...

Страница 28: ...Change the power cord if you are going to use your CloudBook in countries with different connector outlets When you connect the AC adapter it charges the battery whether or not the CloudBook is powere...

Страница 29: ...2 29 2 Getting Started Your CloudBook is designed and pre configured for easy setup and use This chapter describes the installation steps you should follow to get the CloudBook up and running as quic...

Страница 30: ...rgeable Li Ion battery pack allows you to operate the CloudBook without an external power source When you connect the AC power adapter the battery immediately starts to recharge For maximum battery pe...

Страница 31: ...d nose directed toward the compartment insert and push the battery pack Removing the Battery Pack To remove the battery pack slide the lock latch to the end of left side to unlock the battery lock lat...

Страница 32: ...to restart the CloudBook until you have connected to the AC adapter or installed a charged battery To replace the battery pack refer to the previous sections on Installing the Battery Pack and Removin...

Страница 33: ...advisable to always have the AC adapter connected to the CloudBook and the battery pack installed This ensures continuous power supply and prevents any data loss incurring from sudden power breakdown...

Страница 34: ...splayed on the screen and may generate short beep sound as well After the test the screen will also display a message press F2 to enter SETUP You don t need to run this program at the moment as your d...

Страница 35: ...after powering on your CloudBook to suit your viewing pleasure The Brightness hot key control adjusts the brightness on the LCD The brightness hot key control will not set the LCD completely dark or...

Страница 36: ...CloudBookUser Guide 36 This page is intended to be blank...

Страница 37: ...Using Your UMPC 3 37 3 Using Your CloudBook This chapter describes how to operate the standard built in features of the CloudBook...

Страница 38: ...th an operating system pre installed and needs only to be setup and configured during initial use 3 2 Understanding the Keyboard Functions Your CloudBook is equipped with an 80 keys keyboard that prov...

Страница 39: ...ys to change their functions To use control keys press and hold the control key while pressing another key For example Press Ctrl C means to hold down the Ctrl key and type the letter C Key combinatio...

Страница 40: ...e keyboard data entry from insert to type over mode Fn PrtScr key Known as the Print Screen key Press this key to map the whole screen to share memory for your specific usage Del key Known as the Dele...

Страница 41: ...in command Alt key Known as the Alternate key Used in most application program in combination with other keys to execute a certain command Fn Num Lock key Activates the embedded 15 key numeric keypad...

Страница 42: ...e SCREEN CONTROL KEYS Keypad Function Description Fn Home key Moves the cursor to the beginning of a screen or line Fn PgUp key Moves the cursor up one screen at a time Fn PgDn key Moves the cursor do...

Страница 43: ...essed in conjunction with the Fn key these keys set specific system parameters and are sometimes referred to as hot keys Keypad Function Description Switches display between LCD CRT or LCD and CRT sim...

Страница 44: ...e the Control Panel and double click on the Mouse icon The options let you control the size and color of the cursor cursor speed the accepted double click speed and selection button orientation The To...

Страница 45: ...the mouse cursor place the finger lightly on the sensor pad and move in the desired direction If you reach the end of the pad lift your finger and place it back down on the other side of the pad 2 To...

Страница 46: ...n a high performance AGP local bus controller and is fully VGA compatible This controller offers a large set of extended functions and higher resolutions especially useful when you are connecting an e...

Страница 47: ...rformance one of the great features in your CloudBook is the ability to conserve power Your CloudBook is designed to incorporate intelligent and advanced power management functions that turn off power...

Страница 48: ...o hibernation your entire desktop will be saved before powering down your CloudBook You don t need to save and close each document before you put your CloudBook into hibernation When you press power b...

Страница 49: ...o insert a flash memory card into the slot please pay more attention whenever insert the flash memory card into the slot with the correct side You should position the copper connector at the bottom si...

Страница 50: ...CloudBookUser Guide 50 Removing Flash Memory Card To remove the flash memory card you can pull out the card directly there is no release button for flash memory slot...

Страница 51: ...Fun with Multimedia 4 51 4 Fun with Multimedia This chapter explains the multimedia features of your Everex CloudBook...

Страница 52: ...2 Audio Sound System Features Your Everex CloudBook has a built in 16 bit stereo sound controller that allows you to record store and playback voice music and other sound effects with built in mixer...

Страница 53: ...1 8 inch mini jack connector Follow the same procedure for recording voice 4 4 Playing Audio and Sound Your Everex CloudBook has built in twin speakers to playback audio and sound You can also adjust...

Страница 54: ...CloudBookUser Guide 54...

Страница 55: ...hapter describes how you attach additional peripheral devices to your CloudBook The CloudBook allows you to add a printer or mouse connect an external monitor and keyboard or other compatible peripher...

Страница 56: ...crosoft HP Compaq Intel Agere NEC and Philip are seven core members of USB IF to have worked on USB 2 0 standardization USB 2 0 offers data transfer rate up to 480Mbps megabits per second compared to...

Страница 57: ...puter and make sure the monitor power switch is turned off The CloudBook must be powered off or suspended while the monitor is being connected Although you can connect the external Monitor without pow...

Страница 58: ...isplay on the external monitor and shut off the LCD display you can use the Fn F3 hot key to switch display type between LCD and external monitor Keep pressing the hot key until you get the display to...

Страница 59: ...loudBook to other CloudBook networks through a local area network LAN and supports data transfer rates at 10Mbps and can be up to 100Mbps The 10Base T standard also called Twisted Pair Ethernet is con...

Страница 60: ...n an office environment airport major railway station etc that depends on the construction of each country In most case you probably can use it at office please consult with the network department of...

Страница 61: ...your computing needs User adjustable options include system time and date disk drive configuration and password setup BIOS information stored in the CMOS RAM will remain permanent unless changed Defau...

Страница 62: ...e CloudBook the system will read the settings stored in the CMOS RAM and compare them to the equipment check conducted during the Power On Self Test POST If an error occurs an error message will be di...

Страница 63: ...ts own screen Parameters The left side of the screen This area lists the parameters and their current settings Key Status Bar The bottom part of the screen These lines display the keys available to mo...

Страница 64: ...CPU Speed 1200 MHz System Memory 640 KB Extended Memory 457728 KB BIOS Version 0 4A 2309 8A20 F1 Help Select Item F5 F6 Change Values F9 Setup Defaults Esc Exit Select Menu Enter Select Sub Menu F10 S...

Страница 65: ...ly as the BIOS automatically detects the storage media CPU Type This field reports the CPU type information detected by the BIOS during Power On Self Test POST CPU Speed This field reports the CPU spe...

Страница 66: ...abled Transfer Mode FPIO 4 DMA 2 Ultra DMA Mode Mode 2 SMART Monitoring Enabled F1 Help Select Item F5 F6 Change Values F9 Setup Defaults Esc Exit Select Menu Enter Select Sub Menu F10 Save and Exit U...

Страница 67: ...Change Values F9 Setup Defaults Esc Exit Select Menu Enter Select Sub Menu F10 Save and Exit PS 2 Mouse Lets you activate or inactivate the mouse function Disabled prevents any installed PS 2 mouse f...

Страница 68: ...Enter setup utility Set User Password Enter Password on boot Disabled Fixed disk boot sector Normal F1 Help Select Item F5 F6 Change Values F9 Setup Defaults Esc Exit Select Menu Enter Select Sub Men...

Страница 69: ...This field is only available when Supervisor Password has set Enter the user password when boot the system or resume from suspend mode But if the Write Protect is set in the Fixed disk boot sector fie...

Страница 70: ...Realtek Boot Agent configure devices Up or Down arrows Select a device and moves the device up or down F1 Help Select Item F5 F6 Change Values F9 Setup Defaults Esc Exit Select Menu Enter Select Sub M...

Страница 71: ...es Save Changes F1 Help Select Item F5 F6 Change Values F9 Setup Defaults Esc Exit Select Menu Enter Execute Command F10 Save and Exit Exit Saving Changes Saves all changes to CMOS while running the B...

Страница 72: ...tem with the diskette in the diskette drive 3 On the DOS prompt type the following command A Phlash XXXXXX ROM BIOS filename or A XXXXXX BAT Batch file for BIOS file Press Enter to run this BIOS utili...

Страница 73: ...Using Options 7 73 7 Using Options This chapter describes the advanced features and expandable architecture of your CloudBook...

Страница 74: ...rocedures include the following 7 1 Memory Upgrade Your CloudBook offers 200 pin SODIMM Small Outline Dual Inline Memory Module with 512MB or 1024MB DDRII SDRAM The memory compartment is located insid...

Страница 75: ...g for Your CloudBook Your CloudBook contains the latest features in ultra mobile personal computing and multimedia technology If properly cared for and maintained the performance and reliability of th...

Страница 76: ...se moisture sheet or a cloth for cleaning The socket outlet shall be installed near the CloudBook and shall be easily accessible Please keep the CloudBook from humidity Lay the CloudBook on a reliable...

Страница 77: ...in such a way that people can not step on it Do not place anything over the power cord All cautions and warnings on the CloudBook should be noted If the CloudBook is not in use for a long time disconn...

Страница 78: ...vel at the operator s position according to IEC 60704 1 is equal or less than 70dB A 8 2 Cleaning Your CloudBook When it is necessary to clean the plastic case and keyboard use a soft lint free cloth...

Страница 79: ...ok to turn off the LCD power and display when the system is inactive for some time Adding a screen saver also helps prolong the life of your CloudBook screen Follow the safety guidelines mentioned ear...

Страница 80: ...e battery pack Handle batteries carefully Do not try to disassemble crush puncture open drop mutilate short external contacts disposed of in water or fire or expose it to temperatures higher than 60 C...

Страница 81: ...your hard disk before traveling Recharge your battery overnight to ensure full battery power before you leave Don t forget to bring along the AC adapter and extra battery pack Try to bring backup soft...

Страница 82: ...CloudBookUser Guide 82 This page is intended to be blank...

Страница 83: ...System Specification A 83 APPENDIX A System Specification This appendix provides technical specifications for the CloudBook...

Страница 84: ...using 200 pin SODIMM DDRII 533 667 SDRAM modules LCD DISPLAY 7 WXGA 16 10 Color TFT LCD 800 x 480 Maximum 16M true colors on all LCD display VGA SYSTEM Integrated VIA VX700 graphic engine Simultaneou...

Страница 85: ...jacks for microphone MIC Audio output jack for external speaker or headphone Line Out Sound volume adjust by K B Hot Keys TOUCHPAD Integrated Touchpad Serial USB mouse pointing device with 2 click bu...

Страница 86: ...odule AC DC POWER SUPPLY ADAPTER Universal auto switching 100V 240V 65W adapter 20 Volt BATTERY Rechargeable 4 Cells Li ion battery pack with Smart Battery function Approximately 4 5 5 Hour for Batter...

Страница 87: ...Everex 5020 Brandin Court Fremont CA 94538 866 850 8835 www everex com...

Отзывы: