background image


Installation Overview 

The EA-LAN1 provides convenient remote management of the controller over the 
internet or local area network.  There are a few steps to follow to properly install the 
EA-LAN1 and ensure proper connection.  An overview of these steps is given below, 
and the rest of this guide is devoted to a detailed description of the process.  To 
perform these steps, you will need to have the controller and readers installed, and 
will need a computer at the location of the install (we’ll call this the “Installation PC”).  
This computer can be the administration PC that will be used to manage the system, 
but it does not have to be.  A laptop or other PC can be used for step 1-6, and the 
administration PC (we’ll call it the “Admin PC”) must be used in step 7. 

Step 1:

 Install the EA-LAN1 software on the Installation PC using the CD included 

with the EA-LAN1.  Make sure that the installation PC is connected to the network 
that will be used to manage the controller. 

Step 2:

  Connect the EA-LAN1 to the local area network using a LAN cable, and 

power up the EA-LAN1. 

Step 3:

 Using the software that you installed in Step 1 on the Installation PC, locate 

the EA-LAN1 on the local area network and change the IP address on the EA-
LAN1. 

Step 4:

 Configure the EA-LAN1 as described in the detailed description later in this 

guide. 

Step 5:

 Connect the EA-LAN1 to the controller.  (Note: Perform this step only after 

successfully completing steps 1-5) 

Step 6:

 Install the “COM Port Simulator” driver on the Admin PC using the CD 

included with the EA-LAN1, and map the COM Port to be used. 

Step 7:

 Confirm that the controller is now available on the network.  At the Admin 

PC, open the EverAccess Flex Software and connect to the controller using the 
COM Port mapped in Step 7. 


Chapter 

Содержание EA-LAN1

Страница 1: ...Instruction Manual E EA A L LA AN N1 1 N Ne et tw wo or rk k A Ad da ap pt te er r Volume 1 EverAccess...

Страница 2: ...uide 2004 Everfocus Electronics Corp 2445 Huntington Drive Phone 626 844 8888 Fax 626 844 8838 All rights reserved No part of the contents of this manual may be reproduced or transmitted in any form o...

Страница 3: ...allation or any area classified as a wet area Installation environment The temperature should be kept between 14 F 140 F For safety sake do not disseminate the unit or put it on an unstable base Venti...

Страница 4: ...ric shock Never spill liquid of any kind on the unit Service Do not attempt to service this unit by yourself as opening or removing covers may expose you to dangerous voltage of other hazards Refer al...

Страница 5: ...dress 4 Configuring the EA LAN1 5 Connecting the EA LAN1 to the controller 8 How to Connect the EA LAN1 to an RS232 Serial Communication 8 How to Connect the EA LAN1 to an RS485 Connection 9 Installin...

Страница 6: ...serial port Features and Specifications Hardware 32 bit 100 MHz CPU 2M memory 10M 100M self adapting net port The speed of serial port can reach up to 230 4K Software Terminal mode can supports multi...

Страница 7: ...ent levels according to the user IP address and MAC address Provides real COM drive under WINDOWS NT 2000 XP Provides Static Route settings Provides setup interface of menu in Chinese and English and...

Страница 8: ...LAN1 software on the Installation PC using the CD included with the EA LAN1 Make sure that the installation PC is connected to the network that will be used to manage the controller Step 2 Connect th...

Страница 9: ...arch for the server If the server is not connected to the same LAN as the PC go to step 3 below 3 Usually the IP address of the server and the PC are not in the same network The PC can connect to the...

Страница 10: ...address of the PC and press OK Click OK 7 Now you can enter the setting for the server using Web browser under windows Please refer to the section Configuring the EA LAN1 Configuring the EA LAN1 You c...

Страница 11: ...eft side and choose the corresponding Port Port1 2 Choose the Port mode setting for TCP realport option from the Mode menu 3 Click on Submit button 4 Click on Async from the menu on the left side and...

Страница 12: ...ion you wish to use a For RS232 connection choose RS232 b For RS485 connection choose RS485_HALF 6 Click Submit button 7 Click on Save Configurations on the left side 8 Click Save button to save confi...

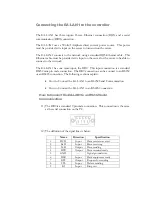
Страница 13: ...rd RS232 nine pin male connection The DB9 connection can be connect to an RS232 or an RS485 connection The following sections explain How to Connect the EA LAN1 to an RS232 Serial Communication How to...

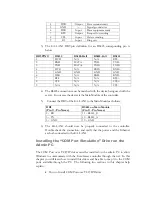
Страница 14: ...Module of the controller 15 Connect the DB9 of the server to the Main Module as follows DB9 Pin Pin Name RS232 on Main Module Pin Pin Name 2 RX 14 TX 3 TX 13 RX 5 GND 12 GND 16 That s all Make sure t...

Страница 15: ...e of the controller 5 Connect the DB9 of the EA LAN1 to the Main Module as follows DB9 Pin Pin Name RS485 on Main Module Pin Pin Name 2 RX 11 RS485_B 3 TX 10 RS485_A 5 GND 12 GND 6 The EA LAN1 should...

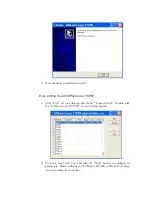
Страница 16: ...l COM Port over TCP IP Driver 1 Run 60x_2k_4 1 1 in CD ROM 2 Click Yes to begin the installation of the terminal server 3 Click Next 4 To keep the installation directory the same click Next other wise...

Страница 17: ...5 Then click Install 6 Then click Finish to complete the installation...

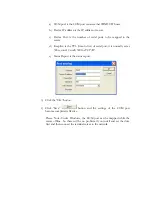
Страница 18: ...Click Start on your desktop and choose Control Panel Double click the COM port over TCP IP A new window appears 2 Choose a free COM Port and click the Map button to configure its parameters Please con...

Страница 19: ...of serial port it is normally set as 300 second Usually 300 for TCP IP e Status Report is the status report 3 Click the OK button 4 Click Save button and the settings of the COM port become completely...

Страница 20: ...Notes...

Страница 21: ...x 49 2822 939495 USA Office Beijing office 1801 Highland Ave Duarte CA Room 609 Technology Trade Building 91010 U S A Shangdi Information Industry Base Tel 1 626 844 8888 Haidian District Beijing Chin...

Отзывы: