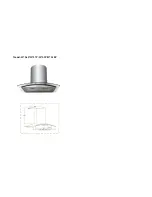
Eurotech H75.6P Скачать руководство пользователя страница 5


5


RANGE  HOOD 

8. Trouble Shooting


If any problem occurs, please remove the plug from the socket and contact 
the manufacturer or its service agent or a similarly qualified person in order 
to avoid a hazard. 

Problem Cause 

Solution 

Light on, but 
motor does not 
work 

The outlet valve is blocked 

Detach flue and duct then 
turn on the hood to check if 
the valve opens 

The capacitor has failed 

Call for technical service 

The control switch has failed 

Call for technical service 

Light does not 
work, motor 
does not work 


No power supply 

Plug another appliance into 
the socket to confirm there 
is power supply 

Fuse has blown 

Open up the plug and 
replace the 13A fuse 

Vibration 

The propeller is damaged or 
unbalanced 

Call for technical service 

The hood is not installed correctly 

Review the installation 
instructions & check the 
installation again for loose 
screws, brackets or 
connections 

Insufficient 
suction effect 

The distance between the hood and the 
cooker is too long 

Check that the distance is 
between 650mm to 700mm 

The filters are saturated 

Clean the filters from 
grease residue and replace 
after drying. 

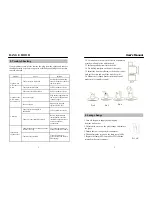
3.2 To install onto the wall, drill 2 holes of 

φ

8mm on  

a sturdy wall and in line with the hood.  
3.3 Insert expended screws into the holes. 
3.4 Fix drilling template on the wall. (See pic2). 
3.5 Install the duct (not offered) to the hood air outlet 
And put the other end out of the wall (See pic3). 
3.6 Mount the U-shaped bracket (alternative part),  
make sure it’s firmed (see pic4).


2


User’s Manual


1.Turn off the power supply by unplugging 
 from the wall socket.  
2.Unfasten the screws on the glass canopy and remove 
 the glass. 
3.Detach the low-voltage electric connector. 
4.Then unfasten the screws on the lamp (see pic 4B).  
5.Replace the lamp (LED Lamp Max.2W) and then 
 reinstall in the reverse manner. 

4. Lamp change 

PIC 4B


Pic 2 

Pic 3 

Pic 4 

Содержание H75.6P

Страница 1: ... authorized service original parts INSTRUCTION MANUAL Read this manual carefully before using the appliance and store it in a safe place for future reference KITCHEN APPLIANCE SERIES RANGE HOOD RANGE HOOD ...

Страница 2: ...Model H75 6P H75 7P H75 9P H75 10P ...

Страница 3: ... use it three months heavy grease build up may not be cleaned easily and the filter may require replacement 11 4 Do not use harsh alkalis or abrasives 11 5 Charcoal filters cannot be cleaned and must be replaced when use it six months 7 11 Cleaning Maintenance RANGE HOOD Content Introduction 1 Features 1 Installation 1 Lamp Change 2 Notice of Installation 3 Safety Warning 3 How to Use 4 Trouble Sh...

Страница 4: ... of hobs covered by range hood should not exceed 5 burners 1 7 Any modifications to the appliance electric wire and plug is dangerous voids the warranty 2 1 This appliance is manufactured from top quality materials and offers superb streamlined effects 2 2 With high suction power and low noise it is designed to remove cooking fumes from your kitchen quietly effectively 3 1 The range hood should be...

Страница 5: ...k the installation again for loose screws brackets or connections Insufficient suction effect The distance between the hood and the cooker is too long Check that the distance is between 650mm to 700mm The filters are saturated Clean the filters from grease residue and replace after drying 3 2 To install onto the wall drill 2 holes of φ8mm on a sturdy wall and in line with the hood 3 3 Insert expen...

Страница 6: ...ating a gas cooker when there is no pan on the stove it is a fire hazard and may cause damage to the hood filters Disconnect the electrical plug prior to any maintenance This appliance is not intended for use by young children and persons unless they have been adequately supervised by a responsible person to ensure that they can use the appliance safely PIC 7 4 User s Manual The range hood is for ...

Отзывы: