EuroLite LED STL-9 Скачать руководство пользователя страница 22

00063567.DOC, Version 1.2

22/23

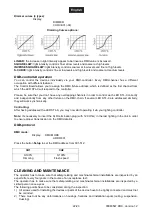
Dimmer curves (4 types):

Display:

DIMMER
CURVE:01(-04)

Dimming Curves options:

LINEAR: 

the increase in light intensity appear to be linear as DMX value is increased.

SQUARE LAW: 

light intensity control is finer at low levels and coarser at high levels

INVERSE SQUARE LAW: 

light intensity control is coarser at low levels and finer at high levels

S-CURVE: 

light intensity control is fine at low levels and high levels and coarser at medium levels.

DMX-controlled operation

You can control the devices individually via your DMX-controller. Every DMX-channel has a different
occupation with different features.
The Control Board allows you to assign the DMX fixture address, which is defined as the first channel from
which the LED STL-9 will respond to the controller.

Please, be sure that you don’t have any overlapping channels in order to control each LED STL-9 correctly
and independently from any other fixture on the DMX-chain. If several LED STL-9 are addressed similarly,
they will work synchronically.

Controlling:

After having addressed the LED STL-9, you may now start operating it via your lighting controller.

Note: 

It’s necessary to insert the XLR termination plug (with 120 Ohm) in the last lighting in the link in order

to ensure proper transmission on the DMX data link.

DMX-protocol

DMX mode:

Display

DMX MODE

ADDR:001

Press the button 

Setup

 to set the DMX address from 001-512:

CH1

CH2

0-100%

Dimming

0-100%

Flash speed

CLEANING AND MAINTENANCE

The operator has to make sure that safety-relating and machine-technical installations are inspected by an
expert after every four years in the course of an acceptance test.
The operator has to make sure that safety-relating and machine-technical installations are inspected by a
skilled person once a year.
The following points have to be considered during the inspection:
1)  All screws used for installing the devices or parts of the device have to be tightly connected and must not

be corroded.

2)  There must not be any deformations on housings, fixations and installation spots (ceiling, suspension,

trussing).

Содержание LED STL-9

Страница 1: ...Copyright Nachdruck verboten Reproduction prohibited F r weiteren Gebrauch aufbewahren Keep this manual for future needs BEDIENUNGSANLEITUNG USER MANUAL LED STL 9 Studio Lighting...

Страница 2: ...TIONS 14 OPERATING DETERMINATIONS 16 DESCRIPTION OF THE DEVICE 17 Features 17 Overview 17 INSTALLATION 18 Rigging 18 Overhead rigging 18 DMX 512 connection connection between fixtures 20 Connection be...

Страница 3: ...e Hinweise beachten sind wir sicher dass Sie lange Zeit Freude an Ihrem Kauf haben werden Nehmen Sie die LED STL 9 aus der Verpackung SICHERHEITSHINWEISE ACHTUNG Seien Sie besonders vorsichtig beim Um...

Страница 4: ...zleitung gelten auch f r evtl Verl ngerungsleitungen Ger t bei Nichtbenutzung und vor jeder Reinigung vom Netz trennen Fassen Sie dazu den Netzstecker an der Grifffl che an und ziehen Sie niemals an d...

Страница 5: ...N betrieben werden Verwenden Sie das Ger t nicht bei Gewitter berspannung k nnte das Ger t zerst ren Das Ger t bei Gewitter allpolig vom Netz trennen Netzstecker ziehen Das Bildzeichen m bezeichnet de...

Страница 6: ...oder an einer Traverse DMX gesteuerter Betrieb oder Standalone Betrieb DMX512 Steuerung ber jeden handels blichen DMX Controller m glich Fl gelbegrenzer im Lieferumfang enthalten Komfortable Adressie...

Страница 7: ...EFAHR Bei der Installation sind insbesondere die Bestimmungen der BGV C1 und EN 60598 2 17 zu beachten Die Installation darf nur vom autorisierten Fachhandel ausgef hrt werden Die Aufh ngevorrichtunge...

Страница 8: ...sensystemen gearbeitet werden Das Ger t darf niemals frei schwingend im Raum befestigt werden Achtung Ger te k nnen beim Herabst rzen erhebliche Verletzungen verursachen Wenn Sie Zweifel an der Sicher...

Страница 9: ...Die Steckverbindung geht ber 3 polige XLR Stecker und Kupplungen Belegung der XLR Verbindung Wenn Sie Controller mit dieser XLR Belegung verwenden k nnen Sie den DMX Ausgang des Controllers direkt mit...

Страница 10: ...Gr n Schutzleiter Der Schutzleiter muss unbedingt angeschlossen werden Wenn das Ger t direkt an das rtliche Stromnetz angeschlossen wird muss eine Trennvorrichtung mit mindestens 3 mm Kontakt ffnung a...

Страница 11: ...S f rmig mit dem DMX Wert DMX gesteuerter Betrieb ber Ihren DMX Controller k nnen Sie die einzelnen Ger te individuell ansteuern Dabei hat jeder DMX Kanal eine andere Belegung mit verschiedenen Eigen...

Страница 12: ...ennen LEBENSGEFAHR Das Ger t sollte regelm ig von Verunreinigungen wie Staub usw gereinigt werden Verwenden Sie zur Reinigung ein fusselfreies angefeuchtetes Tuch Auf keinen Fall Alkohol oder irgendwe...

Страница 13: ...LEDs 9 Abstrahlwinkel 70 Ma e LxBxH 355 x 235 x 210 mm Gewicht 4 kg Maximale Umgebungstemperatur Ta 45 C Maximale Leuchtentemperatur im Beharrungszustand TC 70 C Mindestabstand zu entflammbaren Oberf...

Страница 14: ...ons given in this manual we are sure that you will enjoy this device for a long period of time Unpack your LED STL 9 SAFETY INSTRUCTIONS CAUTION Be careful with your operations With a dangerous voltag...

Страница 15: ...ion of the device All warnings concerning the power cords are also valid for possible extension cords Always disconnect from the mains when the device is not in use or before cleaning it Only handle t...

Страница 16: ...evice must only be operated in an altitude between 20 and 2000 m over NN Never use the device during thunderstorms Over voltage could destroy the device Always disconnect the device during thunderstor...

Страница 17: ...llations on a stand or a crossbeam DMX controlled operation or stand alone operation DMX512 control via regular DMX controller Barndoors included in the delivery Comfortable addressing and setting via...

Страница 18: ...on The installation must only be carried out by an authorized dealer The installation of the device has to be built and constructed in a way that it can hold 10 times the weight for 1 hour without any...

Страница 19: ...ty of a possible installation do NOT install the device Before rigging make sure that the installation area can hold a minimum point load of 10 times the device s weight DANGER OF FIRE When installing...

Страница 20: ...lding a serial DMX chain Connect the DMX output of the first fixture in the DMX chain with the DMX input of the next fixture Always connect one output with the input of the next fixture until all fixt...

Страница 21: ...aximum fault current of 30 mA Lighting effects must not be connected to dimming packs Please note A maximum of 8 EUROLITE LED STL 9 may be linked together After every 8 devices the fixtures must have...

Страница 22: ...e DMX chain If several LED STL 9 are addressed similarly they will work synchronically Controlling After having addressed the LED STL 9 you may now start operating it via your lighting controller Note...

Страница 23: ...rocedure Step 1 Open the fuseholder on the rear panel with a fitting screwdriver Step 2 Remove the old fuse from the fuseholder Step 3 Install the new fuse in the fuseholder Step 4 Replace the fusehol...

Отзывы: