EUROCOM 8880 Dream Machine Скачать руководство пользователя страница 110

Advanced Controls

Enabling Power Options 3 - 21

3

Configuring the Power Button

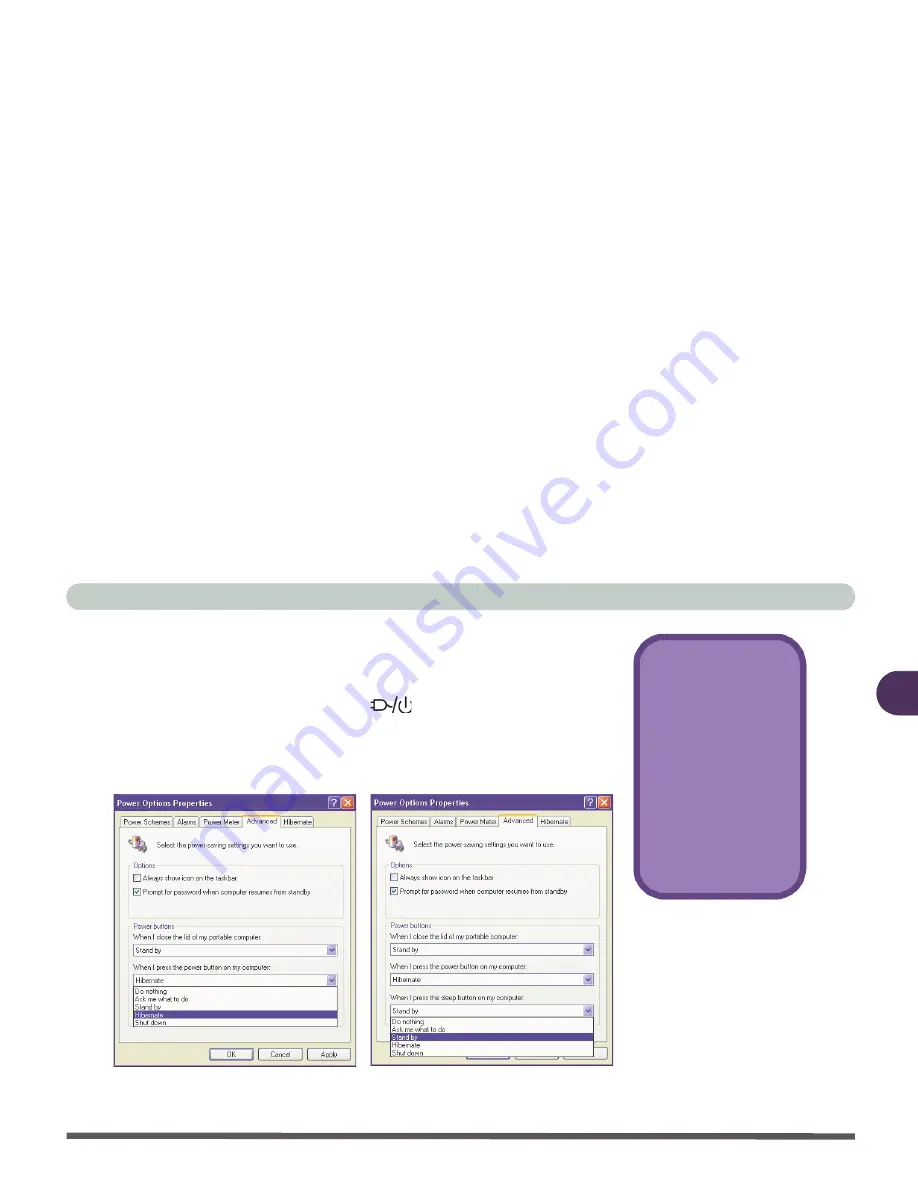
The power button may be set to send the computer in to either 

Stand-

by

 or 

Hibernate

 modes (

Figure 3 - 12

). If you are running on battery

power, in 

Standby

 mode the LED 

 will flash green, in 

Hiber-

nate

 mode the LED will be off. If you are in a power saving mode

set to save power through individual components (e.g. hard disk,
monitor), the LED will remain green.

Suspend/Resume 

Button

You may also config-
ure the 

Suspend/

Resume

 key (

Fn +

Esc)

 from the menu il-

lustrated in 

Figure 3 -

12

. In 

Windows

 this

key is referred to as
the 

Sleep

 button.

Figure 3 - 12

Power Options

(Advanced - 

Power Buttons)

Power Button

Suspend/Resume(Sleep)Button

Содержание 8880 Dream Machine

Страница 1: ......

Страница 2: ...age resulting from the use or misuse of this publication This publication and any accompanying software may not in whole or in part be reproduced translated transmitted or reduced to any machine reada...

Страница 3: ...d other rights owners Use of this copyright protection technology must be authorized by Macrovision Corporation and is intended for home or other limited viewing uses only unless otherwise authorized...

Страница 4: ...f this equipment does cause harmful interference to radio or televi sion reception which can be determined by turning the equipment off and on the user is encouraged to try to correct the interference...

Страница 5: ...Avoid using a telephone other than a cordless type during an electrical storm There may be a remote risk of electrical shock from lightning 3 Do not use the telephone to report a gas leak in the vicin...

Страница 6: ...auf s il s agit d un appareil sans fil pen dant un orage lectrique Ceci peut pr senter un risque de choc lec trique caus par la foudre 3 Ne pas utiliser l appareil t l phonique pour signaler une fuite...

Страница 7: ...from any kind of heating element Keep the computer out of direct sunlight Don t store or use the computer in a humid envi ronment Do not place the computer on any surface which will block the vents 3...

Страница 8: ...en the computer is on Do not disassemble the computer by yourself Remember to periodically save your data as data may be lost if the battery is depleted Perform routine maintenance on your computer 6...

Страница 9: ...ctrician install one When you want to unplug the power cord be sure to disconnect it by the plug head not by its wire Make sure the socket and any extension cord s you use can support the total curren...

Страница 10: ...discarded Keep the battery away from metal appliances Affix tape to the battery contacts before disposing of the battery Do not touch the battery contacts with your hands or metal objects Battery Dis...

Страница 11: ...cing to authorized service personnel Unplug the computer from the power supply Then refer servicing to quali fied service personnel under any of the following conditions When the power cord or AC DC a...

Страница 12: ...es from 100 to 240 volts so you won t need a second voltage adapter However check with your travel agent to see if you need any socket adapters 6 Put the notebook in its carrying bag and secure it wit...

Страница 13: ...it with normal luggage Bag gage handlers may not be sufficiently careful Avoid knocking the computer against hard objects Beware of Electromagnetic fields Metal detectors X ray machines These devices...

Страница 14: ...verhead compartment make sure it s secure Contents may shift and or fall out when the compartment is opened Get power where you can If an electrical outlet is available use the AC adapter and keep you...

Страница 15: ...height of the chair and or desk so that the keyboard is at or slightly below the level of your elbow Keep your forearms wrists and hands in a relaxed position Your knees should be slightly higher tha...

Страница 16: ...Alter your posture frequently Stretch and exercise your body several times a day Take periodic breaks when you work at the computer for long periods of time Frequent and short breaks are better than f...

Страница 17: ...the display to avoid glare or reflections from overhead light ing or outside sources of light Keep the display screen clean and set the brightness and contrast to levels that allow you to see the scr...

Страница 18: ...for Care and Operation VI Power Safety VIII Battery Precautions IX Cleaning X Servicing X Travel Considerations XI Introduction 1 1 Overview 1 1 The Manual 1 2 Advanced Users 1 2 Beginners and Not So...

Страница 19: ...1 9 Microphone 1 9 Hot Key Buttons 1 9 LED Status Indicators 1 10 Power Button 1 10 Close Cover Switch 1 11 Keyboard 1 11 TouchPad Buttons 1 11 Front View 1 12 Stereo Speakers 1 13 Left Side View 1 14...

Страница 20: ...ear View 1 22 DC In Jack 1 22 Four USB Ports 1 23 S Video In Port Optional with TV Tuner installed 1 23 S Video Out Port 1 23 External Monitor CRT Port 1 24 Coaxial TV Antenna Input 1 24 Serial Port 1...

Страница 21: ...4 Proper handling of the Battery Pack 2 4 Turning on the Computer 2 5 LED Indicators 2 6 LED Power Battery E Mail Status Indicators 2 7 LED Status Indicators 2 8 Check Mail Program 2 9 The Hard Disk...

Страница 22: ...s 2 20 Function Keys 2 22 The Numeric Keypad 2 23 Function Keys and Numeric Keypad 2 24 TouchPad and Buttons 2 25 Configuring the TouchPad and Buttons 2 26 Mouse 2 27 Adding a Printer 2 28 USB Printer...

Страница 23: ...splay 3 14 Power Management Features 3 15 Advanced Configuration and Power Interface ACPI 3 15 Advanced Power Management APM 1 2 3 15 Enabling Power Options 3 16 Conserving Power Through Individual Co...

Страница 24: ...es 3 24 Removing and Replacing the Battery 3 25 Audio DJ CD Player 3 26 Audio DJ CD Player Controls Power On 3 28 Configuring the Infrared Settings for FIR 3 32 Drivers Utilities 4 1 Overview 4 1 What...

Страница 25: ...s LAN Win2000 4 11 IP Sharing Module Win2000 4 11 Check Mail Win2000 4 12 Windows XP 4 13 Chipset WinXP 4 13 Audio WinXP 4 13 Modem Win XP 4 14 LAN Win XP 4 15 Video WinXP 4 15 TouchPad WinXP 4 15 Mem...

Страница 26: ...p 5 6 SCU Menu 5 7 Working with the Menu Bar 5 8 Working with the Pull Down Menu 5 9 Working with Sub Menus 5 10 Startup Menu 5 12 Fast Boot Startup Menu 5 13 Boot Device Startup Menu 5 13 Display Sta...

Страница 27: ...6 5 TV Tuner 6 7 Installing the TV Tuner 6 8 IP Sharing Module 6 10 Cable Connections 6 11 Computer Setup 6 12 Windows 2000 Setup 6 13 Windows XP Setup 6 14 Checking the Internet Connection 6 15 Upgra...

Страница 28: ...7 13 Some Things to Watch Out For 7 16 Software 7 16 Setting Up a New HDD 7 16 Upgrading the System Memory 7 17 Removing the Keyboard 7 18 Upgrading the Processor 7 23 Troubleshooting 8 1 Overview 8...

Страница 29: ...CD Device 8 23 PC Card 8 26 Keyboard and Mouse 8 27 Printer 8 28 Operation 8 31 Glossary G 1 Appendix A Specifications A 1 Processor A 1 Core Logic A 1 Structure A 1 Security A 1 Memory A 2 BIOS A 2 L...

Страница 30: ...Preface XXIX Interface A 5 Communication A 6 Power Management A 6 Power A 6 Indicators A 7 Environmental Spec A 7 Physical Dimensions A 7 Weight A 7 Optional A 8...

Страница 31: ...Preface XXX...

Страница 32: ...Introduction Overview 1 1 1 Chapter 1 Introduction Overview What this chapter covers The Manual how to use it Quick Start Guide the minimum you need to know System Map navigating around your computer...

Страница 33: ...notes marked with a 5 of interest to you Beginners and Not So Advanced Users If you are new to computers or do not have an advanced knowledge of them then you should try to look through all the docum...

Страница 34: ...al 1 3 1 Warning Boxes No matter what your level please pay careful attention to the warning and safety information indicated by the symbol Also please note the safety and handling instructions as ind...

Страница 35: ...ams If you have questions about the operating systems or programs then please consult the ap propriate manuals System Software Your computer may already come with system software pre in stalled Where...

Страница 36: ...x Before you begin please follow the safety instructions in the Preface 1 Remove all packing materials CD s DVD s floppy disks and any PC Cards 2 Securely attach any peripherals you want to use with t...

Страница 37: ...ting system Further explanations of the various subsystems are covered in the chapter or pages indicated Getting to Know Your Computer The following graphics will help you to become familiar with the...

Страница 38: ...ight to release the top cover 3 Lift the top cover to reveal the LCD panel and keyboard 4 Adjust the LCD panel to a comfortable viewing angle 5 The LED indicators 2 show the power and battery status o...

Страница 39: ...en Figure 1 3 Top View with LCD Panel Open 1 LCD 2 LED Power Battery E Mail Status Indi cators 3 Built In Microphone 4 Hot Key buttons 5 LED Status Indicators 6 Power Button 7 Close Cover Switch 8 Key...

Страница 40: ...play the system power status and battery status of the computer The third indicator may be configured to give a vi sual confirmation when e mail is received in the default e mail pro gram Microphone R...

Страница 41: ...as a suspend resume key once configured as such in the power management control panel of your operating system Configuring the Power Button on page 3 21 Shutdown Please note that you should always sh...

Страница 42: ...s the same features as a full sized desktop keyboard and can easily be replaced with a different language keyboard should you de sire TouchPad Buttons The pointing device features a sensitive glide pa...

Страница 43: ...running then control for all CD s is handed over to the operating system s software controller see Audio DJ CD Player Controls Power On on page 3 28 however the CD Player s volume controls can still b...

Страница 44: ...peakers Two built in speakers provide rich stereo sound Sound Volume Adjustment The Volume controls on the Audio DJ player still control the volume set tings if the computer s operating system is runn...

Страница 45: ...to connect your DVD capable PC to a Dolby AC 3 compatible receiver for 5 1 or dts surround sound 2 3 4 1 5 6 7 8 9 10 8 Figure 1 5 Left Side View 1 S PDIF Out Port 2 Microphone In Jack 3 Line In Jack...

Страница 46: ...r and another similarly equipped device and is 4M bps FIR IrDA 1 1 compliant For further information please refer to the man ual of the device you wish to connect see Configuring the Infra red Setting...

Страница 47: ...ts or the slot may be used for one Type III PC card PC cards were also previously referred to as PC MCIA Refer to The PC Card Slot on page 2 18 for more in formation 3 5 FDD Floppy Disk Drive This is...

Страница 48: ...ing on the configuration purchased DVD ROM CD ROM CD RW and DVD ROM Combo drive CD RW The modular drive bay Bay Two will have ONE of the following fixed devices depending on the configuration purchase...

Страница 49: ...Bay Two For more information on using the drive please refer to The CD DVD Device on page 2 14 1 CD ROM or DVD label to indicate which type 2 Busy Indicator 3 Emergency eject hole 4 Open button CD Em...

Страница 50: ...13 for information on upgrading replacing your hard disk drive IP Sharing Module The optional IP sharing module allows you to share your xDSL or cable modem internet connection with up to 4 other com...

Страница 51: ...k computer powered by 2 AAA bat teries and includes a headphone socket and a mini USB port see The MP3 Player on page 6 2 Software Installation Warning Make sure the MP3 player is not in the slot when...

Страница 52: ...em Map 1 21 1 Vent This enables airflow to prevent the notebook from overheating Security Lock To prevent possible theft a Kensington type lock can be attached to this slot Locks can be purchased at a...

Страница 53: ...DC In Jack 2 4 USB Ports 3 S Video In Port Optional 4 S Video Out Port 5 External Monitor CRT Port 6 Coaxial TV Antenna Input Optional 7 Serial Port 8 IEEE 1394 Port 9 Parallel Port 10 PS 2 Type Port...

Страница 54: ...nal TV Tuner installed you may plug in ex ternal video sources to this port Examples of sources include VCR s VCD players TV s external DVD s video cameras etc The cable from the source device should...

Страница 55: ...chased the optional TV Tuner module with your note book computer the 75 Ohm Coaxial TV Antenna Input will allow you to connect your cable TV TV antenna to watch television and capture still images on...

Страница 56: ...cameras see note below Printer Parallel Port This port supports ECP Extended Capabilities Port and EPP En hanced Parallel Port 1 7 1 9 modes PS 2 Type Port Connect an external PS 2 type mouse or keyb...

Страница 57: ...k functions Note Broadband e g ADSL modems usually connect to the LAN port RJ 11 Phone Jack This port connects to the built in modem You may plug the tele phone line directly into this RJ 11 telephone...

Страница 58: ...ery the primary HDD is located under the battery 4 Primary Hard Disk 5 Changeable Drive Bay 3 for TV Tuner or HDD 6 Modular Drive Bay 2 7 Primary Drive Bay 1 7 1 1 2 4 3 5 6 3 CPU The CPU is not a use...

Страница 59: ...Your notebook computer may have an optional Mini PCI Wireless Networking module If included the antennae and other components are not externally visible Should you need to install a driver for this ca...

Страница 60: ...earn more about using your computer please read this chapter This chapter includes The Power Sources Turning on the Computer LED Indicators The Hard Disk Drive The Floppy Disk Drive The CD DVD Device...

Страница 61: ...tach the AC adapter to the DC in jack at the rear of the com puter 2 Plug the AC power cord into an outlet then connect the AC power cord to the AC adapter 3 Raise the lid LCD to a comfortable viewing...

Страница 62: ...nd the configuration you re using To increase battery life let the battery discharge completely before re charging We recommend leaving the battery inside the notebook at all times For more informatio...

Страница 63: ...y When the computer is turned off but plugged into an electri cal outlet battery charge time is less refer to LED Indicators on page 2 6 for information on the battery charge status Proper handling of...

Страница 64: ...ows Control Panel to configure this feature 5 Power Button as Standby or Hibernate Button If you are using an ACPI compliant OS such as Windows 2000 Professional or Win dows XP the power button can be...

Страница 65: ...ndicators and LED Status Indicators on your com puter that will display helpful information about the current status of the computer The LED Power Battery E Mail Status Indicators are also vis ible wh...

Страница 66: ...ng Green The computer is in suspend mode Green The battery is being charged Orange The battery is fully charged Blinking Orange The battery has reached critically low power status Blinking Green There...

Страница 67: ...ll display the system s operational status Icon Color Description Green Floppy Hard disk CD Device activity Green Number Lock is activated Green Caps Lock is activated Green Scroll Lock is activated S...

Страница 68: ...ve notification when new mail is received You must be online to re ceive this notification note that this program only supports the POP3 protocol and your default mail program does not need to be open...

Страница 69: ...eep the settings and Hide to minimize the program After clicking Hide the program will be accessible by double clicking the icon in the taskbar If you click the close icon in the Check Mail control pa...

Страница 70: ...nable an audible warning for received mail by click ing on Set Mail Wave and browsing to a WAV sound file to use for mail notification Click Enable play wave for mail arrival and SAVE to save the sett...

Страница 71: ...rchased The hard disk 1 is accessible from the bottom of your computer un der the battery as seen below Further details on removing and in serting the hard disk are available in Upgrading the Primary...

Страница 72: ...BIOS refer to Boot Device Startup Menu on page 5 13 Inserting Removing Floppy Disks When using the floppy drive always insert your floppy diskette with the label side facing up To remove the inserted...

Страница 73: ...side facing up use just enough force for the disc to click onto the tray s spindle Gently push the CD DVD tray in until its lock clicks and you are ready to start The Busy Indicator will light up whil...

Страница 74: ...rface with a pen Do not attach paper or other materials to the surface of the disc Do not store or place the CD or DVD in high temperature areas Do not use benzene thinner or other cleaners to clean t...

Страница 75: ...etection is device dependent not OS dependent You can select your module s region code 5 times The fifth selection is permanent This cannot be altered even if you change your operating system or you u...

Страница 76: ...the Properties menu and select the DVD Region tab to bring up the control panel as seen in DVD Regional Codes Windows XP on page 2 16 DVD Regional Coding Region Geographical Location 1 USA Canada 2 W...

Страница 77: ...for two type II PC cards or one type III PC card Type III PC cards only fit into the lower socket Inserting and Removing PC Cards Align the PC Card with the slot and push the PC Card in until it lock...

Страница 78: ...and the function key combinations on the keyboard Hot Key Buttons These keys access the internet e mail or a user defined application with one quick button press To use the user defined Hot Key you m...

Страница 79: ...ey Function Activate the default e mail program Activate the default Internet browser Activate the user specified application e g Microsoft Word or Excel Non Default E Mail and Browser Programs It is...

Страница 80: ...tory where the desired application exe see the sidebar program exists 5 Double Click on the program file or choose Open 6 The Hot Key is now set to execute that program Application exe You will need t...

Страница 81: ...ys Description Fn Z Turn audio on off Fn Esc Toggle between suspend resume state Fn F6 Toggle between CRT LCD LCD and CRT Fn F9 Decrease LCD brightness Fn F10 Increase LCD brightness Fn F11 Decrease a...

Страница 82: ...ber Lock is en abled or not by looking at the LED status indicators see LED Sta tus Indicators on page 2 8 You can configure the BIOS to have Number Lock enabled when you start up the computer see Com...

Страница 83: ...ure 2 14 Function Keys Numeric Keypad 1 Fn Key 2 Audio ON OFF Toggle 3 Suspend Resume state Toggle 4 CRT LCD LCD and CRT Toggle 5 LCD Brightness Decrease 6 LCD Brightness Increase 7 Audio Volume Decre...

Страница 84: ...sitive glide pad for precise move ments It functions the same way as a two button mouse the central Rocker Switch may be configured to function as a third button if you prefer The right TouchPad butto...

Страница 85: ...uchPad drivers see What to In stall on page 4 2 you can configure the functions from the TouchPad driver icon on the taskbar You may then configure the TouchPad tracking buttons and Rocker Switch etc...

Страница 86: ...through the PS 2 interface or the USB ports at the rear of the computer Mouse Driver If you are using an ex ternal mouse your op erating system may be able to auto configure your mouse during its inst...

Страница 87: ...a USB interface connection There are four USB ports on your notebook computer and you may use any one of the ports to connect the printer Install Instructions 1 Set up the printer according to its ins...

Страница 88: ...2 Attach the parallel cable to the printer 3 Connect the printer s parallel cable to the parallel port at the rear of the computer see Rear View on page 1 22 4 Turn ON the printer 5 Turn ON the compu...

Страница 89: ...Using The Computer 2 30 2...

Страница 90: ...ement features The Audio DJ CD player Drivers You are unable to use most advanced con trols until the neces sary drivers and utilities are properly in stalled your service representative may have alre...

Страница 91: ...just it so you can look at the screen straight on without any glare If necessary adjust the brightness controls Fn F9 F10 as in Figure 3 1 Protecting the LCD Do not allow any for eign objects i e pape...

Страница 92: ...our operating system The driver interface shows the available options You can switch display devices from the Display Properties control panel in Windows as long as the video driver is installed What...

Страница 93: ...o Settings and click Control Panel 2 Double click Display icon 3 In the Display Properties dialog box click Settings tab 4 In Screen area resolution move the slider to the preferred setting for resolu...

Страница 94: ...ols 3 5 3 When the Display Properties control panel is open click the Ad vanced button to bring up the options tabs Clicking through these tabs allows you to make any video adjustments you require Fig...

Страница 95: ...river Controls 3 Access the menus from ATI taskbar to get further help on display op tions TV options etc Right click the ATI icon in the taskbar and point to Help or Troubleshooting Figure 3 4 Figure...

Страница 96: ...ideo connector Drivers You are unable to use most advanced con trols until the neces sary drivers and utilities are properly in stalled If your system hasn t been properly configured your serv ice rep...

Страница 97: ...Refresh Rate The vertical refresh rate of your CRT is impor tant If it is too low and or you re using fluores cent lighting the screen will appear to flicker To reduce flickering on a CRT use faster...

Страница 98: ...ot Available Single Either the LCD CRT or TV as a display device Multiple Clone The LCD CRT or TV outputting the same view you can apply different display modes with different resolutions and refresh...

Страница 99: ...ge 3 5 click on Display to get the other display options including those for TV different OS s will appear with different options Click the enable disable button for the display device you wish to use...

Страница 100: ...the other display s This mode will drive multiple dis plays with the same content Use this feature to display the screen through a projector for a presentation Each display device can be configured in...

Страница 101: ...Go to the Advanced Display Settings see Advanced Display Properties on page 3 5 3 Select the Displays tab see Displays Tab on page 3 10 4 Click the enable disable button for the display device you wis...

Страница 102: ...r from the Display pop up menu and click Ex tend my Windows desktop onto this monitor With the Extended Desktop Mode enabled drag any icons or windows across to the oth er display desktop It is theref...

Страница 103: ...ed to enable the TV display from the control panel in see Figure 3 6 Displays Tab on page 3 10 Further help is available to help you troubleshoot your TV connec tion through the menus accessed from th...

Страница 104: ...ect control over the power and thermal states of devices and processors For ex ample it enables the OS to set devices into low power states based on user settings and information from applications ACP...

Страница 105: ...ur documenta tion You may conserve power through individual components or throughout the whole system 5 BIOS Settings You may use the Pow er Savings settings to manage power in the BIOS This is especi...

Страница 106: ...fied time Hard Disk Standby The computer s hard disk motor will be turned off if the hard disk drive has not been accessed for a specified period of time If the sys tem reads or writes data the hard...

Страница 107: ...utdown Hibernate Mode and Shutdown are the same in that the system is off and you need to press the power button to turn it on Their main difference is When you come back from hibernation you can retu...

Страница 108: ...le at its slowest speed All open applica tions are retained in memory When you are not using your computer for a certain length of time which you specify in the operating sys tem it will enter Standby...

Страница 109: ...it saves the most power it takes the longest time to return to full operation You can set your notebook to automatically enter Hibernate mode when the bat tery power is almost depleted The system wil...

Страница 110: ...flash green in Hiber nate mode the LED will be off If you are in a power saving mode set to save power through individual components e g hard disk monitor the LED will remain green Suspend Resume Butt...

Страница 111: ...g and peripheral devices attached Power Options settings in the OS will help prolong the bat tery life if configured appropriately Battery life may be shortened through improper maintenance To op timi...

Страница 112: ...low just let the com puter use up all of the battery power and shut down on its own it is best to disable the Power Options functions in the Control Panel As the battery nears the end of its life clos...

Страница 113: ...vices Different applications and external devices consume battery power even when they are not being used To conserve battery power we recommend Closing modem or communication applications when they a...

Страница 114: ...ld last a long time However there may be times when you are required to remove swap or replace the battery In these cases please follow these instructions 1 Shut the computer down and turn it over 2 R...

Страница 115: ...ly place an audio CD disc onto the disc tray with label side facing up DVD drives will also play audio CD s 5 Gently push the CD DVD tray in until its lock clicks and you are ready to start 6 The Busy...

Страница 116: ...volume can be set de pends on the setting of the volume control within Windows Click the Speaker icon on the taskbar to check the setting The volume controls on the Audio DJ player still control the v...

Страница 117: ...udio DJ Player controls will allow you to control over various media players in Windows The actual functions available will depend on the application used Function Key Win 2000 Built In CD Player CD P...

Страница 118: ...Controls Audio DJ CD Player 3 29 3 Function Key WinXP Built In Media Player Windows System Volume Up Windows System Volume Down Play Pause Stop Next Track Previous Track Table 3 3 Audio DJ Function Ke...

Страница 119: ...ontrols 3 30 Audio DJ CD Player 3 Function Key InterVideo WinDVD Windows System Volume Up Windows System Volume Down Play Pause Stop Next Track Previous Track Table 3 4 Audio DJ Function Keys InterVid...

Страница 120: ...ced Controls Audio DJ CD Player 3 31 3 Function Key Power DVD Player Windows System Volume Up Windows System Volume Down Play Pause Stop Next Track Previous Track Table 3 5 Audio DJ Function Keys Powe...

Страница 121: ...ck Hardware tab and click the properties button then click the Advanced tab 4 Select Infrared Transceiver A and change the Value to HP HSDL 2300 3600 5 Click OK OK 6 Restart the computer if prompted t...

Страница 122: ...ome of the system components won t be auto configured with an appropriate driver or utility during operating system installation Instead you need to manually install some system required drivers and u...

Страница 123: ...D You will notice that many of the instructions for driver installation require you to Navigate Browse to D In this case D is the drive specified for your CD device Not all computers are setup the sam...

Страница 124: ...message in cases where the driver has been released after the version of Windows you are currently using All the drivers provided will have already received certification for Windows Version Conflict...

Страница 125: ...Driver Installation l Feature Win 2000 Chipset page 4 6 Audio page 4 6 Modem page 4 7 LAN page 4 8 Video page 4 8 TouchPad page 4 8 PCMCIA page 4 9 Memory Stick page 4 10 Hot Key page 4 11 Wireless L...

Страница 126: ...ows XP Driver Installation Feature Win XP Chipset page 4 13 Audio page 4 13 Modem page 4 14 LAN page 4 15 Video page 4 15 TouchPad page 4 15 Memory Stick page 4 16 Hot Key page 4 17 Wireless LAN page...

Страница 127: ...riv ers Audio Setup exe and click OK 3 Click Next 4 Click Finish to restart your computer 5 Go to the Sounds Multimedia Con trol Panel Start Menu and point to Set tings and click Control Panel then do...

Страница 128: ...h for a suitable driver for my device recommended and click Next 5 Select ONLY make sure the other boxes do not have a tick inside them Specify a location and click Next 6 Navigate Browse to D Driv er...

Страница 129: ...ck OK 3 To continue click Next Yes Express click Yes if asked if you want to con tinue at any time 4 Click Finish to restart your computer TouchPad Win2000 1 Click Start menu Run 2 Navigate Browse to...

Страница 130: ...oller items and click the Driver tab 4 Click the Update Driver button 5 Click Next 6 When the Update Device Driver Wizard appears click Next make sure that you have selected Search for a suitable driv...

Страница 131: ...ick Unknown Device and click Reinstall Driver button 4 When the Upgrade Device Driver Wizard appears click Next 5 Select Search for a suitable driver for my device recommended and click Next 6 Select...

Страница 132: ...Wire less Lan GemtekMiniPCI exe and click OK 3 Click Next Next Yes IP Sharing Module Win2000 1 Click Start menu Run 2 Navigate Browse to D Drivers IP Share AUTORUN EXE and click OK 3 Click the Instal...

Страница 133: ...Start menu Run 2 Navigate Browse to D DRIVERS E mail LED SETUP EXE and click OK 3 To continue click OK then click the but ton 4 Click Continue OK 5 Click Yes to restart your computer 6 The program wi...

Страница 134: ...3 To continue click Next 4 Click Finish to restart your computer 5 Go to the Sounds Audio Devices con trol panel Start Menu and point to Set tings and click Control Panel then double click the Sounds...

Страница 135: ...n click Device Manager button 4 Click next to Other Devices if its sub items are not shown 5 Double click PCI Modem and click Reinstall Driver button 6 When the Hardware Update Wizard appears click In...

Страница 136: ...P 1 Click Start menu Run 2 Navigate Browse to D Drivers VGA Setup exe and click OK 3 To continue click Next Yes Express 4 Click Finish to restart your computer TouchPad WinXP 1 Click Start menu Run 2...

Страница 137: ...n to Proper ties and click on it go to step 3 3 Click the Hardware tab then click Device Manager button 4 Click next to Other devices if its sub items are not shown 5 Double click Unknown Device and c...

Страница 138: ...s Lan GemtekMiniPCI exe and click OK 3 Click Next Next Yes IP Sharing Module WinXP 1 Click Start menu Run 2 Navigate Browse to D Drivers IP Share AUTORUN EXE and click OK 3 Click the Install Wizard an...

Страница 139: ...Run 2 Navigate Browse to D Drivers E mail LED SETUP EXE and click OK 3 To continue click OK then click the install button 4 Click Continue OK 5 Click Yes to restart your computer 6 The program will ru...

Страница 140: ...re to your chosen operating system and provides an interface between the two The BIOS includes the POST Power On Self Test and the SCU System Configuration Utility The POST performs diagnostic procedu...

Страница 141: ...the original settings found in the SCU Even if you are a begin ner keep a record of the settings you find and any changes you make This information could be useful if your system ever needs servicing...

Страница 142: ...As the POST proceeds the computer will tell you if there is anything wrong If there is a problem which prevents the system from booting it will display a system summary and prompt you to run Setup If...

Страница 143: ...v 003h Complete L2 Cache 256K installed 64MB Video RAM SysteSoft Plug n Play BIOS Ver 1 17 01 Base Memory 0000640 KB Extended Memory 0261120 KB Total Memory 0262144 KB Auto Detecting IDE Devices Done...

Страница 144: ...center as soon as possible Non Fatal Errors This kind of error still allows you to boot You will get a message identifying the problem make a note of this message followed by the prompt Press F1 to re...

Страница 145: ...Figure 5 1 is usu ally present for a few seconds after you turn on the system If you get a Keyboard Error usually because you pressed Ctrl Alt S too quickly just press Ctrl Alt S again If the compute...

Страница 146: ...n on your par ticular computer may appear a little different ly Figure 5 2 SCU Menu SystemSoft SCU For Intel 845MP chipset Apr 10 2002 9 40 02 am Press Alt key to activate menus and cursor keys to nav...

Страница 147: ...SCU or alternatively you can use the following key combinations Keys Action Alt Activates the menu bar Left arrow Right arrow JI Type the highlighted letters Selects an option in the menu bar Left mou...

Страница 148: ...r item is highlighted press Enter or left click with the mouse to see the pull down menu items The follow ing keys allow you to move about the pull down menu Keys Action Down Up arrows LK Changes the...

Страница 149: ...ll be displayed Navigate through these screens by using the keys in the table below Keys Action Tab Moves from one field to another Down Up arrows LK Selects an item within the field Spacebar Enables...

Страница 150: ...mber that most of your settings will be overridden by those of your operating system see BIOS Settings V s OS Settings on page 5 6 Once again There is one general rule Don t make any changes unless yo...

Страница 151: ...mory Floppy Drive A 1 44MB Hard Drive C 20005MB Hard Drive D 0 MB Hard Drive E 0 MB Hard Drive F 0 MB 3IRQ 7 Serial Port 2 COM 2 2F8 IRQ 7 CPU Clock 1500MHz Base 640 KB Extended 130048 KB Shadow 64 KB...

Страница 152: ...the dis kette A first then the CD ROM Drive CD device and lastly the Hard Disk C In most cases your computer boots starts up from the hard disk There are cases where you may want to Boot from a floppy...

Страница 153: ...and for access to the SCU to make changes SCU pass word See the sidebar for a warning on setting the password Other settings Startup Menu The other settings in this menu allow the enabling disabling...

Страница 154: ...ange values Alt key activates accelerators System Memory Floppy Drive A 1 44MB Hard Drive C 20005MB Hard Drive D 0 MB Hard Drive E 0 MB Hard Drive F 0 MB Se Serial Port 2 COM 2 Pa 2F8 IRQ 3p CPU Clock...

Страница 155: ...pport this mode System Memory Floppy Drive A 1 44MB Hard Drive C 20005MB Hard Drive D 0 MB Hard Drive E 0 MB Hard Drive F 0 MB Serial Port 1 COM 1 3F8 IRQ 4 Serial Port 2 COM 2 2F8 IRQ 3 Parallel Port...

Страница 156: ...nable all power saving features System Memory Floppy Drive A 1 44MB Hard Drive C 20005MB Hard Drive D 0 MB Hard Drive E 0 MB Hard Drive F 0 MB Serial Port 1 COM 1 3F8 IRQ 4 Serial Port 2 COM 2 2F8 IRQ...

Страница 157: ...stemSoft SCU For Intel 845MP chipset Apr 10 2002 9 40 02 am Save current settings and return to previous work System Memory Floppy Drive A 1 44MB Hard Drive C 20005MB Hard Drive D 0 MB Hard Drive E 0...

Страница 158: ...ending on the configura tion purchased If you are unsure please contact your service repra sentative The chapter includes information on the following The MP3 music player The TV Tuner The IP sharing...

Страница 159: ...C flash memory cards a mini USB port USB cable not supplied and headphone out jack headphones not included Figure 6 1 Right Side MP3 Player In Out 1 MP3 Player Slot 2 MP3 Player Release Switch 3 MP3 P...

Страница 160: ...the computer The player should be inserted with the control panels facing upwards as indicated in Figure 6 2 Windows will recognize the drive as a removable disk and assign it a letter according to t...

Страница 161: ...st the card to eject it Be careful not to do this while information is being written to or read from the card or you could lose data When the SD card MMC is in serted you may drag and drop files to an...

Страница 162: ...ou have downloaded and copied your MP3 files to the SD card MMC you may eject the player and use it as a standalone player running on battery power the player does not need to be powered on when inser...

Страница 163: ...e MP3 Player 6 Icon Description Headphone Out Jack Mini USB Port Secure Digital MMC Slot Power On Off Audio Volume Up Down Play Pause Stop Previous Track Next Track EQ Equalizer Toggle Table 6 1 MP3 P...

Страница 164: ...uide Please consult the guides for full in structions on how to use the TV Tuner and TV Studio software Make sure you install the software before connecting the coaxial ca ble to the TV antenna input...

Страница 165: ...computer on a clean stable surface and turn it over 3 Remove screws 1 3 Figure 6 6 4 Lift the cover 4 off the changeable drive bay and set it aside Line In Function with TV Tuner With the TV Tuner in...

Страница 166: ...ecure 7 Secure the model by inserting screws 3 6 8 Insert the cable connector 7 into the module 9 Replace the changeable drive bay cover and three screws 10 Insert the cable aerial 8 into the connecto...

Страница 167: ...ernet connection DHCP client and DHCP server allow you to complete the network configuration automatically The following pages give a quick guide to cabling and setup For full information on the IP sh...

Страница 168: ...ter Any other devices will con nect to one of the four ports on the IP sharing module When a device is connected the LED indicators will flash Figure 6 8 Ports LED s 1 RJ 45 LAN Jack 2 Four RJ45 dual...

Страница 169: ...ns are grouped by oper ating system For full setup and configuration instructions refer to the he accompanying manual and quick start guides on the Device Driv ers Utilities User s Manual CD ROM The f...

Страница 170: ...Options IP Sharing Module 6 13 6 Windows 2000 Setup 1 Go to My Computer Control Panel Network and Dial up Connections 2 Double click Local Area Connection Figure 6 9 Win 2000 Setup...

Страница 171: ...Options 6 14 IP Sharing Module 6 Windows XP Setup 1 Go to My Computer Control Panel Network and Internet Connections Network Connections 2 Double Click Local Area Connection Figure 6 10 Win XP Setup...

Страница 172: ...vice you must have Internet Explorer 4 01 or above installed To see if the IP Sharing device is visible on the local network go to Start Run PING 192 168 1 254 To check if this IP Sharing device is co...

Страница 173: ...Options 6 16 6...

Страница 174: ...rking with or repairing the internal components you will need to wear an antistatic wrist strap to ground yourself because stat ic electricity may damage the components The chapter includes Upgrading...

Страница 175: ...the correct environment you doubt your abilities Under any of these conditions contact your service representative to purchase or replace the component s Please make sure that you review each procedu...

Страница 176: ...y Bay One on the right front as you look at the left side of the com puter will depend on what configuration you purchased If you wish to change or upgrade this device follow this procedure 1 Turn the...

Страница 177: ...ing the Primary Drive Bay Bay One CD Device 7 5 Remove screw 1 6 Remove screws 2 5 7 Apply gentle pressure at point 6 to push the battery up and out of the computer 1 5 2 3 4 6 Figure 7 2 Battery Remo...

Страница 178: ...out of the bay you may need to use a screwdriver to do this 9 Slide the new device into the bay then secure it with screw 1 Figure 7 2 10 Replace the changeable drive bay cover and secure with the th...

Страница 179: ...side of the computer will depend on what con figuration you purchased If you wish to change or upgrade this de vice follow the same procedure as Upgrading the Primary Drive Bay Bay One CD Device on p...

Страница 180: ...removable case under battery bay and can be taken out to accommodate other 2 5 IDE hard disk drives with a height of 9 5 mm To upgrade the primary hard disk in your notebook please perform the followi...

Страница 181: ...ng the Primary Hard Disk 7 Removing the Battery 1 Shut the computer down and turn it over 2 Remove screws 1 4 3 Apply gentle pressure at point 5 to push the battery up and out of the computer Figure 7...

Страница 182: ...HDD assembly 2 Release the HDD connector cable 3 3 Remove the HDD assembly from the bay HDD Cables The illustrated HDD cable may differ from the one in your model depending on the con figuration purc...

Страница 183: ...r cable 7 Just reverse the removal procedure to install the new HDD assembly make sure you reconnect the cable before replacing the screws 1 2 in Figure 7 6 1 2 3 4 5 6 HDD Orientation Note the orient...

Страница 184: ...ular bay Bay Two on the left rear as you look at the left side of the computer follow the same procedure as Upgrading the Pri mary Drive Bay Bay One CD Device on page 7 3 In this case remove the screw...

Страница 185: ...in its place 1 Remove screws 1 4 and disconnect cable 5 2 Take the HDD assembly 6 out of the case 3 Remove screws 7 10 from the HDD assembly note the ori entation of the disk within the assembly brack...

Страница 186: ...under the computer can be used to house either the optional TV tuner or an optional hard disk drive To upgrade the hard disk in the changeable drive bay please perform the following steps 1 Turn the c...

Страница 187: ...omputer 7 14 Upgrading the Hard Disk in Bay Three 7 4 Lift the cover off the changeable drive bay and set it aside 5 Remove screws 1 4 6 Lift the HDD assembly out of the bay 1 2 3 4 Figure 7 11 HDD As...

Страница 188: ...g the Hard Disk in Bay Three 7 15 7 7 Remove screws 1 4 and the connector 5 to release the HDD from the case 8 Insert the new hard disk and reverse the procedures to install it Figure 7 12 HDD Case Sc...

Страница 189: ...ation instructions and install all necessary drivers and utilities as outlined in What to Install on page 4 2 HDD System Warning New HDD s are blank Before you begin make sure You have backed up any d...

Страница 190: ...ory Modules SO DIMM The main memory can be expanded up to 1024MB and accepts 128 256 512MB modules The total memory size is automatically detected by the POST routine once you turn on your computer To...

Страница 191: ...2 Press the two keyboard latches at the top of the keyboard to elevate the keyboard from its normal position as in Figure 7 14 you may need to use a small screwdriver to do this 3 Lift the keyboard up...

Страница 192: ...driver to gently pry the locking col lar away from its base when replacing the connection make sure the connector is oriented in the same way 5 Lift the keyboard away and carefully set it aside 6 Remo...

Страница 193: ...aced then remove it 9 Gently pull the latches 3 and 4 on the memory socket toward the front and rear of the computer as indicated in Fig ure 7 16 10 The module 5 will pop up and you can remove it 1 2...

Страница 194: ...ll only fit one way as defined by its pin alignment Make sure the module is seated as far into the slot as it will go DO NOT FORCE IT it should fit without much pressure 13 Press the module down towar...

Страница 195: ...suring the five tabs at the base of the keyboard fit into place you will find these under the Fn Spacebar 2 arrow and Enter keys see Figure 7 18 17 Carefully press the front of the keyboard down so th...

Страница 196: ...If you want to upgrade your computer by replacing the existing pro cessor with a faster new one you will need to contact your customer service representative We recommend that you do not do this your...

Страница 197: ...Upgrading The Computer 7 24 7...

Страница 198: ...s make sure you have followed the instructions carefully and observed the safety precautions in the preface If all else fails talk to your ser vice center You should also make a record of what happene...

Страница 199: ...p make sure it is actually working Connections Check all the cables to make sure that there are no lose connections anywhere Power Savings Make sure that the system is not in Hibernate or Standby mode...

Страница 200: ...e system is not set to external only display see Chapter 3 Attaching a Monitor CRT on page 3 8 Boot Drive Make sure there are no floppy disks in the drive when you start up your machine this is a com...

Страница 201: ...and OS as often as you can You may schedule these programs to run at times when you are not using your computer You can use those which are provided free with your OS or buy the more powerful dedicat...

Страница 202: ...urces you don t know Viruses are often triggered from within e mail attachments so take care when opening any attached file You can configure most Anti Virus pro grams to check all e mail attachments...

Страница 203: ...ng at the computer s manual but what about any new peripheral devices you have just purchased Many problems are caused by the installation of new hardware and or software Always refer to the documenta...

Страница 204: ...ge you just made and see if the problem still occurs Don t over complicate things The less you have to deal with then the easier the source of the problem may be found Example if your com puter has ma...

Страница 205: ...r incor rectly installed solution Check the battery bay make sure the battery is present and seated properly the design of the battery only allows it to go in one way Make sure there s nothing interfe...

Страница 206: ...moments before trying this con trol again possible cause There is a serious problem with the battery indicator The battery status LED is blinking green solution Turn the system off remove the battery...

Страница 207: ...y is too hot indicator The battery is warm to the touch solution Allow the battery to cool If this problem per sists make sure the vents aren t blocked and the computer isn t sitting on a thermal surf...

Страница 208: ...esn t cool it down put the system into Suspend mode or turn it off for an hour The battery pack will not charge possible cause The battery pack is exposed to an excessively hot or cold environment sol...

Страница 209: ...ery pack is exposed to an excessively hot or cold environment Place the battery in a suit able environment and after it returns to normal temperature try again solution The battery may be bad and may...

Страница 210: ...er Actual battery operating time is shorter than expected possible cause The battery is exposed to excessively high or low temperature solution Suitable operating conditions are between 5 C and 35 C p...

Страница 211: ...ipheral device or PC card is consuming a lot of power solution Turn off the unused device to save power possible cause Previously the battery was given only a partial charge solution Always fully char...

Страница 212: ...uspend key combination Fn Esc see Chapter 2 Function Keys on page 2 22 possible cause The screen controls need to be adjusted solution Toggle the screen control key combinations Fn F9 and F10 see Chap...

Страница 213: ...The screen saver is activated solution Press any key or touch the TouchPad to return to your display The screen is flickering possible cause The vertical refresh rate is insufficient on your external...

Страница 214: ...or too dim solution Adjust the position of the LCD LCD s are designed to be viewed straight on If the angle is wrong you may see glare from the screen s backlight possible cause The screen is dirty in...

Страница 215: ...cator The screen has ghost images even when it s off solution This problem is usually associated with external CRT monitors Use power saving options see Chapter 3 Monitor Standby on page 3 17 to turn...

Страница 216: ...e cause The computer is waking up from Hibernate mode Boot Password You forget the boot password solution If you forget the password you may have to dis charge the battery of the CMOS Contact your ser...

Страница 217: ...never intended for long term data storage and have a finite lifespan Do not store important files you wish to keep for a long time on floppy disks As a general rule it is worth reformatting floppy di...

Страница 218: ...he LCD of the player possible cause The computer is turned ON solution Check your computer is not turned on or run ning in a power saving mode and if it is then shut it down then toggle the ON OFF swi...

Страница 219: ...plugged into the wrong jack It should be plugged into the Line In Jack Line In Jack on page 1 15 3 Check the volume control settings on the Audio DJ player The line in cannot be used possible cause T...

Страница 220: ...isc is not correctly placed in the tray solution Gently try to remove the disc using the eject hole Loading Compact Discs on page 2 14 I can no longer change regional codes using the DVD utility possi...

Страница 221: ...c hardware or software solution Refer to your operating system manual for more information on the software and make sure you have the correct software installed for running video compact discs DVD s I...

Страница 222: ...e CD ROM drive prop erly installed and configured 2 The CD ROM drive is dirty Clean it with a CD ROM cleaner kit 3 There may be a problem with the disc hard ware or software Refer to your operating sy...

Страница 223: ...e cause The PC card driver is not installed indicator The system cannot access the card after it is installed solution Please read the documentation which comes with any new external device and make s...

Страница 224: ...stalled the driver to enable any extra functions solution Make sure you read the documentation which comes with any new external device and make sure you install the driver for it as this will allow y...

Страница 225: ...solution Check all connections and cables and the try to reinstall the driver possible cause The printer is not turned on or has an internal problem solution Make sure the printer is on You may refer...

Страница 226: ...ause The printer driver is not installed or is config ured incorrectly solution Check that the printer is properly installed and configured correct port etc Also check that you have installed the late...

Страница 227: ...t set in the BIOS doesn t correspond with the mode your printer can work with solution Please check your printer manual to find out which mode your printer uses Check that the settings in the BIOS see...

Страница 228: ...use The system s power saving features have timed out indicator The screen goes dark solution Use the AC adapter press the Fn Esc Sus pend key combination or press the Power But ton if no LED s are li...

Страница 229: ...2 The system never goes into hibernate mode possible cause Power Options features are not enabled solution Go to the Windows Power Options menu and enable the features you prefer see Chapter 3 Enabli...

Страница 230: ...for it as this will allow you to access any extra functions which come with your device possible cause The IrDA port is blocked solution Make sure nothing is between your system s IrDA port and the d...

Страница 231: ...Troubleshooting 8 34 Operation 8 possible cause The control IR settings are not configured cor rectly solution See Configuring the Infrared Settings for FIR on page 3 32...

Страница 232: ...vides a direct connection between the display adapter and mem ory application A program such as a word processor database or im age editor B BIOS Basic Input Output System An essential set of routines...

Страница 233: ...che When you cache something you improve the speed of access to it by moving it one stage closer to the CPU CardBus A 32 bit version of the PCMCIA PC Card standard CD ROM Compact Disc Read Only Memory...

Страница 234: ...rs DRAM The most common type of computer RAM called D RAM or DRAM driver A program that controls a device Every device whether it is a printer disk drive or keyboard must have a driver program DVD Ori...

Страница 235: ...B Gigabyte A unit of storage one gigabyte is equal to 1 024 megabytes H Hot key see function keys I interface Something that connects two separate things Hardware interface connects the computer to at...

Страница 236: ...KB Kilobyte A unit of storage one kilobyte is equal to 1024 bytes L LAN Local Area Network A communications network within a confined physical area It is made up of servers workstations a net work ope...

Страница 237: ...computer where information is stored on chips an example is RAM MHz One MHz represents one million cycles per second The speed of microprocessors called the clock speed is measured in megahertz MMX A...

Страница 238: ...comput ers and contain Nickel Metal Hydride P parallel port A socket on a computer used to connect a printer or other parallel device via the computer s parallel interface parallel printer A printer...

Страница 239: ...CIA is an acronym for Personal Computer Memory Card Inter national Association which is an international standards body and trade association that was founded to establish a standard for con necting p...

Страница 240: ...and cannot be altered ROM chips are used to store con trol routines in personal computers ROM BIOS peripheral control lers and other electronic equipment S SD Secure Digital Memory Cards SD memory ca...

Страница 241: ...Stick Sony s digital portable storage medium The Memory Sticks are used for storing and transferring images from digital cameras and digital music players to personal computers and laptops These will...

Страница 242: ...ace for low speed pe ripherals such as the keyboard mouse joystick scanner printer and telephony devices Devices are plugged directly into a four pin sock et on the PC utility A program that provides...

Страница 243: ...nsion to the PC Card PCMCIA standard that provides a high transfer rate for video applications on portable computers The ZV Port is built into the notebook computer and activated by plugging in an MPE...

Страница 244: ...fications Processor Intel Pentium 4 Processor 478 pin FC PGA2 package 1 5 1 6 1 7 1 8 1 9 2 0 2 1 2 2 2 3 2 4 GHz Core Logic Intel 845 ICH3 Structure Fully PC99 Compliant ACPI 1 0B Compliant PC2001 Co...

Страница 245: ...SODIMM Modules BIOS One 256KB Flash ROM Insyde BIOS with smart battery Plug and Play 1 0a ACPI 1 0B LCD 15 0 OR 15 7 1280 x 1024 SXGA TFT 15 0 1600 x1200 UXGA TFT Display 4 UltraAGP 64MB DDR graphic m...

Страница 246: ...wing DVD ROM 12 7mmH 24 CD ROM 24 CD RW Combo Drive DVD ROM CD RW Built in modular drive Bay Two for one of the following DVD ROM 12 7mmH 24 CD ROM 24 CD RW Combo Drive DVD ROM CD RW 3rd HDD IP sharin...

Страница 247: ...o Audio Built in microphone Audio DJ Advanced Wavetable Synthesizer 2 built in speakers Virtual AC3 Full Duplex Direct Sound 3D Accelerator Keyboard Win Key keyboard including a numeric keyboard Built...

Страница 248: ...arallel port LPT1 supporting ECP EPP 1 7 and 1 9 One COM port Fast Infrared FIR file transfer IrDA 1 1 One external CRT monitor One external keyboard mouse through Y cable PS 2 port One line in jack O...

Страница 249: ...K MDC modem V 90 compliant V 92 software driver upgradeable IP sharing module for xDSL or Cable Modem optional Power Management Supports ACPI v1 0B Supports APM v1 2 Soft Off by system power button Su...

Страница 250: ...g e mail Audio DJ control display power MP3 Audio Play Pause FWD RWD Stop Volume Volume EQ Environmental Spec Temperature Relative Humidity Operating 5 C 35 C Operating 20 80 Non Operating 20 C 60 C N...

Страница 251: ...ndix A A 8 A Optional DVD ROM Drive 12 7mmH CD RW Drive 12 7mmH Combo Drive DVD ROM and CD RW 12 7mmH Portable MP3 player Mini PCI Wireless LAN module Software DVD player IP sharing module TV Tuner mo...

Отзывы: