7. Operation
a) Attaching the anemometer to the tripod
• Start by attaching the anemometer to the tripod. Screw the threaded bolts on the top of the
tripod in a clockwise direction into the thread (8) on the bottom of the anemometer. Secure
the screw connection by tightening the plastic lock nut with your finger.
b) Setup
• Place the tripod in an open space. There should be no obstructions on any side. The wind
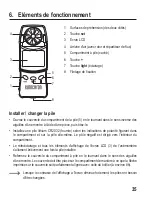
that you want to measure should have unimpeded access to the air inlet (4).
• Attach the wrist strap by pulling it through one of the slots to the left and right of the air inlet.
Once you have attached the strap, you can hold the anemometer in your hand without the
tripod and point it at the wind for quick measurements.
8. Using the anemometer
a) Turning the anemometer on/off
• Press and hold the set button (2) for approximately 2 seconds to turn on the device and the
LCD display (3). The backlight will turn on for a few seconds.
• Press and hold the set button (2) for approximately 4 seconds to turn off the device and the
LCD display. "OFF" will appear briefly on the LCD display.
• When a battery is inserted and atmospheric pressure/altitude mode is selected, the
anemometer will turn itself off automatically if it is not used for 24 hours.
• If the anemometer is in temperature/wind speed mode, it will turn off automatically after
30 minutes provided that the average wind speed is NULL (no wind and rotor movement).
b) Backlight
• Press and hold the light button (7) for approximately 2 seconds to turn on the backlight. The
backlight turns off automatically after approximately 8 seconds.
22

