background image

15 


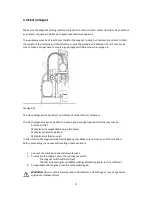
4.2 Morse taper spindle 


 [image 2-3] 


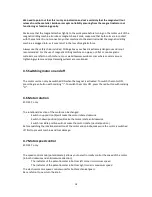
     [image 2-4] 


1.


Make sure the inside of the output shaft and the Morse Taper spindle are clean and free of 

grease 

2.


Align the coolant ring rotation limiter with the recess in the gearbox (A) 

3.


Firmly slide the Morse Taper spindle into the output shaft by hand (B). Make sure the spindle 

is properly positioned. You should not be able to pull it out by hand. 

4.


To remove the Morse Taper spindle 

-


Switch of the motor 

-


Rotate the mechanical gear switch to neutral (see chapter Gearbox) 

-


Rotate the output shaft until the slots on the shaft align with the slots on the gearbox 

-


Gently tap the supplied drift into the slots to push the Morse Taper arbor out 


Содержание ECO.55-A

Страница 1: ...Operators manual version 1 3 EN Serial no _______________________ Date of purchase _______________________ Magnetic drilling machine ECO 55 A ECO 55 TA ...

Страница 2: ...cts to help you be more productive Before operating your new magnetic drilling machine please read all instructions first These include the Operators Manual and warning label on the unit itself With proper use car and maintenance your model will provide you with years of effective hole drilling performance TO REDUCE THE RISK OF INJURY USER MUST READ AND UNDERSTAND ALL INSTRUCTIONS EUROBOOR BV Kryp...

Страница 3: ...14 4 1 Control panel 14 4 2 Morse taper spindle 15 4 3 Gearbox 16 4 4 Electromagnet 17 4 5 Switching motor on and off 18 4 6 Motor rotation 18 4 7 Motor speed control 18 4 8 Automatic functionality 19 4 9 LED display torque control 21 4 10 Temperature control 22 4 11 Tool lubrication 22 5 Working with operating tools 23 5 1 Annular cutters 23 5 2 Twist drills 25 5 3 Machine taps 26 5 4 Countersink...

Страница 4: ...etic drilling machine Distractions can cause you to lose control ELECTRICAL SAFETY 1 Magnetic drilling machine plugs must match the outlet Never modify the plug in any way Do not us any adapter plugs 2 Avoid body contact with grounded surfaces such as pipes radiators ranges and refrigerators There is an increased risk of electric shock if your body is grounded 3 Do not expose magnetic drilling mac...

Страница 5: ...r other practical way to secure and support the work piece to a stable platform Holding the work by hand or against your body is unstable and may lead to loss of control 4 Do not use machine if switch does not turn it on or off Any tool that cannot be controlled with the switch is dangerous and must be repaired 5 Disconnect the plug from the power source before making any adjustments changing acce...

Страница 6: ...ll accessories have been mounted correctly Always use the recommended speed for the accessories and the material Do not use the machine on the same work piece on which electric welders are being used Use only an appropriate cutting fluid We offer a range of premium cutting oils and lubricants which are specially developed and selected for optimum performance and maximum tool life Do not use liquid...

Страница 7: ...eather protected environment using the application tools and accessories recommended by EUROBOOR The magnetic drilling machine can be used horizontally vertically or overhead 2 2 Description and features image 1 1 1 LED display 2 Carbon brush cover 3 Gearbox guide 4 Magnet indicator 5 Speed control knob 6 Output shaft 7 Morse Taper spindle 8 Feed handle 9 Automatic feed motor 10 L R switch 11 Moto...

Страница 8: ...f safety glasses 1 Pair of gloves ECO 55 TA only 2 4 Serial number The serial number is mentioned on the machine 3 times engraved on the frame and magnet plus on the serial no sticker on the motor housing Additional serial no stickers are provided with the machine for your administration The serial number will help you and your sales point validate and identify the machine As example 055T1501001 b...

Страница 9: ...mm 19 5 16 26 490 660 mm 19 5 16 26 STROKE 170 mm 6 11 16 170 mm 6 11 16 WEIGHT 15 8 kg 35 lbs 15 8 kg 35 lbs MAGNET L x W x H 170 x 85 x 50 mm 6 1 16 x 3 3 8 x 1 7 8 170 x 85 x 50 mm 6 1 16 x 3 3 8 x 1 7 8 MAGNETIC FORCE 1850 kg 4100 lbs 1850 kg 4100 lbs MOTOR POWER 1600 W 14 5 A 1600 W 14 5 A TOTAL POWER 1700 W 15 6 A 1700 W 15 6 A SPEED I 275min 1 II 500min 1 I 60 275min 1 II 100 500min 1 SPIND...

Страница 10: ...ves of the European Community Class of protection I Product with basic insulation and exposed touchable conductive parts additionally connected to the protective earth conductor mm Millimeter Unit of measure for length width height or depth kg Kilogram Unit of measure for the mass V Volt Unit of measure for the electric voltage A Ampere Unit of measure for the electric current intensity W Watt Uni...

Страница 11: ...s and packaging allows materials to be recycled and used again Re use of recycled materials helps prevent environmental pollution and reduces the demand for raw materials Local regulations may provide for separate collection of electrical products from the household at municipal waste sites or by the retailer when you purchase a new product ...

Страница 12: ... guard in front of the magnet aligning the slots in the guard with the holes in the magnet 2 Fit the screws into the hole located in the side of the magnet WARNING Always use the Safety guard FITTING THE LUBRICATION SYSTEM The lubrication system can be used for horizontal drilling applications the drill being used vertically 1 Hang the coolant tank A on the coolant tank holder 2 Position and tight...

Страница 13: ...ditions or in presence of flammable liquids or gases This magnetic drilling machine is a professional power tool DO NOT let children come into contact with the machine Supervision is required when inexperienced operators use this machine ELECTRICAL SAFETY The electric motor has been designed for one voltage only Always check that the power supply corresponds to the voltage on the rating plate Your...

Страница 14: ...sconnect tool from power source before making any adjustments or removing installing attachments or accessories 4 1 Control panel The control panel on your magnetic drilling machine is designed for maximum operating facility and safety 1 L R Switch 2 Motor Switch 3 Magnet LED Indicator 4 Fuse holder with Fuse 5 Speed control knob 6 Magnet Switch ECO 55 TA only image 2 2 ...

Страница 15: ...e the Morse Taper spindle into the output shaft by hand B Make sure the spindle is properly positioned You should not be able to pull it out by hand 4 To remove the Morse Taper spindle Switch of the motor Rotate the mechanical gear switch to neutral see chapter Gearbox Rotate the output shaft until the slots on the shaft align with the slots on the gearbox Gently tap the supplied drift into the sl...

Страница 16: ...ou have trouble fully and correctly selecting a gear the gears in the gearbox might be misaligned Slightly rotating the output shaft by hand will help you align the gears and correctly and fully selecting the intended gear NOTE never touch moving machine parts 3 Speed selection for annular cutters also see plate on gearbox o Ø 27 55 mm Rotating speed 275min 1 ECO 55 A or 60 275min 1 ECO 55 TA oo Ø...

Страница 17: ...ness The electromagnet may not be able to create a good enough magnetic field Causes may be Surface not flat Workpiece not magnetizable e g aluminium Workpiece coated or painted Workpiece not thick enough In this situation the magnet indicator will light up red Make sure to solve any of these matters before proceeding in any way and creating unsafe situations 1 Connect the machine to the mains wor...

Страница 18: ... systems are mentioned 4 5 Switching motor on and off The motor unit can only be switched ON when the magnet is activated To switch the motor ON press the green button with marking I To switch the motor OFF press the red button with marking O 4 6 Motor rotation ECO 55 T only The rotational direction of the motor can be changed Switch in up position R will make the motor rotate clockwise Switch in ...

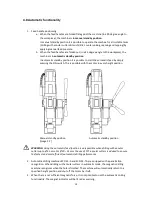
Страница 19: ...is is possible with the motor in every height position Manual standby position Automatic standby position image 2 7 WARNING Using the automatic feed function is only possible when drilling with annular cutters up to Ø 55 mm For Ø 30 55 mm the use of TCT annular cutters is advised to ensure the fastest and most efficient automatic drilling performance 2 Automatic drilling machines ECO 55 A and ECO ...

Страница 20: ...witch from manual to automatic mode and vice versa WARNING Always check if the situation before drilling in automatic mode is safe Stay close by to the machine and keep a close eye to the automatic drilling process to be ready to switch of the machine whenever there is need to ...

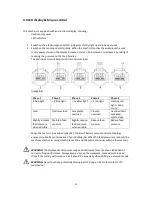
Страница 21: ...ble overload Close to overload Overload limit exceeded motor stops Slightly increase feed pressure when possible Maintain feed pressure Slightly reduce feed pressure when possible Reduce feed pressure Reduce feed pressure When the motor is in overload phase 5 the Smart Restart torque control technology ensures trouble free continuation of your drilling job When the feed pressure is reduced the mac...

Страница 22: ... fluid or oil 1 Make sure the flow regulator is closed 2 Unscrew the cap 3 Fill the container with cutting fluid or oil 4 Screw the cap back on Adjust the fluid flow as required using the flow regulator Add more cutting fluid if the shavings metal chips become blue VERTICAL AND OVERHEAD APPLICATIONS Dip the cutter in cutting paste or apply an appropriate spray WARNING Do not use the lubrication sy...

Страница 23: ...al showing similar physical properties The drilling conditions are dependent on requirements for tool life and surface finish These conditions are further restricted by the rigidity of the tool and the work piece lubrication and machine power available The harder the material the lower the cutting speed Some materials of low hardness contain abrasive substances leading to rapid cutting edge wear a...

Страница 24: ...e motor and your annular cutter will be worn sooner A continuous non discoloured iron swarf is a sign of correct drilling speed and a well cooled sharp cutter Let the cutter do the job and give it time to cut the metal 9 Adjust the oil supply when necessary if your drill does not have an auto coolant system stop drilling regularly refill the holes of the spindle and continue drilling 10 Apply less...

Страница 25: ... Twist drills 1 Remove the Morse Taper arbor see chapter Gearbox 2 Fit the twist drill a Straight shank twist drills image 3 2 b Morse Taper shank twist drills image 3 3 Morse Taper 2 image 3 4 Morse Taper 3 ...

Страница 26: ...ist drills WARNING Do not use the automatic feed mode when drilling with twist drills Manual feed only 5 3 Machine taps ECO 55 TA only The ECO 55 TA model is equipped with a reversible direction of rotation and can also be used for cutting threads Proceed as follows for cutting threads 1 Install the tap image 3 5 2 Drill the hole for the thread on the recommended size of the tap 3 Switch off the m...

Страница 27: ...ine tap to come completely out of the work piece Then guide the motor unit slide upwards at handles to avoid damaging the start of the thread DO NOT LET YOUR TAP PUSH UP THE MOTOR UNIT BY ITSELF Make sure the properly lubricate while performing tapping work see chapter Annular cutters WARNING Do not use the automatic feed mode when using machine taps Manual feed only 5 4 Countersinks Thanks to its...

Страница 28: ... Never use solvents or other harsh chemicals for cleaning the non metallic parts of the tool These chemicals may weaken the materials used in these parts Use a cloth dampened only with water and mild soap Never let any liquid get inside the tool never immerse any part of the tool into a liquid OPERATION OF THE MACHINE The machines operation must be checked to ensure that all components are working...

Страница 29: ... periodically with grease to ensure smooth operation Raise the motor unit to the highest position possible Lubricate the dove tail guide way at both sides Lubricate the gear rack After repeated use the gear rack may become loose If necessary adjust the 5 self locking set screws at the left side Tighten screws in series until the gear rack moves freely in the dove tail guide but does not allow the ...

Страница 30: ...e hole cutter Clearance in the guide Bent spindle Shaft extending from the motor is bent Bent pilot pin Motor running roughly and or seizing up Bent spindle Shaft extending from the motor is bent Triangular guide not mounted straight Dirt between spindle and triangular guide Motor starts running when magnet switch is turned on Damage or defective relais in control unit Motor making a rattling soun...

Страница 31: ...witch is turned on Damaged or defective wiring Wrong value fuse Defective magnet switch Defective Control Unit Defective magnet Fuse blows when motor is started Damaged or defective wiring Wrong value fuse Motor running roughly Defective Armature and or Field Carbon brushes worn out Defective Control Unit Rotation system free stroke too long Loose or defective gear rack Defective rotation system R...

Страница 32: ...32 8 Exploded view spare part list 8 1 Exploded views ECO 55 A ...

Страница 33: ...33 ECO 55 A CONTINUED ...

Страница 34: ...34 ECO 55 TA ...

Страница 35: ...35 ECO 55 TA CONTINUED ...

Страница 36: ...ring 15 x 21 x 3 1 101 030 0030X Arm for capstan 3 30 050 0236 Y Inner gear plate 1 102 050 0027 Washer Φ36xΦ42x0 2 1 31 040 0161 Needle bearing HK 0810 3 103 055 0017 Bearing 61907 1 32 050 0065 Metal ring 1 104 050 0044 Circlip Φ35 1 33 050 0176 Circlip 471 11 1 105 050 0041 Turbine 50x0 9 1 34 050 0071 O ring 82 x 1 8 1 106 050 0029 Washer Φ28 5xΦ38x2 0 1 35 050 0207 Gasket middle 1 107 050 004...

Страница 37: ...1 104 055 0017 Bearing 61907 1 30 050 0064 Oil bearing 15 x 21 x 3 1 105 050 0044 Circlip Φ35 1 31 050 0236 Y Inner gear plate 1 106 050 0041 Turbine 50x0 9 1 32 040 0161 Needle bearing HK 0810 3 107 050 0029 Washer Φ28 5xΦ38x2 0 1 33 050 0065 Metal ring diam 40 1 108 050 0045 Circlip Φ28 1 34 050 0176 Circlip 471 11 1 109A 020 0031 Coupling nut Main cable 1 35 050 0071 O ring 82 x 1 8 1 109B 020 ...

Страница 38: ...38 8 3 Wiring diagrams ECO 55 A ...

Страница 39: ...39 ECO 55 TA ...

Отзывы: