background image

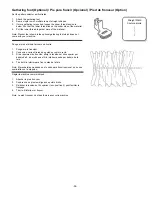
FREE MOTION DARNING (Optional) / ZURCIDA DE BRAZO LIBRE (Opcional) / REPRISE (Option)

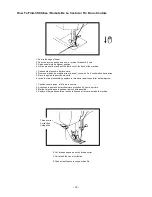
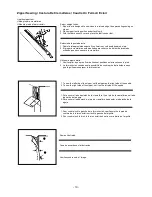
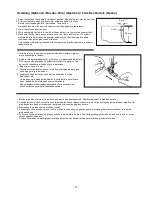
Move the drop feed control down to lower the feed dogs. (1)

Remove the presser foot clamp. (2)

Attach the darning/embroidery foot to the presser foot bar.

The lever (A) should be behind the needle clamp screw (B).

Press the darning/embroidery foot on firmly from behind with

your index finger and tighten the screw (C). (3)

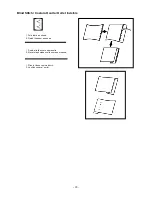
First sew round the edge of the hole (to secure the threads).

(4)

First row: Always work from left to right. Turn work by 1/4

and oversew.

A darning ring is recommended for easier sewing and better

results. (Not provided.)

Deslice el control del tranportador de dientes al lado abajo

para bajar los dientes. (1)

Quitar el porta-pie. (2)

Fijar el pie para zurcir en la barra prensatelas. la planca (A)

tiene que estar detrás, sobre el tornillo del porta-agujas (B).

Apretar enérgicamente con el indice contra la parte posterior

del pie para zurcie y atornillar el tornillo (C). (3)

Primero coser alrededor del agujero (para aseguer los pun-

tos). (4)

Primera serie: trabajar siempre de izquierda a derecha. girar

el trabajo de 1/4 y recubrir.

Para obtener un mejor resultado recomendamos un bastit-

dor. (No suministrar.)

Abaisser les griffes d’entraînement . (1)

Retirer le support de pied-de-biche. (2)

Fixer le pied à repriser à la barre. Le levier (A) doit se trou-

ver derrière, au dessus de la vis de fixation de l’aiguille (B).

Avec l’index, appuyer fermement par l’arrière sur le pied à

repriser, puis serrer la vis (C). (3)

Commencer par coudre tout autour du trou (pour empêcher

les mailles de filer). (4)

Première rangée: Travailler toujours de gauche à droite.

Tourner l’ouvrage d’un quart et finir la reprise.

Pour obtenir un meilleur résultat, nous conseillons d’utiliser

un tambour à répriser. (Non inclus.)

-3

5

-

Straight Stitch

Down

Up

A

Содержание 385X

Страница 1: ...Instruccion Manual Manuel D instruction EURO PRO Operating LLC 4400 Bois Franc St Laurent Quebec H4S 1A7 Tel 1 800 361 4639 Model Modelo Mod le 385X 94 Main Mill Street Door 16 Plattsburgh NY 12901 T...

Страница 2: ...d dealer or service center for examination repair electrical or mechanical adjustment 4 Never operate the appliance with any air openings blocked Keep ventilation openings of the sewing machine and fo...

Страница 3: ...aido al agua devuelva el aparato a un distribuidor autorizado o al centro de servicio autorizado m s cercano para que lo revisen reparen o hagan los ajustes el ctricos o mec nicos debidos 4 Nunca use...

Страница 4: ...3...

Страница 5: ...ension 18 Regulating the presser foot pressure 19 Drop feed 19 Changing needle 20 Fabric Thread Needle table 21 Sewing pattern selector and operation table 22 To start sewing 23 How to finish stitches...

Страница 6: ...as tensiones del hilo de rosca 18 Regular la presi n del pie prensatela 19 Avance en la posici n hundida 20 Reemplazo de la aguja 20 Tabla de tejidos hilo aguja 21 Tabla de costura selector de dise o...

Страница 7: ...ion du fil 18 R glage de la tension du pied coudre 19 Griffes d entra nement 19 Changement de l aiguille 20 Survue des tissus des fils et des aiguilles 21 Coudre Choix du motif de couture Equipement d...

Страница 8: ...ension 1 Spool pin 2 Bobbin winder stopper 3 Pattern selector dial 4 Stitch length dial 5 Reverse button 6 Thread guide and needle clamp 7 Extension table 8 Shuttle cover 9 Presser foot 10 Thread cutt...

Страница 9: ...ver 4 Thumb screw 5 Needle plate 6 Hand wheel 1 2 5 3 4 6 1 Axe bobineur 2 Guide fil sup rieur 3 Levrier presse toffe 4 Vis de serrage 5 Plaque aiguille 6 Volant main 1 Huso de la bobina 2 Gu a de hil...

Страница 10: ...on suministrados con las m quinas sino que ellos est n disponibles en llamar al servicios al cliente al 1 800 361 4639 o en el comercio de nuestros distribudores autorizados l Pie para bordar m Pie ov...

Страница 11: ...l compartimiento de la bombilla deber destornillar los tornillos como se indica 2 Desenrosque la bombilla hacia la izquierda en el sentido contrario a las agujas del reloj 3 Enrosque la bombilla hacia...

Страница 12: ...s Libre 1 This sewing machine can be used as a flat bed machine but easily converts to a free arm machine by removing the extension table 2 Especially useful for sewing sleeves pant legs tubular fabri...

Страница 13: ...s original position A la izquierda en la cubierta del brazo se encuentra la tensi n de bobinado sta se puede ajustar como se describe si la m quina no enrollara de manera uniforme A gauche sur le couv...

Страница 14: ...cent metros de hilo de rosca de m s V ase ilustraci n Fig 1 1 Laissez d passer 5cm de fil si vous remettez la canette dans la capsule voir image Fig 1 3 Pull the thread through the slot and under the...

Страница 15: ...elante Abra la palanca y sostenga el casquillo 1 Faites attention que l aiguille soit en position la plus haute Tirez le fil en avant Ouvrez le levier basculable et tenez ainsi la capsule 2 Holding th...

Страница 16: ...ading La aguja melliza enhebrando Enfilage pour aiguille jumel e B E A B C D E Pass the thread from front to rear through needle and pull approx 10 cm of thread through eye of needle Pase el hilo supe...

Страница 17: ...e et resortie Arretez si le donnneur de fil est tout fait en haut Tirez lentement sur le fil sup rieur Ainsi le fil inf rieur est amen en haut en forme de bride 2 Pull out both threads and place them...

Страница 18: ...17 Levelling Machine Estabilidad De La M quina Positionnement De La Machine Down Hacia abajo En bas Up Hacia arriba En haut...

Страница 19: ...eased by turning the screw of the bobbin case slightly to the right clockwise Turning it to the left anti clockwise decreases tension La tensi n del hilo inferior puede ser regulada girando el tornill...

Страница 20: ...rnillo La palanca normalmente est en la posici n 2 1 La tension du levier se r gle en fonction de la pression du pied de couture La position 3 est choisie pour des tissus l gers la position 2 est pris...

Страница 21: ...lado plano de la aguja hacia la parte posterior coloque la aguja tan arriba como sea posible 4 Apriete muy bien el tornillo de la abrazadera 1 Mettez l aiguille dans la position la plus haute 2 D vis...

Страница 22: ...Voir page 19 Stitch Length Dial Elecci n de puntada Longuer de la piq re Nylon Nylon Nylon 80 Cotton Algod n 80 Coton 80 Tricot Tricot Tricot 60 S Fiber silk Fibra sint tica 60 Fibre artificielle 60 S...

Страница 23: ...ure Drop feed Avance Griffes d entra nement Buttonhole Ojal Boutonni re 0 25 1 Ric rac Zig zag stitch Puntada Zig zag Ric rac Zig zag point 1 4 Freehand embroidery Puntada decorativa Points d ornement...

Страница 24: ...oser y pisar el pedal 4 Presione el pedal y comience a coser 5 Pruebe las puntadas en un trozo de tejido de muestra para as poder ajustar la longitud de puntada y la tensi n Notas 1 Gire el volante si...

Страница 25: ...4 cent metros hacia atr s 3 Eleve la aguja a la posici n m s alta 4 Levante el pie prensatela y desplace la tela hacia la parte posterior de la m quina 1 Veuillez coudre jusqu la fin de la couture 2 A...

Страница 26: ...point augmente lorque le r glage du bouton de longueur de point approche du 0 Pour un point zigzag efficace la longueur de point devrait tre 2 5 ou moins Lorsque le bouton de point est situ entre 0 1...

Страница 27: ...cot or other stretchy fabrics The stitch enables your seam to stretch with out breaking the thread Use esta puntada para telas tejidas de tricot y otras telas el sticas Este tipo de costura permite se...

Страница 28: ...Costura Oculta Ourlet Invisible 1 Fold fabric as shown 2 Finish the seam as shown 1 Doble el tejido como se muestra 2 Ejecute la puntada oculta como se muestra 1 Pliez le tissus comme d crit 2 Veuille...

Страница 29: ...r de l ourlet et la position de l aiguille pendant que vous coudez pour que l ourlet devienne r gulier Wrong Needle is not piercing edge to fold at all Incorrecto La aguja no cose el dobladillo Faux l...

Страница 30: ...zurcir plato 2 Coloque el pie para botones 3 Coloque el bot n entre el pie y la tela y baje el pie prensatela 4 Gire manualmente la rueda volante hacia usted asegur ndose de que la aguja penetre en a...

Страница 31: ...r s 2cm de tissus et positionnez le travail sous le pied 2 Le fermoir clair vous donne la possibilit de coudre pr s de la bordure sans que l aiguille puisse piquer le fermoir clair 1 To sew the left s...

Страница 32: ...1 4 2 3 31 Stitch length Rueda de longitud La longueur du point...

Страница 33: ...low it to run into the hemmer foot 5 Make sure that the fabric does not move under the right half of the foot The fabric must be fed into the scroll of the hemmer sufficiently so that the workpiece ed...

Страница 34: ...be exceder dos tercios de la anchura m xima puesto que la aguja podr a romperse Enfilez la machine comme pour coudre normalement en guidant les deux fils par la conduite jusqu l aiguille ou ils sont e...

Страница 35: ...istance from the edge of the fabric 2 Screw the guide on the right side of the needle plate and adjust the desired distance 3 While sewing the edge of the fabric must touch the guide 1 Use el gu a de...

Страница 36: ...estar detr s sobre el tornillo del porta agujas B Apretar en rgicamente con el indice contra la parte posterior del pie para zurcie y atornillar el tornillo C 3 Primero coser alrededor del agujero pa...

Страница 37: ...jo Ajustar el dial selector del largo de la puntada en la posici n 4 Overlock el stico Para teminar dobladillos costuras decorativas Adecuando para dobladil los y costuras decorativas en materiales el...

Страница 38: ...l soporte del prensatelas y adjuste el espacio a su gusto Desplace tela por encima y cosa hileras sucesivas con la gu a situada a lo largo de la hilera de puntada anterior Nota El prensatelas mostrado...

Страница 39: ...achine Ponga el pie del dibujo tal como se ilustra 1 Ponga el pie fruncidor 2 Cosa una o varias hileras de puntos en costura recta 3 Si se requiere m s fruncido afloje la tensi n del hilo superior por...

Страница 40: ...de la puntada de zizgzag 3 Hilvane el dise o sobre la superficie de la tela 4 Empieze a coser con cuidado seg n el dise o 5 Recorte la tela que rebase la costura 6 Saque la puntadas de hilvanar 7 Vuel...

Страница 41: ...e mezclilla denim para jeans Este accesorio hace uniforme el avance de los hilos superior e inferior de la tela y hace que casen mejorar los cuadros excocesses listas y dibujos Tambi n ayuda a impedir...

Страница 42: ...an and oil shuttle race and hook thereafter replace all parts in reverse order 1 Levante la aguja a su posici n m s alta 2 Saque la caja de la bobina 3 Gire el picaporte a como se muestra en la direcc...

Страница 43: ...selector de ancho de zig zag Enhebrado incorrecto Demasiada tensi n del hilo superior Aguja doblada Hendiduras y raspaduras en la lanzadera Re adjust zigzag width Re thread machine Reduce upper thread...

Страница 44: ...ur zig zag Le fil est mal mis La tansion du fil sup rieur est trop forte Aiguille mal guid e Fissures et rayures sur la navette Corrigez les r glages Enfiler de nouveau Dimunuer la tansion du fil sup...

Страница 45: ...of the unit and excludes all other legal and or conventional warranties The responsibility of EURO PRO Operating LLC if any is limited to the specific obligations expressly assumed by it under the te...

Страница 46: ...garantie est propos e l acheteur d origine du produit et exclut toute autre garantie juridique et ou conventionnelle La responsabilit de EURO PRO Operating LLC si responsabilit il y a ne se rapporte...

Страница 47: ...esponsabilidad de EURO PRO Operating LLC de existir se limita a las obligaciones espec ficas asumidas expresamente bajo los t rminos de esta garant a limitada Bajo ninguna circunstancia EURO PRO Opera...

Отзывы: