background image

2      

Eureka Customer Service HELPLINE 1-800-282-2886

Contents 

Important safeguards. . . . . . . . . . . . . . . . . . . . . . . . . . . . . . . . . 3
What comes in the carton . . . . . . . . . . . . . . . . . . . . . . . . . . . . . 4
How to assemble your vacuum cleaner. . . . . . . . . . . . . . . . . . . 5
How to identify parts of your vacuum cleaner . . . . . . . . . . . . . . 6
How to use your vacuum cleaner  . . . . . . . . . . . . . . . . . . . . . . . 7
How to use accessories. . . . . . . . . . . . . . . . . . . . . . . . . . . . . . . 8

 . . . . . . . . . . . . . . . . . . . . . 9

How to clear a blockage  . . . . . . . . . . . . . . . . . . . . . . . . . . . . . 10
How to maintain brushroll . . . . . . . . . . . . . . . . . . . . . . . . . . . . 11
How to replace brushroll or belt . . . . . . . . . . . . . . . . . . . . . . . . 12
Thermal cut-off and problem solving . . . . . . . . . . . . . . . . . . . . 13
The Eureka limited warranty . . . . . . . . . . . . . . . . . . . . . . . . . . 14
How to order replacement parts  . . . . . . . . . . . . . . . . . . . . . . . 15

Write the model, type and serial number here:
Date of purchase (keep your receipt)  ______________
Model number and type _________________________
Serial number  ________________________________  
Find these numbers on a label on the middle back side 

of the vacuum cleaner. Refer to these numbers when 

ordering parts and accessories or if service is needed. 

 To register your product visit 

www.eureka.com

Carefully unpack and inspect your new Eureka vacuum cleaner for shipping damage. 

Each unit is tested and thoroughly inspected before shipping. For instructions regarding any 

shipping damage, call the Eureka Customer Service 

HELPLINE

 at 

1-800-282-2886

 immediately.

!

 Follow caution information wherever you see this symbol.

Содержание NEU180 series

Страница 1: ...owner s guide If you have questions about your new vacuum please contact our customer service HELPLINE at 1 800 282 2886 Eureka stands by our Clean Promise seal Learn more at www eureka com cleanpromise www eureka com Owner s Guide NEU180 series Including NEU180 NEU181 NEU181A NEU182A NEU182B NEU188 NEU188A Upright vacuum cleaner household type ...

Страница 2: ...ial number here Date of purchase keep your receipt ______________ Model number and type_________________________ Serial number ________________________________ Find these numbers on a label on the middle back side of the vacuum cleaner Refer to these numbers when ordering parts and accessories or if service is needed To register your product visit www eureka com Carefully unpack and inspect your n...

Страница 3: ... grasp the plug not the cord Do not handle plug or vacuum cleaner with wet hands Do not put any objects into openings Do not use with any openings blocked keep free of dust lint hair and anything that This vacuum cleaner creates suction and contains a revolving brush roll Keep hair away from openings and moving parts Do not place vacuum cleaner on furniture or stairs as the brush roll may cause da...

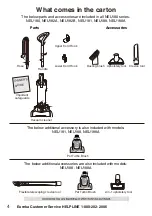
Страница 4: ...le telescoping crevice tool 2 in 1 upholstery tool Vacuum cleaner Upper Cord Hook Lower Cord Hook Hose The below parts and accessories are included in all NEU180 series NEU180 NEU182A NEU182B NEU181 NEU188 NEU188A The below additional accessory is also included with models NEU181 NEU188 NEU188A The below additional accessories are also included with models NEU188 NEU188A Parts Accessories ...

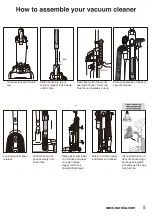
Страница 5: ...k of vacuum cleaner Click Slide handle into top of vacuum cleaner Push down until it clicks Insert bent end of hose into opening at back of dust cup Twist hose clockwise to lock Push loose end of hose securely onto hose inlet Vacuum cleaner with dust cup Loop hose over hose retainer Store turbo brush on front of handle Align brush opening with slot and push to snap tool into clip ...

Страница 6: ... screen Crevice tool Power switch Hose retainer Hose Lower cord wrap Hose inlet Vacuum cleaner Belt Brushroll Dust cup Turbo brush Upper cord wrap Upholstery tool Cord clip Dusting brush Handle release latch Power cord Handle release pedal Dust cup Dust cup latch Dust cup lid Carry handle Headlights Brushroll cover NEU188 NEU188A ...

Страница 7: ...andle release to lower handle into position for Step on power switch to turn vacuum cleaner on Step on again to turn off Turn height adjustment knob to pile carpet Press release button and lift off dust cup To empty debris press lever to release bottom lid ...

Страница 8: ...ks Push loose end of hose securely onto hose inlet Store tools on vacuum cleaner back See page 5 When using tools always place handle in upright position Make sure vacuum cleaner is turned off while attaching tools Use for baseboard edges corners detailing chairs sofas dryer vents and tight spaces Use for furniture drapes blinds drawers and vents Turbo brush Use to remove pet hair from stairs carp...

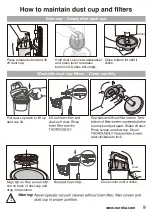
Страница 9: ...bottom lid Debris will empty Click Close bottom lid until it clicks Pull dust cup latch to lift up dust cup lid shake off dust Rinse slot on back of dust cup and drop into position to unlock and pull apart Shake off dust Rinse screen and dust cup Dry all twist clockwise to lock Click Close cover until it clicks Warning ...

Страница 10: ...dust See maintenance instructions on page 9 Loosen end of hose Use a rod or similar blunt implement to clear a blockage in wand or hose Flex hose to loosen debris Fig 3 Use caution if there is any risk that glass or nails could have become imbedded in hose path Fig 4 dust cup and position dust cup onto vacuum cleaner Warning Never operate vacuum 1 3 2 Make sure vacuum is turned off and power cord ...

Страница 11: ...ck brushroll for debris Use scissors to clip heavy threads or strings Make sure vacuum is turned off and power cord is unplugged How to maintain turbo brush Grasp collar and twist to unlock cover Lift cover up brush to clear accumulated pet hair from bristles Close cover and twist collar to lock ...

Страница 12: ...ig 2 Lift out left end of brushroll To replace belt position new belt around motor shaft Fig 3 Loop new belt around brushroll shaft at left end of brushroll Fig 4 To reposition brushroll into base pull belt down and insert left end of Fig 5 Press right end of brushroll into position To replace brushroll cover align slot on cover with tab Fig 6 and snap cover into place Replace 6 screws Fig 7 1 3 2...

Страница 13: ...still does not work call the Eureka Customer Service HELPLINE at 1 800 282 2886 Push plug securely into outlet try another outlet or check circuit breaker Step on power switch to turn vacuum on See detailed thermal cut off instructions above Check vacuum height adjustment knob position Clean brushroll if needed Page 11 See other solutions above Remove clogs from the hose or wand that restrict Chec...

Страница 14: ... by anyone other than Eureka or an authorized Eureka Warranty Station This warranty is not applicable to any product that has been altered or on which the serial number has erasing or forging any proof of purchase documents voids any applicable product warranty To obtain warranty service you must contact the Eureka Service Team toll free at 1 800 282 2886 or email to discuss warranty claim and pro...

Страница 15: ...06D NEU187 NEU188 E0206E NEU188A E0206F NEU182A S3006 all E0208 all S3007 all E0207 NEU180 NEU180C E0207B NEU181 NEU182 NEU182CT E0207C NEU186 E0207D NEU187 NEU188 Crevice tool Dusting brush tool Upholstery tool Brushroll Hose Belt Detachable handle Flexible telescoping crevice tool Turbo brush 2 in 1 upholstery tool Dust cup E0601 all Upper and lower hooks ...

Страница 16: ... Do not return to the store call Eureka Customer Service HELPLINE 1 800 282 2886 www eureka com Eureka stands by our Clean Promise seal Learn more at www eureka com cleanpromise Owner s Guide 2018 Midea America Corp Printed in Vietnam 02155180_WMT_rev5 ...

Отзывы: