


Battery
indicator
lights
1
5
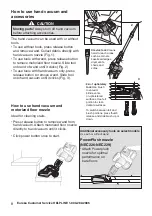
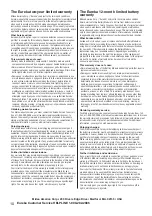
Easy assembly
1
. Slide battery onto hand vacuum
until firmly attached (Fig. 1).
2
. Slide wand onto hand vacuum
until it clicks (Fig. 2).
3
. Push wand into motorized floor
nozzle until it clicks (Fig. 3).
How to install wall mount
• Choose location near power outlet.
Locate point high enough on wall
to allow wand and motorized floor
nozzle to hang freely.
• Place mount against wall and use
pencil to mark drill holes.
• Drill holes (with 1/4" bit) and insert
drywall anchors. Insert screws
through holes on mount and tighten
until firmly attached (Fig. 4).
How to charge battery and
store accessories (Fig. 5)
• Place assembled vacuum cleaner
on wall mount.
• Plug charger into power outlet and
then into charger port on hand vac.
• Loop charger cord into clips on
sides of wall mount.
• Snap tool(s) into tool storage areas.
Battery indicator lights show
level of charge (Fig. 5)
• Indicator lights stop blinking when
fully charged.
• Charge battery fully before using for
the first time. This may take up to
four hours.
6
2
Click!
3
Click!
4
Eureka Customer Service HELPLINE 1-800-282-2886
Cord
clip
Drywall anchors
Tool storage
Cord
clip
Tool storage


