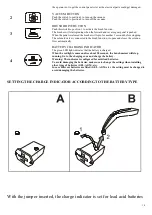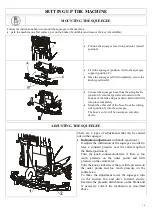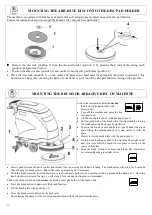
20
PERIODIC SERVICING
INTRODUCTION
REGULAR AND PERIODIC SERVICING OF YOUR SCRUBBER GUARANTEES OUTSTANDING
PERFORMANCE OF THE MACHINE AND ITS LONG LIFE. THE PAGES THAT FOLLOW CONTAIN THE
INFORMATION THAT WILL HELP TO PLAN THE CARE AND THE SERVICING THAT THE SCRUBBER
NEEDS
WARNING!
DO NOT CARRY OUT ANY MAINTENANCE OPERATION NEITHER ON THE MACHINE NOR ON ITS
COMPONENTS WITHOUT HAVING FIRST:
- STOPPED THE MACHINE
-
ENGAGED THE PARKING BRAKE
-
BLOCKED OFF THE WHEELS
-
DISCONNECTED THE STARTING BATTERY CONNECTORS.
WARNING!
DO NOT TAMPER WITH ANY SAFETY-RELATED PART. THESE CAN BE REMOVED ONLY AS PART OF THE
MAINTENANCE OF AN AUTHORISED SERVICE CENTRE.
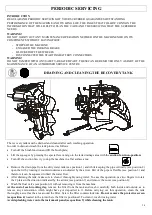
DRAINING AND CLEANING THE RECOVERY TANK
The recovery tank must be drained and cleaned after each washing operation.
In order to drain and wash the tank proceed as follows:
Turn off the brush function and lift the brush plate;
Lift the squeegee by pressing the special lever and go to the tank drainage area with the
suction fan in on-position;
Turn off the suction fan, try to stop the machine in a flat surface area;
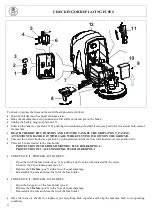
Remove the drain pipe from the dirty water tank (see position 1) and while keeping the pipe vertically (see position 2)
open the lid by rotating it counterclockwise as indicated by the arrow. Part of the pipe is flexible (see position 3) and
therefore it can be squeezed to limit the water flow;
After draining the tank, make sure to clean it thoroughly using water. To ease this operation, use two fingers to rotate
the 2 plates in the direction indicated by the arrows (see position 7) and remove the cover (see position 8);
Wash the float valve (see position 6) without removing it from the machine.
At the end of each working day,
remove the filter from the tank and wash it carefully both inside and outside, as to
remove any encrustation which might have got deposited in it. Before carrying out this operation, clean the tank
thoroughly as well as the area around the filter. Screw the filter counterclockwise.
Do not remove the protective screen
(see position 4)
located in the joint where the filter is positioned. To clean it, wash it using water.
Avoid splashing water onto the instrument panel (see position 9) while cleaning the tank.
Содержание E51 BASE
Страница 2: ...3...


