background image

Eureka warrants this vacuum cleaner to be free from

defects in material and workmanship for a term of two

years for normal household use. Warranty is granted only 

to the original purchaser and members of immediate

household.
This warranty is good for two years from the date of

purchase only when the vacuum cleaner is used in the

accordance with Eureka operating instructions. 

Note:

refurbished or remanufactured products have a 

one year limited warranty.

What This Warranty Does Not Cover

• Parts of the cleaner that require replacement under

normal use, such as disposable dust bags, filters, drive

belts, light bulbs, brush rollbristles, impellers and

cleaning.

• Damages or malfunctions caused by negligence, abuse,

or use not in accordance with the Owner’s Guide,

• Defects or damages caused by unauthorized service or

the use of other than Genuine Eureka, ARM &

HAMMER

TM

and Filtrete

TM

by 3M parts.

What Eureka Will Do

Eureka will, at its option, repair or replace a defective

cleaner or cleaner part that is covered by this warranty. As

a matter of warranty policy, 

Eureka will not refund the

consumer’s purchase price.

Obtaining warranty service

To obtain warranty service you must return the vacuum or

vacuum part along with “proof of purchase” to any Eureka

Authorized Warranty Station. For Eureka Authorized

Warranty Station or Service Information, visit

www.eureka.com, write or telephone toll free:

Obtaining warranty service outside your community

You must pay the shipping charges to the Eureka

Authorized Warranty Station.

Return shipping charges

will be paid by the Warranty

Station. When returning parts for repair, please include the

model, type and serial number located on the rating plate

on the lower backside of the vacuum.

Further limitations and exclusions

Any warranty that may be implied in connection with your

purchase or use of the vacuum, including any warranty of

Merchantability or any warranty for Fitness For A Particular

Purpose is limited to the duration of this warranty. Some

states do not allow limitations on how long an implied

warranty lasts, so the above limitations may not apply to

you. Your relief for the breach of this warranty is limited to

the relief expressly provided above. In no event shall the

manufacturer be liable for any consequential or incidental

damages you may incur in connection with your purchase

or use of the vacuum. 
Some states do not allow the exclusion or limitation of

incidental or consequential damages, so the above

limitation or exclusion may not apply to you.
This warranty give you specific legal rights. You may also

have the other rights, which may vary by state.

The ARM & HAMMER name is a trademark of Church and Dwight Co.,

Inc. 3M and Filtrete are trademarks of 3M Company, used by Electrolux

Home Care Products, Inc. under license

.

THE EUREKA LIMITED WARRANTY

USA: 1-800-282-2886

Electrolux Home Care

North America Service Division

P.O. Box 3900

Peoria, IL 61612

Canada: 1-800-282-2886

Electrolux Home Care

North America Service Division

5855 Terry Fox Way

Mississauga, Ontario L5V 3E4

Содержание AS2100 Series

Страница 1: ... visite eureka com o llame a la línea directa de servicio al cliente 1 800 282 2886 Séries AS2100 et AS2139 GUIDE DU PROPRIÉTAIRE Pour des détails sur les aspirateurs incluant la FAQ veuillez visiter eureka com ou composez le numéro du service à la clientèle 1 800 282 2886 To view an assembly video go to Eureka com videos or scan QR code Pour visualiser la vidéo d assemblage rendez vous à l adress...

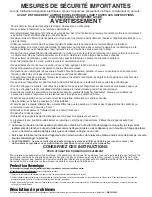
Страница 2: ...es matches or hot ashes Do not use without dust cup or filter s in place Do not use to pick up flammable or combustible liquids such as gasoline or use in areas where they may be present Store your vacuum indoors in a cool dry area Keep your work area well lighted Unplug electrical appliances before vacuuming them Brush roll could suddenly restart Unplug before servicing SAVE THESE INSTRUCTIONS FO...

Страница 3: ...ltro s no están en su lugar No la utilice para aspirar líquidos inflamables o combustibles como la gasolina ni en áreas en las que haya presencia de estos líquidos Guarde su aspiradora bajo techo en un lugar fresco y seco Mantenga su área de trabajo bien iluminada Desconecte los aparatos eléctricos antes de aspirarlos El cepillo giratorio puede reiniciar su funcionamiento súbitamente Desconéctelo ...

Страница 4: ...ls les cigarettes allumettes ou cendres chaudes Ne pas utiliser sans bac à poussière ou filtres installés N aspirez pas de liquide inflammable ou combustible tels que la gazoline et n utilisez pas l appareil dans des endroits ou pourrait se trouver ce genre de produit Remisez votre aspirateur à l intérieur dans un endroit frais et sec Éclairez bien l aire de travail Débranchez les appareils électr...

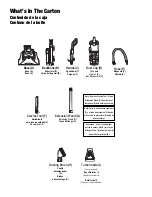
Страница 5: ...sempolvador H Brosse d époussetage H Crevice Tool F Herramienta para ranuras anidada F Suceur plat F Extension Wand G Extension Wand G Tuyau Rallonge G Note Remove Crevice Tool F and Extension Wand G from inside of Backbone B hole before assembly Contenido de la caja Nota Quite la herramienta esquinera F y el tubo de extensión G desde el hueco de la estructura B antes de desensamblar Contenu de la...

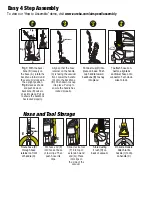
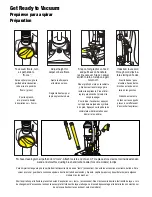
Страница 6: ...wn to snap into place Pull up to ensure the handle has locked properly Put dust cup D into place on base Push cup handle toward backbone B to snap into place To attach hose con nector align tabs and lower hose onto connector Turn clock wise to lock Route hose E through hose retainer on front of handle C Put hose end E into hook at base of tool clips Then push hose into clips Slide crevice tool F i...

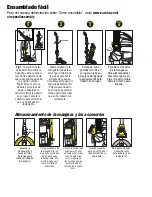
Страница 7: ...amente Coloque el cubo guardapolvo D en su lugar en la base Empuje la manija hacia la estructura B para trabarlo en su lugar Para fijar el conector de la manguera alinee las lengüetas y baje la manguera so bre el conector Gírela hacia la derecha para trabarla Encause la manguera E a través del retén de la manguera situado al frente de la manija C Ponga el extremo de la manguera E en el gancho en l...

Страница 8: ...Tirez vers le haut pour vous assurer que la poignée soit correctement verrouillée Glissez le suceur plat F dans l extrémité supérieure du tuyau rallonge G et placez dans les attaches de retenue sur le côté de l aspirateur E G H I Remise de boyau et accessoires A B B A Alternate View Fig 1 Fig 2 B A STEP 2 STEP 3 STEP 4 STEP 1 Pour fixer le connecteur de flexible alignez les languettes et abaissez ...

Страница 9: ...par le flexible placez le bouton d aspiration sur tools accessoires Fixez l accessoire désiré à l extrémité du tuyau Lors de changement d accessoire remisez le suceur plat à l intérieur du tuyau rallonge La brosse d époussetage et le balai turbo son montés sur des pinces attaches le cas échéant selon le modèle Para aspirar pisos gire la perilla de direccionamien to de aire a la posición floors pis...

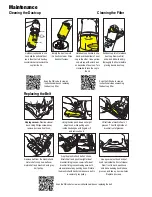
Страница 10: ...new belt over motor shaft and brushroll onto grey belt pulley Using thumbs push down on height adjust knob while pulling up on inside hood edges with fingers Lift and remove hood Lift left side of brushroll out of grooves Then lift right side of brushroll out of grooves Line up corners of hood and put hood tab inside the front of cleaner From front to back push hood onto base keeping hood in base ...

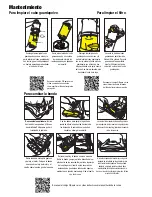
Страница 11: ... las ranuras Baje el lado izquierdo del cepillo para colocarlo en las ranuras cer ciorándose de que ambos lados están seguros mediante una presión hacia abajo Gire el cepillo con las manos Sostenga la manija del cubo guardapolvo con una mano y la parte inferior del cubo guardapolvo con la otra gire el cubo guardapol vo hacia la derecha para destrabar el cubo de la tapa Sostenga la manija de cubo g...

Страница 12: ...le côté droit du rouleau dans le palier de roule ment Abaissez le côté gauche du rouleau dans le palier de roulement en vous assurant que les deux côtés sont bien en place en appliquant une pression vers le bas Faites pivoter le rouleau brosse manuellement pour vous assurer que la courroie est au centre de la poulie grise En maintenant la poignée du bac à poussière d une main et son fond de l autr...

Страница 13: ...ado l y desconecte la aspiradora 2 Verifique si hay una fuente probable de recalentamiento como el cubo guardapolvo lleno una manguera obstruida o un filtro tapado Si detectan estas condiciones arréglelas y espere al menos 30 minutos antes de volver a utilizar la aspiradora 3 Después del lapso de 30 minutos enchufe la aspiradora y presione el interruptor de encendido apagado para encenderla l Si l...

Страница 14: ...e outside your community You must pay the shipping charges to the Eureka Authorized Warranty Station Return shipping charges will be paid by the Warranty Station When returning parts for repair please include the model type and serial number located on the rating plate on the lower backside of the vacuum Further limitations and exclusions Any warranty that may be implied in connection with your pu...

Страница 15: ...ervice Division P O Box 3900 Peoria IL 61612 Canadá 1 800 282 2886 Electrolux Home Care North America Service Division 5855 Terry Fox Way Mississauga Ontario L5V 3E4 LA GARANTIE LIMITÉE EUREKA Eureka garantit cet aspirateur libre de tous défauts de matériaux et de fabrication pendant deux ans pour une utilisation résidentielle normale La garantie n est offerte qu à l acheteur original et aux membr...

Страница 16: ......

Отзывы: