background image

08

09

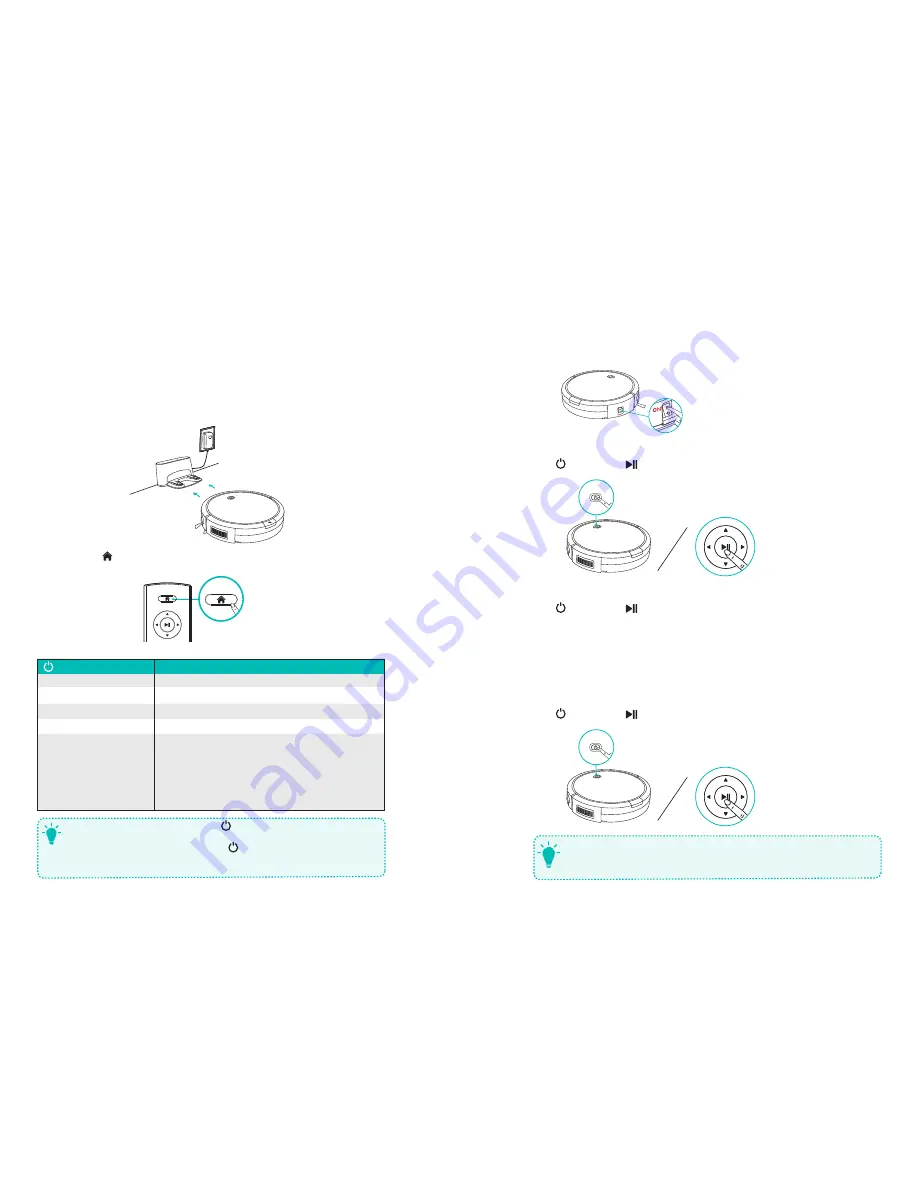
Charge Your RoboVac 

•  RoboVac has a pre-installed rechargeable battery that has to be fully charged before use.
•  RoboVac returns to the Charging Base at the end of a cleaning cycle or when its battery is 

running low.

•  Make sure the main power switch on the side of RoboVac is turned on before charging. 

Method 1:

 Attach RoboVac to the Charging Base by aligning its charging pins with the 

charging pins on the base. 

Method 2:

 Press   on the remote control to return RoboVac to the Charging Base. 


(Status Light)

Status

Breathing blue

Charging

Solid blue

Standby / Cleaning /  Returning to Charging Base 

Solid purplish-red

Low power and returning to Charging Base

Flashing / Solid red + Beeping RoboVac has an error

Off

RoboVac is off.
To conserve power, the light automatically turns off:

When RoboVac is not docked to the Charging Base and has 

been inactive for 10 minutes;
After RoboVac is docked to the Charging Base and has been 

fully charged for 10 minutes.

T

- When charging RoboVac, press and hold       on RoboVac for 20 seconds and when 

you hear two beeps, indicating that RoboVac has entered Reduced Power Standby 

mode; Wi-Fi is disabled in this mode. Press       to exit Reduced Power Standby mode.

- Turn off the power switch if RoboVac will not be used for a long period of time. To 

preserve the battery’s lifespan, recharge at least once every 3 months.

Start / Stop Cleaning 

1.  Turn on the main power supply

Press the main power switch on the side of RoboVac to turn on the main power supply. 

2. Start cleaning

Press   on RoboVac or   on the remote control to start cleaning in Auto Mode. 

3. Stop cleaning 

Press   on RoboVac or   on the remote control to stop cleaning. 

Select a Cleaning Mode 

1.  Auto cleaning 

RoboVac automatically cleans in a back-and-forth, straight-line pattern. This is the most 

commonly used cleaning mode.
Press   on RoboVac or   on the remote control to start cleaning in Auto Mode. 

T

- RoboVac will return to the Charging Base automatically when the power level becomes 

low or when RoboVac finishes cleaning.

- By default, RoboVac starts in Auto cleaning mode when it is turned on.

Содержание RoboVac 11c Pet Edition (T2111)

Страница 1: ...Cleaning Owner s Manual RoboVac 11c Pet Edition T2111 www eufylife com For FAQs and more information please visit T2111 51005000847 V01...

Страница 2: ...aning Mode Schedule Cleaning Use Your RoboVac with the EufyHome App Use Your RoboVac with Amazon Alexa the Google Assistant Optional Use the Boundary Strips 17 Cleaning and Maintenance Clean the Dust...

Страница 3: ...oVac 11c Pet Edition Charging Base Remote Control AAA Battery 2 Safety Leaflet Owner s Manual Quick Start Guide RoboVac Anatomy Top Side Auto cleaning On Off button Bumper Dust collector Main power sw...

Страница 4: ...3 4 5 6 Return RoboVac to Charging Base Start Stop Auto cleaning Control cleaning direction manually Adjust the hour and minute Start Spot cleaning Start Edge cleaning Start Single Room cleaning Inst...

Страница 5: ...gh the Boundary Strips can be applied to block off the areas you do not want RoboVac to clean they should not be solely relied upon to avoid a potentially dangerous situation In such cases it is recom...

Страница 6: ...ed for 10 minutes T When charging RoboVac press and hold on RoboVac for 20 seconds and when you hear two beeps indicating that RoboVac has entered Reduced Power Standby mode Wi Fi is disabled in this...

Страница 7: ...between Standard and Enhanced power default Three beeps Off Maximum power When RoboVac starts Auto cleaning the next time it will clean according to the suction power level you previously selected 2 S...

Страница 8: ...is slowly flashing blue EufyHome Download the EufyHome app from the App Store iOS devices or Google Play Android devices Open the app and create a user account Tap the icon in the top right corner to...

Страница 9: ...our RoboVac Say simple commands to Alexa Alexa ask RoboVac to start cleaning Alexa ask RoboVac to stop cleaning Alexa ask RoboVac to go home Alexa ask RoboVac to find my robot To control RoboVac with...

Страница 10: ...ndary Strips are rolled up remove and then re apply on the floor with an adhesive tape Otherwise the Boundary Strips may not work well Be careful not to damage the floor when using adhesive tape It is...

Страница 11: ...stall the rolling brush by inserting the fixed protruding end first then clicking into place Press down to snap the brush guard into place 1 4 2 5 3 Clean the Sensors and Charging Pins To maintain bes...

Страница 12: ...l for 3 seconds 2 turn on the main power switch You will hear three beeps after successful pairing RoboVac stops working suddenly Check if RoboVac is trapped or stuck on an obstacle Check if the power...

Страница 13: ...location Four beeps RoboVac s suction fan is stuck Turn off RoboVac then remove and empty the dust collector Make sure the suction inlet is not blocked by any hair or debris Five beeps RoboVac s infr...

Страница 14: ...oVac with the EufyHome App Reset the Wi Fi connection Slowly flashing blue Wi Fi connection is reset or has not been set up before Set up Wi Fi connection with RoboVac Refer to this section Use Your R...

Отзывы: