background image

E G O   4 0 0 0   P L U S

O P E R A T I O N   M A N U A L

23

continued

RADIO” or “AL 2 RADIO” indicates.

When the desired alarm mode indicator is

shown, stop pressing 

UP/DOWN

buttons, and

wait for a few seconds, the alarm mode is set

automatically, and you can also press 

SET

button

to save it once you choose it .

Viewing Alarm Setting

Follow the steps below to view alarm settings

•  

Press 

ALARM 1/ALARM 2

button once, the 

LCD display shows alarm 1 setting (include 

alarm time and mode) for about 5 seconds 

before resuming to the local time clock.

•  

Press 

ALARM 1/ALARM 2

button twice,

the LCD display shows alarm 2 for about 

five seconds before resuming to the local 

time clock.

•  

Press 

ALARM 1/ALARM 2

button repeatedly 

to toggle between alarm 1 and alarm 2 

settings.

Snooze Mode:

When alarm activates, you may press 

SNOOZE

button to postpone alarm for 5 minutes. While in

snooze mode, “SOONZE” indicator appears on

the LCD display.

22

OPERATING INSTRUCTIONS: CLOCK/ALARM           

3.

Press 

SET

button to save settings or just 

release buttons to save settings. The 

corresponding alarm icons will indicate on 

the display.

4.

When the alarm sounds, press any button for 

buzzer or 

STOP

button for CD/MP3 or radio 

alarm to deactivate the alarm. Otherwise all 

alarms automatically shutoff in 5 minutes if 

not manually deactivated before.

•  

Ensure player displays local time clock 

before activating alarms. It takes 5 seconds 

to resume local time clock after setting 

clock/alarm or viewing alarm setting.

•  

The volume of the CD/MP3 alarm is at 

previous listening level. Remember to 

check listening level when setting alarms 

to ensure it is the appropriate volume as 

an alarm.

Setting Alarm Mode

The default alarm mode is buzzer but this can 

be changed to CD/MP3 alarm or radio alarm 

as well.

Follow the steps below to change alarm mode:

1.

Either press 

ALARM MODE

button repeatedly 

or press 

UP/DOWN

buttons to find the 

desired alarm mode combination.

2.

Press 

SET

button to save settings or just 

release buttons to save settings.

3.

The corresponding alarm icons will indicate 

on the display.

•  

If buzzer is selected, “AL 1 BUZZER” or “AL 2 

BUZZER 2” indicates.

•  

If CD/MP3/WMA Alarm mode is selected,

“AL1  ” or “AL 2  ” indicates.

•  

If Radio Alarm mode is selected, “AL 1 


Содержание 4000

Страница 1: ...2 MAJOR FEATURES OF THE MODEL S350 O P E R AT I O N M A N UA L w w w e t o n c o r p c o m CD MP3 AM FM Travel Clock Radio with Detachable Speakers ...

Страница 2: ...toring Station Memories 19 Retrieving Station Memories 19 CLOCK ALARM OPERATION 20 Setting Local Time 20 Setting World Time 20 Selecting Hour Mode 21 Setting Alarm Time 21 Activating Deactivating Alarm 21 Selecting Alarm Mode 22 Viewing Alarm Setting 23 Snooze Mode 23 OTHER FEATURES 23 Backlight 24 Sleep Mode 24 Bass Settings 24 TROUBLE SHOOTING 25 CARE AND MAINTENANCE 26 CD MP3 Disc Care Tips 26 ...

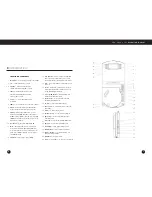
Страница 3: ... MP3 ID Tag Display displays the name of the artist and track recorded on MP3 discs Programmable Play program and play up to 99 tracks in any sequence you choose Repeat Play automatically repeat a single track a directory for MP3 or an entire disc Intro Scan locate or preview tracks by automatically playing the first 10 seconds of every track Shuffle Play play the tracks on a CD MP3 in random EQ c...

Страница 4: ...aying press to set Intro or Shuff Random play Play Pause press to play or pause CD MP3 Scan Up Down press to skip and search CD MP3 tracks or directory in tuner mode press to search desired radio stations or automatically scan stations Stop press to stop CD MP3 in tuner mode press to power off Snooze when alarm is activated press to snooze for 5 minutes when alarm is inactive press to turn on LCD ...

Страница 5: ...L indicates repeat ALL tracks mode while playing a CD MP3 MHz indicates FM frequency KHz indicates AM frequency MONO indicates tuner MONO mode DIR indicates repeat DIRECTORY mode while playing a CD MP3 STEREO indicates tuner STEREO mode REPT 1 indicates repeat ONE track mode while playing a CD MP3 AM indicates AM radio FM indicates FM radio SHUFF indicates Random mode while playing a CD MP3 PROG i...

Страница 6: ...s connected to the unit the batteries installed will be disconnected automatically 10 4 INSTALLATION AND CONNECTIONS CONNECTING SPEAKERS The player comes with two matched speakers that are detachable The player may be used with the speakers docked in the lid or with the speakers detached You may take remove the speakers from the lid and place them where you like by using the supplied connection wi...

Страница 7: ...To open player slide OPEN PLAYER button towards the arrow 2 Press OPEN LID button on the left front corner of the player to open the disc lid cover 3 Hold the disc by its edges and carefully place it into CD MP3 compartment and securely onto the disc spindle with CD MP3 label side up 4 Press CLOSE LID position on the disc cover to securely protect the CD MP3 during playback PLAYING DISCS Press PLA...

Страница 8: ...rst track 4 To cancel Intro Scan press STOP button 14 OPERATING INSTRUCTIONS CD MP3 STOPPING PLAYBACK CD MP3 playback stops automatically at the end of the last track or the last track of the last direc tory To stop playback sooner press STOP button If no further action is taken after 30 seconds later the player is automatically powered off To power off the unit quicker press STOP button a second ...

Страница 9: ...d Shuffle Play starts at once 4 To cancel Shuffle Play press STOP button PROGRAMMED PLAY You can program up to 99 tracks to play in any order you choose The same track can be pro grammed for more than once To program a CD MP3 playback sequence CD 1 Stop playback by pressing STOP button 2 Press EQ PROG button until PROG indicates on the display along with PROGRAM 01 3 Press SCAN UP DOWN button repe...

Страница 10: ...ation 2 Press TUNER BAND button repeatedly to select either AM or FM band 3 Use one of following methods to tune for the desired station The display shows the tuned frequency Memory Tuning Press PRESET PRESET buttons When one of the preset stations is selected the LCD shows channel number CH0 and frequency FM MHz AM KHz There are 20 stations presets for FM and 10 station presets for AM Manual Tuni...

Страница 11: ...G INSTRUCTIONS CLOCK ALARM SETTING LOCAL TIME AND DATE Once the power supply is connected initially or after an extended period of non use the LCD dis play indicates 00 00 SATURDAY JAN 01 2000 You can select from numerous cities around the world to serve as your local time zone Once your local time is set the player can automatical ly tell you the time in different cities around the world Follow t...

Страница 12: ...e buttons to save settings The corresponding alarm icons will indicate on the display 4 When the alarm sounds press any button for buzzer or STOP button for CD MP3 or radio alarm to deactivate the alarm Otherwise all alarms automatically shutoff in 5 minutes if not manually deactivated before Ensure player displays local time clock before activating alarms It takes 5 seconds to resume local time c...

Страница 13: ... OFF indicator appears on the display 2 Press SET button to cancel sleep setting SLEEP indicator disappears on the display BASS SETTINGS This player has three different bass settings for optimal listening The three settings are Stereo TruBass and SRS 3D On the right side of the player slide the bass switch to either TruBass or SRS 3D to experience enhanced bass effects and determine the optimal li...

Страница 14: ...that can corrode the electronic circuits Use and store the player only in normal temperature environments Temperature extremes can shorten the life of electronic devices damage batteries and distort or melt plastic parts Keep the player away from dust and dirt which can cause premature wear of parts Handle the player gently and carefully Dropping it can damage circuit boards and cause malfunctioni...

Страница 15: ...ION CAUTION TO REDUCE THE RISK OF ELEC TRIC SHOCK DO NOT REMOVE COVER OR BACK NO USER SERVICEABLE PARTS INSIDE REFER SERVICING TO QUALIFIED SERVICE PERSONNEL DANGEROUS VOLTAGE Uninsulated dangerous voltage that may be of suffi cient magnitude to constitute a risk of electric shock to persons is present within this product s enclosure ATTENTION The owner s manual contains important operating and ma...

Страница 16: ... tant to obtain proper performance from this product Therefore carefully read the Instruction Manual This warranty does not apply to any defect that Etón determines is due to 1 Improper maintenance or repair including the installation of parts or accessories that do not conform to the quality and specification of the original parts 2 Misuse abuse neglect or improper installation 3 Accidental or in...

Страница 17: ...o not allow limitations on how long an implied warranty lasts or do not allow the exclusions or limitation of incidental or consequential damages so the above limitation and exclusion may not apply to you This warran ty give you specific legal rights and you may also have other rights which vary from state to state FOR SERVICE INFORMATION CONTACT Etón Corporation 1015 Corporation Way Palo Alto CA ...

Страница 18: ...MENT DU TUNER AM FM 53 Écoute de la radio 53 Mise en mémoire de stations présélectionnées 54 Retrouver les stations présélectionnées 54 FONCTIONEMENT DE L HORLOGE ALARME 55 Réglage de l heure locale 55 Réglage de l heure mondiale 56 Sélection du mode des heures 56 Réglage de l heure d alarme 56 Activation Désactivation de l alarme 57 Sélection de la fonction Alarme 58 Affichage des réglages d alar...

Страница 19: ...at horaire 12 24 choisissez entre le format horaire soit sur 12 heures ou sur 24 heures 36 2 CARACTERISTIQUES Le Radio réveil CD MP3 AM FM de voyage ego 4000 Plus est équipé des fonctions prin cipales suivantes Lecteur CD MP3 Protection électronique contre les chocs ESP met en mémoire 40 secondes de données CD et 120 secondes de données MP3 pour une lecture ininterrompue même lorsque le lecteur es...

Страница 20: ...tachez et placez les enceintes de qualité où vous voulez pour une écoute et une performance optimales Système audio SRS système surround sound avec amplification des graves et performance 3D plus large Écran LCD éclairé à fonctions multiples grand écran LCD à rétroéclairage bleu avec matrice de type à gros points pour voir confortablement l état du système et l horloge même dans un endroit pas écl...

Страница 21: ...tro lecture des débuts de plage ou la lecture Shuff Random Mélangée Aléatoire Play Pause Appuyez pour lancer ou interrompre la lecture d un CD MP3 Scan Up Down Appuyez pour avancer et reculer rapidement et rechercher des plages ou un répertoire d un CD MP3 dans la fonction tuner appuyez pour rechercher les stations de radio désirées ou pour rechercher automa tiquement les stations Stop Appuyez pou...

Страница 22: ... TOUTES les plages pendant la lecture d un CD MP3 MHz indique la fréquence FM KHz indique la fréquence AM MONO indique la fonction MONO du tuner DIR indique la fonction de répétition du RÉPERTOIRE pendant la lecture d un CD MP3 STEREO indique la fonction STÉRÉO du tuner REPT 1 indique la fonction d UNE plage pendant la lecture d un CD MP3 AM indique la radio AM FM indique la radio FM SHUFF indique...

Страница 23: ...ssitôt que l adaptateur AC DC est branché sur l appareil les piles installées seront automatiquement hors circuits 44 4 INSTALLATION ET RACCORDEMENTS RACCORDEMENT DES HAUT PARLEURS Le lecteur est équipé d une paire de haut par leurs détachables Le lecteur peut être utilisé avec les haut parleurs placés dans le couvercle ou avec les haut parleurs détachés Vous pouvez enlever les haut parleurs du co...

Страница 24: ...te procédure RÉGLAGE DU VOLUME Tournez le bouton Volume comme indiqué sur le côté droit du lecteur pour ajuster le volume à un niveau d écoute confortable 46 6 MODE D EMPLOI FONCTIONNEMENT DU CD MP3 CHARGEMENT DES DISQUES 1 Pour ouvrir le lecteur coulissez le bouton OPEN PLAYER dans la direction de la flèche 2 Appuyez sur le bouton OPEN LID situé sur le coin avant gauche du lecteur pour ouvrir le ...

Страница 25: ...uyer à plusieurs reprises sur le bouton SCAN DOWN pour sauter en arrière pour choisir la plage ou le répertoire désiré La lecture commencera automatiquement 48 6 MODE D EMPLOI FONCTIONNEMENT DU CD MP3 ÉGALISEUR EQ Lorsque vous écoutez des disques CD MP3 vous pouvez appuyer sur le bouton EQ PROG pour sélectionner un effet d égaliseur pré programmé pour une écoute améliorée de votre musique Les cinq...

Страница 26: ...lecture d un disque MP3 est arrêtée mais l alimentation est encore en marche vous pouvez 1 Appuyer à plusieurs reprises sur le bouton SCAN UP DOWN pour trouver le répertoire ou la plage désirée 2 Appuyer sur le bouton PLAY PAUSE pour lancer la lecture à partir de cette plage NOTE Pendant la lecture appuyez sur le bouton SAS 10 pour sauter en avant de 10 plages à chaque fois RÉPÉTITION DE LECTURE P...

Страница 27: ... écoute de l émission sur MONO Lorsque MONO est sélectionné la réception sera meilleure et MONO apparaîtra sur l écran LCD Appuyez sur le bouton STOP pour mettre la radio à l arrêt 52 6 MODE D EMPLOI FONCTIONNEMENT DU CD MP3 5 Appuyez sur le bouton PLAY PAUSE pour jouer la plage programmée pendant que l indication PROG est affichée sur l écran LCD 6 Répétez les étapes 1 à 5 pour programmer toutes ...

Страница 28: ...r le mois correct 8 Appuyez à nouveau sur le bouton SET pour sauvegarder le réglage du mois L affichage commence à clignoter le jour 9 Appuyez sur le bouton UP DOWN pour sélectionner le jour correct 10 Appuyez à nouveau sur le bouton SET pour sauvegarder le réglage de la date L affichage commence à clignoter l heure 11 Appuyez sur le bouton UP DOWN pour sélectionner l heure correcte 12 Appuyez à n...

Страница 29: ... sonnerie ou appuyez sur le bouton _ pour l alarme par l écoute d un CD MP3 ou pour l alarme par l écoute de la radio 56 MODE D EMPLOI FONCTIONNEMENT DE L HORLOGE ALARME 13 Appuyez sur le bouton UP DOWN pour sélectionner la minute correcte 14 Appuyez à nouveau sur le bouton SET pour sauvegarder le réglage de minute L heure et la date sont réglées LE TEMPS DE MONDE DE VUE Pour regarder le temps de ...

Страница 30: ... indications AL 1 BUZZER ou AL 2 BUZZER 2 seront affichées Si la fonction d alarme par CD MP3 WMA est sélectionnée l indication AL1 ou AL 2 sera affichée Si la fonction d alarme par radio est sélectionnée l indication AL 1 RADIO ou AL 2 RADIO sera affichée Lorsque l indication de fonction d alarme désirée est affichée arrêtez d appuyer sur le bouton Up ou Down et attendez pendant quelques secon de...

Страница 31: ...rises sur le bouton SLEEP jusqu à ce que l indication SLEEP OFF apparaisse sur l écran 2 Appuyez sur le bouton SET pour annuler le réglage de durée de temporisation d arrêt L indication SLEEP disparaît sur l écran RÉGLAGES DES GRAVES Ce lecteur est équipé de trois réglages différents des graves pour une écoute optimale Les trois réglages sont Stéréo TruBass et SRS 3D Sur le côté droit du lecteur c...

Страница 32: ...éraux qui peuvent corroder les circuits électroniques Utilisez et rangez le lecteur seulement dans des endroits dont la température ambiante est normale Des températures extrêmes peuvent raccourcir la durée de vie des appareils électroniques endommager les piles et déformer ou faire fondre les pièces en matière plastique Gardez le lecteur à l abri de la poussière et de la saleté qui peuvent causer...

Страница 33: ...r le dispositif de sécurité de raccordement à la masse ou de polarité Une fiche polarisée a deux lames dont une plus large que l autre Une fiche de terre a deux lames et une troisième broche pour la mise à la terre La lame large ou la troisième broche est fournie pour votre sécurité Si la fiche fournie ne rentre pas dans votre prise secteur consultez un électricien pour le remplacement de la prise...

Страница 34: ...e Mode d emploi Cette garantie ne s applique pas aux défauts qui selon l évalua tion de Etón ont été provoqués par 1 un entretien ou des réparations incorrects y compris l installation de pièces ou d acces soires qui ne sont pas conformes à la qualité et aux spécifications des pièces d origine 2 une utilisation incorrecte abusive ou négligente ou une installation incorrecte 3 des dégâts accidentel...

Страница 35: ...tats n autorisent aucune limitation sur la durée d une garantie implicite ou ne permettent pas les exclusions ou les limitations sur les dommages indirects ou consécutifs et donc les limitations et exclusions ci dessus peuvent ne pas s appliquer à vous Cette garantie vous donne des droits juridiques précis et vous pouvez également avoir d autres droits qui varient d état en état POUR OBTENIR DE PL...

Страница 36: ...800 872 2228 From Canada 800 637 1648 From Everywhere Else 650 903 3866 Email customersvc etoncorp com Internet www etoncorp com Etón Corporation 1015 Corporation Way Palo Alto California 94303 USA w w w e t o n c o r p c o m ...

Отзывы: