background image

EN 6

General safety

•  The lamp in this household appliance is only suitable for 

illumination of this appliance. The lamp is not suitable for 
household room illumination.  

•  

WARNING!

 This appliance is intended to be used in household 

and similar applications such as
–  staff kitchen areas in shops, offices and other working 

environments;

–  farm houses and by clients in hotels, motels and other 

residential type environments;

– bed and breakfast type environments;
–  catering and similar non-retail applications.

•  

WARNING!

 Keep ventilation openings, in the appliance 

enclosure or in the built-in structure, clear of obstruction.

•  

WARNING!

 Do not use mechanical devices or other means 

to accelerate the defrosting process, other than those 
recommended by the manufacturer.

•  

WARNING!

 Do not damage the refrigerant circuit.

•  

WARNING!

 Do not use electrical appliances inside the food 

storage compartments of the appliance, unless they are of the 
type recommended by the manufacturer.

•  

WARNING!

 Do not use water spray and steam to clean the 

appliance.

•  

WARNING!

 Clean the appliance with a moist soft cloth. Only 

use neutral detergents. Do not use abrasive products, abrasive 
cleaning pads, solvents or metal objects.

•  

WARNING!

 Do not store explosive substances such as aerosol 

cans with a flammable propellant in this appliance.

•  

WARNING!

 If the supply cord is damaged, it must be replaced 

by the manufacturer, its service agent or similarly qualified 
persons in order to avoid a hazard.

SAFETY INSTRUCTIONS

Содержание EVV1432WIT

Страница 1: ...GEBRUIKSAANWIJZING MODE D EMPLOI BEDIENUNGSANLEITUNG INSTRUCTIONS FOR USE VRIEZER CONG LATEUR GEFRIERSCHRANK FREEZER VV155WIT VV555WIT EVV1432WIT...

Страница 2: ...en aansluiten De keuze van de ruimte 12 Toestel aansluiten 13 Afstandhouders 14 Draairichting deur wijzigen 14 Toestelbeschrijving Toestel 16 Bediening van het toestel Instellen van de thermostaat 17...

Страница 3: ...ontdooien 21 Het toestel reinigen 22 Storingen Storingstabel 23 Milieuaspecten Verpakking en toestel afdanken 24 INHOUDSOPGAVE Gebruikte pictogrammen Belangrijk om te weten Tip Waarschuwing Brandgeva...

Страница 4: ...e handleiding leest u hoe u dit toestel het best kunt gebruiken Naast informatie over de bediening vindt u hier ook achtergrondinformatie die u tijdens het gebruik van het toestel van pas kan komen Le...

Страница 5: ...ervoor te zorgen dat ze niet met het apparaat spelen Reiniging en onderhoud mogen niet door kinderen worden uitgevoerd zonder toezicht Houd alle verpakkingsmaterialen uit de buurt van kinderen Alleen...

Страница 6: ...geen mechanische of andere middelen om het ontdooiproces te versnellen behalve die middelen die door de fabrikant zijn aanbevolen WAARSCHUWING Let op dat u het koelcircuit niet beschadigt WAARSCHUWIN...

Страница 7: ...de olie terug in de compressor stromen Installeer het apparaat niet in de nabijheid van radiators fornuizen ovens of kookplaten Installeer het apparaat niet op een plaats met direct zonlicht Gebruik...

Страница 8: ...netsnoer na installatie bereikbaar is Pak altijd de stekker vast als u de kabel uit het stopcontact wilt halen Trek nooit aan de voedingskabel WAARSCHUWING Plaats geen meervoudige stekkerdozen of draa...

Страница 9: ...t geen hete items op de kunststofonderdelen van het apparaat Bewaar geen ontvlambare gassen en vloeistoffen in het apparaat Plaats geen ontvlambare producten of items die vochtig zijn door ontvlambare...

Страница 10: ...en en huisdieren opgesloten raken in het apparaat Het koelcircuit en de isolatiematerialen van dit apparaat zijn ozonvriendelijk Het isolatieschuim bevat ontvlambare gassen Neem contact met uw plaatse...

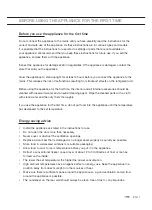
Страница 11: ...reinigen de delen af met schoon water en droog ze zorgvuldig Als u het toestel voor de eerste keer gaat gebruiken plaats dan geen voedsel in het toestel voordat de temperatuur tot de gekozen instelli...

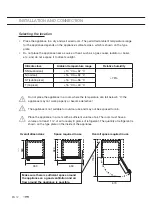
Страница 12: ...T subtropisch 16 C tot 38 C T tropisch 16 C tot 43 C Plaats het toestel niet in een ruimte waar de temperatuur kan dalen tot onder 5 C want dit kan een onjuiste werking of een storing veroorzaken Het...

Страница 13: ...estel waterpas zetten Toestel aansluiten Sluit het toestel met het netsnoer aan op het elektriciteitsnet Het stopcontact moet geaard zijn De nominale spanning en de frequentie van het toestel vindt u...

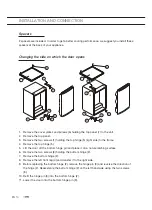
Страница 14: ...charnier 5 5 Til de deur op van de pen van het onderste scharnier en leg hem op een niet krassend oppervlak 6 Verwijder de twee schroeven 8 terwijl u het onderste scharnier ondersteunt 2 7 Verwijder h...

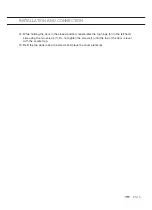
Страница 15: ...rnier 5 aan de linkerkant met behulp van de twee schroeven 1 Draai de schroeven 1 pas vast als de deur waterpas is ten opzichte van de ondergrond van het apparaat 13 Monteer het bovenpaneel weer met d...

Страница 16: ...NL 16 TOESTELBESCHRIJVING Toestel VV555WIT VV155WIT EVV1432WIT 2 2 2 2 1 4 3 1 Thermostaat 2 Vrieslade 3 Stelvoeten 4 Deur Beste locatie voor het invriezen van vers voedsel 4 2 2 2 2 2 2 1 3...

Страница 17: ...aar stand MIN te draaien Stel een lagere temperatuur in door de regelknop naar stand MAX te draaien Haal de stekker uit het stopcontact de vriezer is uitgeschakeld Snel invriezen Zet een dag voordat u...

Страница 18: ...n mayonaise niet in de vriezer Voorkom het bederven van voedsel Volg de onderstaande instructies om het bederven van voedsel te voorkomen Als u de deur gedurende lange tijd opent kan de temperatuur in...

Страница 19: ...e hoofdstuk Aanbevolen indeling voor de beste locatie voor het invriezen van vers voedsel 1 2 kilo en het maken van ijsblokjes Invriezen van grote hoeveelheden vers voedsel Zet een dag voordat u een g...

Страница 20: ...van belang dat het voedsel op de juiste manier wordt ontdooid Geschikte manieren om voedsel te ontdooien in de koelkast in koud water in een magnetron of oven met een geschikt ontdooiprogramma Sommig...

Страница 21: ...r aan deze levensmiddelen binnen niet al te lange tijd te consumeren Zet het toestel uit Laat de deur open staan om zo het ontdooi proces te versnellen Gebruik bij het ontdoolen geen ontdooisprays omd...

Страница 22: ...sumeren Maak regelmatig de binnenzijde van het toestel schoon met lauw water met eventueel een neutraal reinigingsmiddel of speciale koelkastreiniger Maak alle oppervlakken schoon met een zachte doek...

Страница 23: ...op met het servicecentrum als de deurrubbers beschadigd zijn Toestel maakt lawaai Onjuiste opstelling levensmiddelen in het toestel Plaats levensmiddelen op de juiste wijze in het toestel Er ligt een...

Страница 24: ...ke apparaten afzonderlijk moeten worden afgedankt Dit houdt in dat het toestel aan het einde van zijn levensduur niet met het gewone huisvuil mag worden meegegeven Het toestel moet naar een speciale g...

Страница 25: ...NL 25...

Страница 26: ...ent Choix de l emplacement 13 Branchement de l appareil 14 Entretoises 15 Changement du sens d ouverture de la porte 15 Description de l appareil Appareil 17 Utilisation de l appareil R glage du therm...

Страница 27: ...ttoyage de l appareil 23 Probl mes Tableau des probl mes 24 Aspects environnementaux Mise au rebut de l appareil et de l emballage 25 SOMMAIRE Pictogrammes utilis s Important savoir Conseil Mise en ga...

Страница 28: ...ent utiliser votre appareil de mani re optimale Il contient des informations relatives au fonctionnement de l appareil ainsi que des informations d ordre g n ral susceptibles d en faciliter l utilisat...

Страница 29: ...surveill s pour s assurer qu ils ne jouent pas avec l appareil Les enfants ne peuvent en aucun cas nettoyer ou entretenir cet appareil sans tre supervis s Tenez tous les emballages hors de port e des...

Страница 30: ...a structure d encastrement MISE EN GARDE Ne pas utiliser de dispositifs m caniques ou d autres moyens pour acc l rer le processus de d givrage en dehors de ceux recommand s par le fabricant MISE EN GA...

Страница 31: ...urs des gants de s curit Assurez vous que l air circule autour de l appareil Attendez au moins 4 heures avant de brancher l appareil sur secteur Ceci afin de permettre l huile de refouler dans le comp...

Страница 32: ...trouver en dessous du niveau de la fiche secteur Branchez la fiche secteur dans la prise de courant uniquement la fin de l installation Assurez vous que la fiche secteur est accessible une fois l app...

Страница 33: ...dans la pi ce A rez la pi ce vitez tout contact d l ments chauds avec les parties en plastique de l appareil Ne stockez pas de gaz ou de liquide inflammable dans l appareil Ne placez pas de produits...

Страница 34: ...au rebut Retirez la porte pour emp cher que les enfants et les animaux ne s enferment l int rieur de l appareil Le circuit de r frig ration et les mat riaux isolants de cet appareil ne sont pas n fas...

Страница 35: ...e fois l int rieur et tous les accessoires internes doivent tre nettoy s l eau ti de et un d tergent neutre Essuyez les parties nettoy es avec un chiffon imbib d eau claire puis s chez les soigneuseme...

Страница 36: ...tour de l appareil pour permettre une ventilation correcte et une bonne circulation de l air autour de l appareil Le condenseur sur la paroi arri re doit tre toujours propre exempt de poussi re et d i...

Страница 37: ...la temp rature peut descendre en dessous de 5 C l appareil risque de ne pas fonctionner correctement et de devenir d fectueux L appareil n est pas con u pour un usage en ext rieur et ne doit pas tre e...

Страница 38: ...ppareil niveau avec les pieds r glables Branchement de l appareil Branchez la fiche de l appareil dans l alimentation secteur La prise doit tre mise la terre La tension et la fr quence nominales requi...

Страница 39: ...4 Retirez la charni re sup rieure 5 5 Soulevez la porte de la goupille de la charni re inf rieure et placez la sur une surface non rayante 6 Retirez les deux vis 8 tout en soutenant la charni re inf...

Страница 40: ...ion ferm e montez la charni re sup rieure 5 du c t gauche avec les deux vis 1 Ne serrez pas les vis 1 jusqu ce que la porte soit au m me niveau que la surface de l appareil 13 Remontez le panneau sup...

Страница 41: ...ESCRIPTION DE L APPAREIL Appareil VV555WIT VV155WIT EVV1432WIT 2 2 2 2 1 4 3 1 Thermostat 2 Tiroir du cong lateur 3 Pieds r glables 4 Porte Zones optimales pour congeler les aliments frais 4 2 2 2 2 2...

Страница 42: ...a position MIN Pour r gler l appareil une temp rature inf rieure faites tourner le bouton du thermostat jusqu la position MAX Retirez la fiche de la prise murale le r frig rateur est arr t Cong lation...

Страница 43: ...re ou la mayonnaise dans le cong lateur viter la contamination des aliments Pour viter la contamination des aliments veuillez respecter les instructions suivantes L ouverture de la porte pendant de lo...

Страница 44: ...s sur les zones optimales pour congeler des aliments frais 1 2 kg et faire des gla ons Cong lation de grandes quantit s d aliments frais La veille du jour o vous souhaitez congeler de grandes quantit...

Страница 45: ...ppropri e Les m thodes de d cong lation recommand es sont les suivantes dans le r frig rateur dans de l eau froide dans un four micro ondes ou un four conventionnel poss dant un programme de d cong la...

Страница 46: ...riode de temps relativement courte teignez l appareil Laisser la porte ouverte pour acc l rer la d givrage Enlever l eau de d givrage du compartiment Pour le d givrage ne pas utiliser les bombes a ros...

Страница 47: ...rement avec de l eau ti de Ajoutez au besoin un produit nettoyant neutre ou sp cial cong lateur dans l eau Nettoyez toutes les surfaces avec un chiffon doux Essuyez les parties nettoy es avec un chif...

Страница 48: ...ou endommag s Nettoyez les joints s ils sont endommag s contactez le service apr s vente L appareil fait du bruit Des aliments sont dispos s de fa on incorrecte dans l appareil Placez les aliments co...

Страница 49: ...re attention sur le tri s lectif et la n cessit d liminer les appareils m nagers domestiques s par ment des ordures m nag res Cela signifie qu la fin de son cycle de service l appareil ne peut pas tre...

Страница 50: ...w hlen eines geeigneten Standorts 13 Anschlie en des Ger ts 14 Abstandhalter 15 Anschlagseite der Ger tet r ndern 15 Beschreibung des Ger ts Ger t 17 Bedienung des Ger ts Einstellen des Thermostats 18...

Страница 51: ...tauen des Ger ts 22 Ger t reinigen 23 St rungen St rungstabelle 24 Umweltschutz Entsorgung von Ger t und Verpackung 25 INHALT Verwendete Piktogramme Wichtiger Hinweis Tipp Warnung Brandgefahr brennbar...

Страница 52: ...unkt In dieser Anleitung erfahren Sie wie Sie das Ger t optimal verwenden Sie enth lt Informationen zur Bedienung sowie Hintergrundinformationen zur Funktionsweise Lesen Sie vor der Inbetriebnahme des...

Страница 53: ...eug Halten Sie Kinder davon fern Kinder d rfen Reinigungs und Wartungsma nahmen am Ger t nur unter Aufsicht Erwachsener durchf hren Verpackungsmaterialien von Kindern fern halten Nur f r den europ isc...

Страница 54: ...n WARNUNG Beim Abtauen keine mechanischen Hilfsmittel verwenden die nicht ausdr cklich vom Hersteller empfohlen werden WARNUNG K ltemittelkreislauf nicht besch digen WARNUNG Keine elektrischen Ger te...

Страница 55: ...e das Ger t nach der Lieferung mindestens 4 Stunden aufrecht stehen bevor Sie es mit der Stromversorgung verbinden So lassen Sie dem l ausreichend Zeit zur ck in den Kompressor zu flie en Ger t nicht...

Страница 56: ...dendienst oder von einem Elektriker durchgef hrt werden Das Netzkabel muss stets tiefer liegen als die Steckdose Installation erst vollst ndig abschlie en danach Stecker in die Steckdose stecken Achte...

Страница 57: ...nststoffteilen des Ger ts fernhalten Im Ger t keine brennbaren Gase und Fl ssigkeiten lagern Brennbare Produkte und Objekte die mit brennbaren Fl ssigkeiten benetzt sind vom Ger t fernhalten Kompresso...

Страница 58: ...der und Haustiere im Ger t einschlie en Der K ltemittelkreislauf und die Isoliermaterialien dieses Ger ts sind unsch dlich f r die Ozonschicht Der Isolierschaum enth lt brennbares Gas Informationen zu...

Страница 59: ...ebnahme das Innere des Ger ts sowie alles interne Zubeh r mit lauwarmem Wasser und einem neutralen Reinigungsmittel Gereinigte Teile mit einem Tuch und klarem Wasser abwischen und danach gr ndlich abt...

Страница 60: ...herum gen gend Platz vorhanden ist damit eine gute Bel ftung und Luftstr mung um das Ger t herum m glich ist Der Kondensator an der R ckwand sollte immer sauber staubfrei und frei von Verunreinigungen...

Страница 61: ...icht in R umen aufstellen in denen die Temperatur unter 5 C fallen kann Bei Nichtbeachtung kann es zu Funktionsst rungen und Sch den am Ger t kommen Das Ger t eignet sich nicht f r den Einsatz im Frei...

Страница 62: ...Stromkabel nicht besch digt Das Ger t gerade und stabil auf einer festen Unterlage aufstellen Sie k nnen das Ger t mit den verstellbaren F en ausgleichen Anschlie en des Ger ts Schlie en Sie das Ger...

Страница 63: ...rnen Sie das obere Scharnier 5 5 Heben Sie die T r vorsichtig vom unteren Scharnier ab und legen Sie sie auf eine gepolsterte Oberfl che um Kratzer zu vermeiden 6 Entfernen Sie die zwei Schrauben 8 7...

Страница 64: ...t den zwei Schrauben 1 auf der linken Seite Ziehen Sie die Schrauben 1 erst an wenn die T r auf H he der Oberfl che des Ger ts steht 13 Befestigen Sie die obere Abdeckung wieder mit den Schrauben und...

Страница 65: ...17 BESCHREIBUNG DES GER TS Ger t VV555WIT VV155WIT EVV1432WIT 2 2 2 2 1 4 3 1 Thermostat 2 Gefrierraum Schublade 3 Stellf e 4 T r Beste Position f r das Einfrieren frischer Lebensmittel 4 2 2 2 2 2 2...

Страница 66: ...e Temperatur ein indem Sie den Regelknopf auf Stufe MAX drehen Ziehen Sie den Netzsteckerder aus der Steckdose die Gefrierschrank ist ausgeschaltet Schnelles Einfrieren Am Tag bevor Sie gro e Mengen f...

Страница 67: ...Joghurt Buttermilch Schmand oder Mayonnaise Verderben von Lebensmitteln vermeiden Um ein verderben von Lebensmitteln zu vermeiden beachten Sie bitte die folgenden Hinweise Wenn Sie die T r f r l ngere...

Страница 68: ...Datum des Einfrierens Frische Lebensmittel d rfen nicht in Kontakt mit Gefriergut kommen Einfrieren geringer Mengen frischer Lebensmittel Herstellung von Eisw rfeln Die besten Einlegepositionen f r f...

Страница 69: ...W rste Blaubarsch 1 Monat Auftauen von Gefriergut Das Auftauen ist ein wichtiger Schritt bei der Lagerung von Lebensmitteln die durch Tiefgefrieren konserviert werden Es kommt auf die richtige Art de...

Страница 70: ...hend k rzerer Zeit zu verzehren Schalten Sie das Ger t aus Lassen Sie die T r offen um den Abtauvorgang zu beschleunigen Entfernen Sie das Abtauwasser das sich im Innenraum ansammelt Beim Abtauen bitt...

Страница 71: ...n n tig Neutralreiniger oder K hlschrankreinigungsmittel zum Wasser hinzuf gen Alle Oberfl chen mit einem weichen Tuch reinigen Gereinigte Teile mit einem Tuch reinigen das mit sauberem Wasser angefeu...

Страница 72: ...gt sind wenden Sie sich an den Kundendienst Ger t macht Ger usche Lebensmittel stehen falsch im Ger t Geben Sie Lebensmittel korrekt in den Ger t Lebensmittel stehen falsch im K hlschrank oder Gefrier...

Страница 73: ...t ist mit dem Symbol einer durchstrichenen M lltonne gekennzeichnet Dieses Symbol weist darauf hin dass Elektroger te getrennt entsorgt werden m ssen Das Ger t darf am Ende seiner Nutzungsdauer nicht...

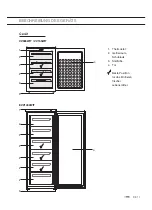
Страница 74: ...ation and connection Selecting the location 12 Connecting the appliance 13 Spacers 14 Changing the side on which the door opens 14 Description of the appliance Appliance 16 Operating the appliance Set...

Страница 75: ...ting the appliance 21 Cleaning the appliance 22 Faults Faults table 23 Environmental aspects Disposal of packaging and appliance 24 CONTENTS Pictograms used Important information Tip Warning risk of f...

Страница 76: ...for use explain how you can make best use of this appliance These instructions contain information about the operation of the appliance and background information that may be of help to you during its...

Страница 77: ...safety Children should be supervised to ensure that they do not play with the appliance Cleaning and user maintenance shall not be made by children without supervision Keep all packaging away from chi...

Страница 78: ...chanical devices or other means to accelerate the defrosting process other than those recommended by the manufacturer WARNING Do not damage the refrigerant circuit WARNING Do not use electrical applia...

Страница 79: ...east 4 hours before connecting the appliance to the power supply This is to allow the oil to flow back in the compressor Do not install the appliance close to radiators or cookers oven or hobs Do not...

Страница 80: ...he mains plug to the mains socket only at the end of the installation Make sure that there is access to the mains plug after the installation Do not pull the mains cable to disconnect the appliance Al...

Страница 81: ...t let hot items to touch the plastic parts of the appliance Do not store flammable gas and liquid in the appliance Do not put flammable products or items that are wet with flammable products in near o...

Страница 82: ...and pets to be closed inside of the appliance The refrigerant circuit and the insulation materials of this appliance are ozone friendly The insulation foam contains flammable gas Contact your municip...

Страница 83: ...d parts with a cloth with clean water and then dry them thoroughly If you use the appliance for the first time do not put food into the appliance until the temperature has decreased to the set tempera...

Страница 84: ...43 C Do not place the appliance in a room where the temperature can fall below 5 C the appliance may not work properly or become defective The appliance is not suitable for outdoor use and may not be...

Страница 85: ...evel the appliance using the adjustable feet Connecting the appliance Connect the appliance to the power supply with a plug The socket must be earthed The nominal voltage and frequency required for th...

Страница 86: ...s 1 holding the top hinge 5 right side to the frame 4 Remove the top hinge 5 5 Lift the door off the bottom hinge pin and place it on a non scratching surface 6 Remove the two screws 8 holding the bot...

Страница 87: ...reassemble the top hinge 5 on the left hand side using the two screws 1 Do not tighten the screws 1 until the top of the door is level with the counter top 13 Refit the top panel using the screws and...

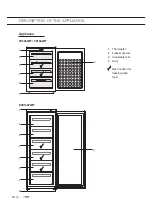
Страница 88: ...EN 16 DESCRIPTION OF THE APPLIANCE Appliance VV555WIT VV155WIT EVV1432WIT 2 2 2 2 1 4 3 1 Thermostat 2 Freezer drawer 3 Adjustable feet 4 Door Best location for freezing fresh food 4 2 2 2 2 2 2 1 3...

Страница 89: ...ing the knob to setting MIN Set a lower temperature by turning the knob to setting MAX Disconnect from the power mains the freezer is off Fast freezing The day before you want to freeze large amounts...

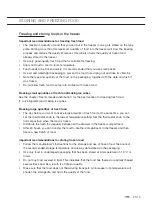
Страница 90: ...t buttermilk sour cream or mayonnaise in the freezer Avoid contamination of food To avoid contamination of food please respect the following instructions Opening the door for long periods can cause a...

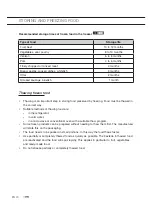
Страница 91: ...ribution for the best location for freezing fresh food 1 to 2 kilograms and making ice cubes Freezing large quantities of fresh food The day before you want to freeze large amounts of fresh food at th...

Страница 92: ...ng Food must be thawed in the correct way Suitable methods of thawing food are in the refrigerator in cold water in a microwave or conventional oven with a suitable thaw program Some frozen products c...

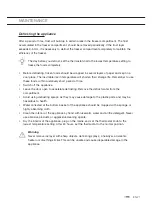
Страница 93: ...relatively short period of time Switch off the appliance Leave the door open to accelerate defrosting Remove the defrost water from the compartment Avoid using defrosting sprays as they may cause dam...

Страница 94: ...h lukewarm water If so required add a neutral cleaning agent or special refrigerator cleaner to the water Clean all surfaces with a soft cloth Wipe the cleaned parts with a cloth with clean water and...

Страница 95: ...r the seals are damaged Clean the door seals Call the service centre if the door seals are damaged Appliance makes a noise Incorrect positioning of food in the freezer Place foods in the proper manner...

Страница 96: ...n to the requirement for the separate disposal of domestic electrical appliances This means that the appliance may not be disposed of in unsorted household waste at the end of its service life The app...

Страница 97: ...EN 25...

Страница 98: ...EN 26...

Страница 99: ...EN 27...

Страница 100: ...jzing is ook te vinden op onze website La notice d utilisation est galement disponible sur notre site web Die Bedienungsanleitung finden Sie auch auf unserer Internetseite The instructions for use can...

Отзывы: