eTIGER ES-DLS-01 Скачать руководство пользователя страница 7

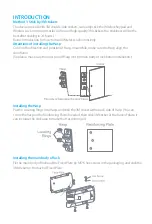
The device packed with 3M double-side stickers, can easily stick the Wireless Keypad and 
Wireless Lock on smooth surface (We used high-quality 3M stickers, the stickiness will be the 
best after sticking in 24 hours). 
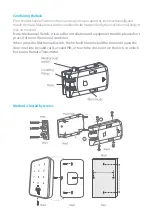
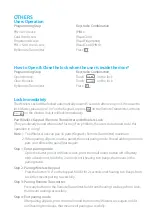
Below introduction for how to install Wireless Lock intensively:

Method 1: Stick by 3M stickers

Confirm the direction and position of Hasp, meanwhile, make sure the Hasp align the 
doorframe.
(So please make sure the direction of Hasp is fit for main body of lock before installation.)

Attentions of installing the Hasp

Put the Locating Rings into Hasp, and stick the 3M sticker at the back side of Hasp (You can 
screw the hasp on the Reinforcing Plate if needed, then stick 3M sticker at the back of plate. It 
can increase the stick area to make the Hasp stronger).

Installing the Hasp

Fix the main body of lock and the Fixed Plate by M5*6 hex screws in the packaging, and stick the 
3M sticker on the back of Fixed Plate.

Installing the main body of lock

OPEN

CLOSE

INTRODUCTION

Содержание ES-DLS-01

Страница 1: ...ES DLS 01 Wireless Security DockLock Base Set www etiger com ON OFF ON OFF ...

Страница 2: ......

Страница 3: ......

Страница 4: ...ng3Mstickersprovideasimplewayforinstallation nodoordestroy no hole wireless nopowercab 433MhzRollingCodeofencryptionalgorithmandthesplitdesign guaranteehigher secure TheKeypadcanstore500PIN cardusers Becauseofultralowpowerconsumption theKeypad andRemoteTransmitterscanworkaslongasoneyear baseson30times day WirelessLock canwork6months Itwillremindpeopletoreplacebatteriesintelligentlyiflowbattery 500...

Страница 5: ...Keypad WirelessLock OperatingHumidity Physical WirelessLock RemoteTransmitter Dimensions WirelessLock RemoteTransmitter UnitWeight WirelessLock RemoteTransmitter 500 4 8Digits 13 56MHzM1Card 2unitsofAAbatteries 1unitof2032Lithiumbattery Allitems 10uA 42mA 3mA 433MHz 50mMaximum 40 C 60 C 40 F 140 F 20 C 60 C 4 F 140 F 0 86 RH Zinc Alloy ABSShell ABSShell L150 W95 D39 mm L55 W32 D10 mm 800g 16g pc S...

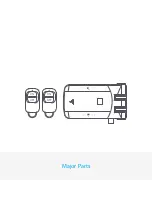
Страница 6: ...Major Parts ON OFF ON OFF ...

Страница 7: ...uretheHaspalignthe doorframe SopleasemakesurethedirectionofHaspisfitformainbodyoflockbeforeinstallation Attentions of installing the Hasp PuttheLocatingRingsintoHasp andstickthe3MstickeratthebacksideofHasp Youcan screwthehaspontheReinforcingPlateifneeded thenstick3Mstickeratthebackofplate It canincreasethestickareatomaketheHaspstronger Installing the Hasp FixthemainbodyoflockandtheFixedPlatebyM5 6...

Страница 8: ... Note Mechanical Switch it is used for installation and equipment trouble please don t press it often in the normal condition When press the Mechanical Switch the lock will be unlock all the time until open the door one time by valid card or valid PIN or touch the close icon on the lock or unlock button on RemoteTransmitter Method 2 Install by screws OPEN CLOSE OPEN CLOSE 87mm 61mm ...

Страница 9: ...itter ByWirelessLock LockImmediately ByKeypad ByRemoteTransmitter ByWirelessLock FingerprintAccess Enter and Exit Program Mode Operation 123456 123456isthefactorydefaultmastercode 0 NewCode RepeatNewCode code 6digits 1 UserID PIN RepeatPIN 1 ReadCard 1 UserID Readfingerprint RepeatReadfingerprint 2 UserID 2 ReadCard PIN ReadCard Press Touch Press 0 Press Touch ReadFingerprint ProgrammingStep Keyst...

Страница 10: ...Card s ProgrammingStep KeystrokeCombination 1 EnterProgramMode 2 AddCard UsingAutoID AllowstoassignCard tonextavailableUserIDnumber OR 2 AddCard SelectSpecificID AllowsMasterto defineaSpecificUserIDtoassociate thecard 3 Exit UserID 0 499 Cardtype 13 56MHzM1Card MasterCode 1 ReadCard Thecardscanbeaddedcontinuously 1 UserID ReadCard Change PIN ProgrammingStep KeystrokeCombination 1 ChangePIN ByCard ...

Страница 11: ...userscanbedeletedcontinuously 2 ReadCard 2 MasterCode Set Access Mode ProgrammingStep KeystrokeCombination 1 EnterProgramMode 2 Ad2 PINAccess OR PIN CardAccess OR PINorCard 3 Exit MasterCode 30 31 32 factorydefault ProgrammingStep KeystrokeCombination 1 EnterProgramMode 2 Strike OutOFF OR Strike OutON 3 Exit MasterCode 60 factorydefault 61 Set Buzzer ProgrammingStep KeystrokeCombination 1 EnterPro...

Страница 12: ...othis operationinusing PairWireless Keypad RemoteTransmitter withWireless Lock CLOSE Note 1 TheWirelessLockcanpair16parts Keypad RemoteTransmitter maximum 2 Whenpairing allpartsmustbepaired thenexitparingmode Ifneedaddingonemore part youstillneedtopairallpartsagain Step 1 Enter pairing mode OpenthebatterycoverofWirelessLock pressthesmallroundbuttonleftofbattery withaslenderrod holditfor2secondsunt...

Страница 13: ... Trans mitter Exitfromthe program mode Anykeypresslow batteryiconturn on5 Sthenoff Lowbattery reminding Pairing ON Unlock thelock Lock Lock Lowbattery reminding LEDshining andbeeps Pressbutton RedLED Note Thelockwillopenautomaticallywhenthebatteryis tooloworrunout pleasechangethebatteryINTIME ONfor3 seconds Green LED Lowbattey ICON Whenthe LEDisdim pleasechange thebattery Buzzer Onebeep Onebeep On...

Страница 14: ...Name Packagingbox WirelessLock RemoteTransmitters Manual ScrewDriver WallFixingPlus SelfTappingScrews AccessoriesofWirelessLock 3MStickers Packing List Quantity 1pc 1pc 2pcs 1pc 1pc 4pcs 4pcs 4sets 4pcs ...

Отзывы: