background image

ES1000.3 Housing

15

2.5

Attaching the ES1000.3

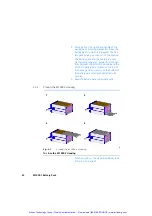
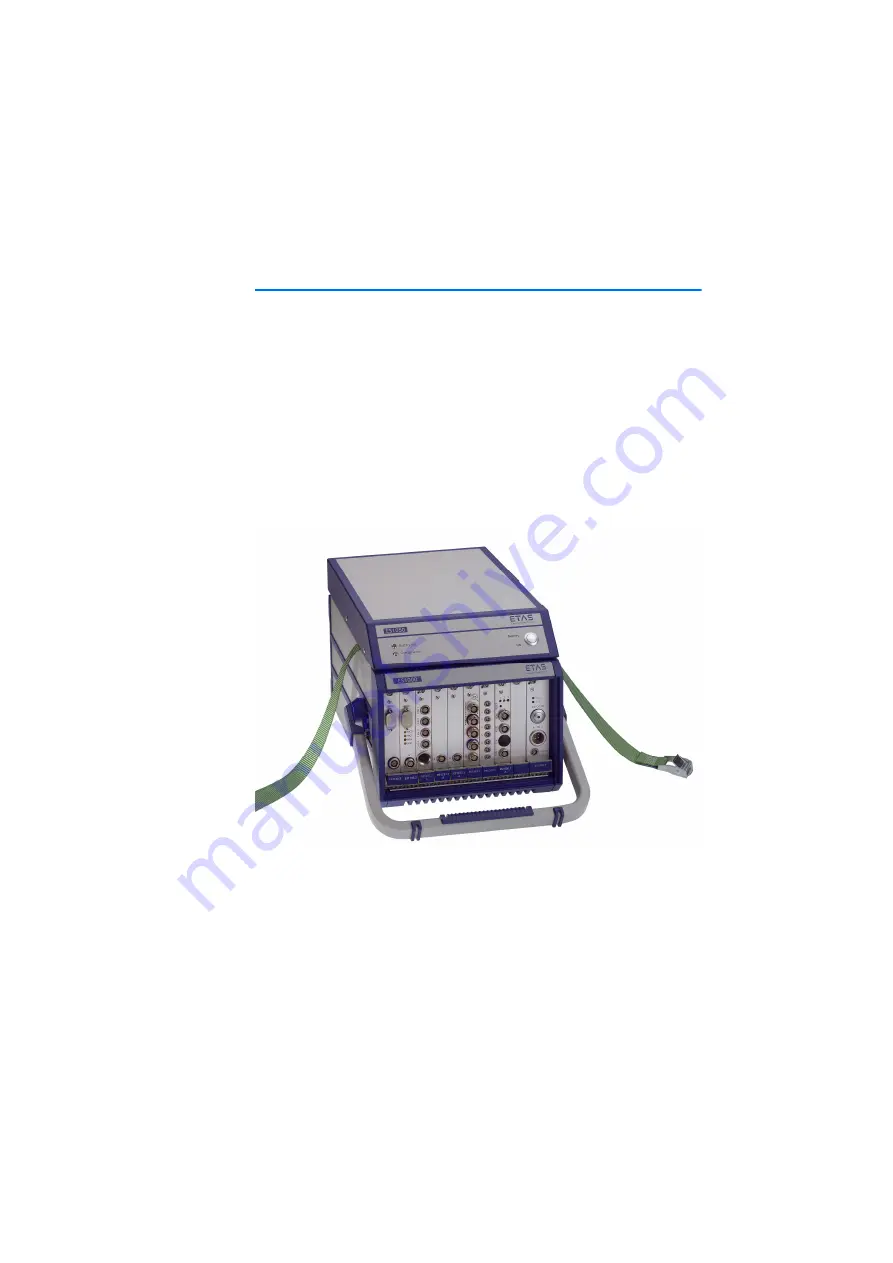
If necessary, the ES1000.3 Housing can be attached mechanically in the vehi-
cle, e.g. using a securing strap, and thus made stable. The structure of the
ES1000.3 Housing makes it possible for it to be attached either with or with-
out the ES1050.1 Battery Pack. 
If you are operating the device using a battery pack and the securing strap is
attached to the ES1000.3 Housing as shown in Fig. 2-2 on page 15, it is possi-
ble to change the battery pack without removing the securing mechanism.
If you want to make it possible to change the battery pack on an attached
ES1000.3 Housing, preparations must be made for mounting the battery pack.
The steps described in section 3.2.1 on page 19 must have been completed
before the ES1000.3 Housing is attached with the securing strap. The battery
pack is then connected to the ES1000.3 Housing (see section 3.2.2
on page 20).

Fig. 2-2

Attaching the ES1000.3 Housing

Artisan Technology Group - Quality Instrumentation ... Guaranteed | (888) 88-SOURCE | www.artisantg.com

Содержание ES1000.3

Страница 1: ...xcess underutilized and idle equipment along with credit for buybacks and trade ins Custom engineering so your equipment works exactly as you specify Critical and expedited services Leasing Rentals Demos In stock Ready to ship TAR certified secure asset solutions Expert team I Trust guarantee I 100 satisfaction All trademarks brand names and brands appearing herein are the property of their respec...

Страница 2: ...ES1000 3 Housing ES1050 1 Battery Pack User s Guide Artisan Technology Group Quality Instrumentation Guaranteed 888 88 SOURCE www artisantg com ...

Страница 3: ... is only allowed in concurrence with the specifications stip ulated in the contract Under no circumstances may any part of this document be copied repro duced transmitted stored in a retrieval system or translated into another lan guage without the express written permission of ETAS GmbH Copyright 2007 ETAS GmbH Stuttgart The names and designations used in this document are trademarks or brands be...

Страница 4: ...3 ES1000 3 Power Supply 11 2 3 1 Control Elements 12 2 3 2 Display Elements 12 2 3 3 Power Supply Interface 13 2 3 4 Automatic Overcurrent Deactivation 14 2 3 5 Remote Interface 14 2 3 6 Service Interface 14 2 4 Fan 14 2 5 Attaching the ES1000 3 15 3 ES1050 1 Battery Pack 17 3 1 Features 17 Artisan Technology Group Quality Instrumentation Guaranteed 888 88 SOURCE www artisantg com ...

Страница 5: ...oards 27 4 2 Removing VMEbus boards 28 4 3 Operating Modes of the ES1000 3 Power Supply 29 4 3 1 Overview 29 4 3 2 Switching Operating Mode 29 4 3 3 Automatic Operating Mode 29 4 3 4 Normal Operating Mode 30 4 3 5 Using a Battery Pack 30 4 4 Remote Control of the ES1000 3 Power Supply 31 4 4 1 Remote Control using the ES1000 3 Power Supply Control Unit 31 4 4 2 Remote Control using ES1120 x ES1130...

Страница 6: ...nformation 43 6 1 ES1000 3 Housing 43 6 1 1 Delivery Scope 43 6 2 Accessories 43 6 2 1 Cable 43 6 2 2 Delivery Scope 43 6 2 3 Cable 43 7 ETAS Contact Addresses 45 Index 47 Artisan Technology Group Quality Instrumentation Guaranteed 888 88 SOURCE www artisantg com ...

Страница 7: ...Contents 6 Artisan Technology Group Quality Instrumentation Guaranteed 888 88 SOURCE www artisantg com ...

Страница 8: ...em Fig 1 1 ES1000 3 Housing The most important features are high performance development and experimental platform for use in the lab and in the field automotive suitability resistance to extreme environmental conditions temperature EMC no need for a warm up of the system for a winter test see section 5 1 1 on page 33 high mechanical stability and robustness compact dimensions simple handling supp...

Страница 9: ...2 ES1050 1 Battery Pack The number of possible uses increases if the ETAS ES1000 3 experimental sys tem is combined with an optional ETAS ES1050 1 Battery Pack power is supplied to the experimental system making the system inde pendent of the vehicle power supply or an external power supply and use of the ES1050 1 Battery Pack as a buffer to avoid drastic voltage changes particularly when running ...

Страница 10: ...0 3 System control unit CU 1000 3 power unit PU 1000 3 VME power monitor signals remote function V out 5 1V V out 12 0V V out 12 0V VME backplane internal power supply interface 24 0V 5 0V 12 0V 12 0V 6 0V 36 0V V stb 5 0V 24 0V 24 0V controller ES1050 1 Battery Pack LED 1 LED 2 Sub D interface PWM fan control 1 fan 1 PWM fan control 2 fan 2 temperature sensor LED Vout LED C user interface 6 36 V ...

Страница 11: ...Introduction 10 Artisan Technology Group Quality Instrumentation Guaranteed 888 88 SOURCE www artisantg com ...

Страница 12: ...sing 2 3 ES1000 3 Power Supply The ES1000 3 Housing power supply is also suitable for all automotive require ments It has the following features wide input voltage range 6 V to 36 V transient filter complying with ISO 7637 1 active reverse connect protection output voltage monitoring temperature monitoring sustained short circuit proof power monitor complying with VMEbus specification ACFAIL SYSRE...

Страница 13: ...atic and normal of the power supply The LED display in the operating mode switch AUTO ON shows the oper ating status of the ES1000 3 Power Supply see section 2 3 2 on page 12 2 3 2 Display Elements There are two LED displays on the front panel of the power supply control unit Vout and C as well as an LED display in the operating mode switch AUTO ON 6 36V Vout C REMOTE ES1000 3 Artisan Technology G...

Страница 14: ...te the device with a supply voltage of 6V to 8V Display Element Sta tus Meaning C Off Interior housing temperature Normal On Interior housing temperature Increased automatic deactivation of the output voltages if the tem perature continues to rise Vout On Output voltages of the system Within the defined limits Off Output voltages of the system Overcurrent condition ful filled all output voltages d...

Страница 15: ...ace the ES1000 3 firmware can be updated if necessary The service software necessary for the update can be downloaded from the ETAS website The service interface is not accessible from the front but within the ES1000 3 Housing on the left on the power supply control unit directly on the circuit board To be able to use the service interface you have to remove any boards inserted next to the power s...

Страница 16: ...as shown in Fig 2 2 on page 15 it is possi ble to change the battery pack without removing the securing mechanism If you want to make it possible to change the battery pack on an attached ES1000 3 Housing preparations must be made for mounting the battery pack The steps described in section 3 2 1 on page 19 must have been completed before the ES1000 3 Housing is attached with the securing strap Th...

Страница 17: ...ES1000 3 Housing 16 Artisan Technology Group Quality Instrumentation Guaranteed 888 88 SOURCE www artisantg com ...

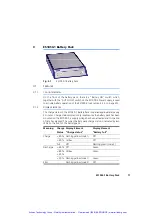
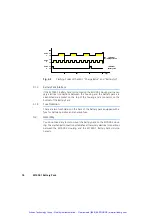
Страница 18: ...minutes Charge status display is only reliable once the battery pack has been mounted on the ES1000 3 a supply voltage has been activated and this period of time has elapsed The current battery pack charge status is indicated by two LEDs on the front of the battery pack Meaning Charge Display Element Display Element Status Charge status Battery full Charge 80 Flashing yellow code 1 Off 80 Yellow O...

Страница 19: ...4 Fuse Protection There are two fuseholders on the back of the battery pack equipped with a fuse for battery operation and a backup fuse 3 2 Assembly You do not need any tools to mount the battery pack on the ES1000 3 Hous ing The mechanical connection establishes all necessary electrical connections between the ES1000 3 Housing and the ES1050 1 Battery Pack simulta neously 1 3 4 2 t s Code 1 On O...

Страница 20: ... below look at Fig 3 3 on page 19 2 Unscrew the two mounting screws at the back of the top cover 3 Slide the top cover out to the back and remove it from the housing 4 Turn the top cover upside down so that the external side is now facing downwards 5 Slide the top cover in the front of the frame on the underside of the housing 6 Tighten the two mounting screws of the cover into the housing 1 2 3 4...

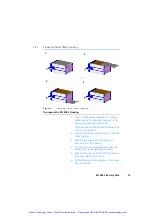
Страница 21: ... front of the ES1000 3 housing 2 Snap the battery pack onto the housing using its guide pins Press hard on the battery pack from above see Fig 3 5 on page 21 The battery pack and the housing are now connected to each other mechanically All nec essary electrical connections between the housing and the battery pack are established simultaneously via a socket on the top of the housing and a connector...

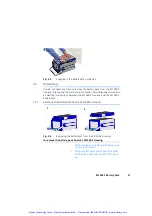
Страница 22: ...ES1000 3 Housing and the ES1050 1 Battery Pack 3 3 1 Removing the Battery Pack from the ES1000 3 Housing Fig 3 6 Removing the Battery Pack from the ES1000 3 Housing To remove the battery pack from the ES1000 3 Housing When carrying out the steps listed below look at Fig 3 6 on page 21 1 Using your left hand press down the middle of the battery pack onto the ES1000 3 Hous ing 3 2 1 Artisan Technolo...

Страница 23: ... tions between the ES1000 3 Housing and the ES1050 1 Battery Pack socket on the top of the housing and a connector on the bottom of the battery pack are disconnected simulta neously 3 Keep the battery pack somewhere safe 3 3 2 Closing the ES1000 3 Housing Fig 3 7 Closing the ES1000 3 Housing To close the ES1000 3 Housing When carrying out the steps listed below look at Fig 3 7 on page 22 1 2 3 4 A...

Страница 24: ...ou receive your ES1050 1 Battery Pack it is already charged 3 4 2 Charging at the Battery Pack Interface of the ES1000 3 Housing The ES1000 3 Power Supply automatically charges the ES1050 1 Battery Pack via the ES1000 3 battery pack interface as soon as an external voltage source is applied automatic operation or when the ES1000 3 is operating normally Note Warning Electrochemically speaking batte...

Страница 25: ...in power supply is connected to the SUB D con nector on the bottom of the battery pack The ES1050 1 Battery Pack should be charged with an external charger at room temperature 3 5 Operation and Storage Operating and storing the ES1050 1 Battery Pack at very high or very low tem peratures may well considerably reduce its service life The ES1050 1 Battery Pack should not be stored for more than 6 ho...

Страница 26: ...This also applies when the battery pack is mounted on the ES1000 3 Housing Note If the battery pack is kept in storage for a long period of time it should be recharged at least every 6 months Note Never store the battery pack uncharged over a long period of time Artisan Technology Group Quality Instrumentation Guaranteed 888 88 SOURCE www artisantg com ...

Страница 27: ...ES1050 1 Battery Pack 26 Artisan Technology Group Quality Instrumentation Guaranteed 888 88 SOURCE www artisantg com ...

Страница 28: ...e for the board is pro tected by a cover remove it 3 Insert the board into the slot Make sure that the board runs in both the top and bottom guide rails 4 Slide the board in until the connector snaps in 5 Screw in the mounting screws for the front panel of the board 6 Establish any necessary cable connections to the connectors of the front panel Note The boards can only be configured and installed...

Страница 29: ...nt to remove 3 Unscrew the mounting screws at the very top and bottom edge of the front panel of the board 4 Carefully pull out the board using its handle 5 Pack the board in its transport packaging or an anti static bag 6 Close the slot with a cover Note The boards can only be removed at a workplace that is protected against static discharge Artisan Technology Group Quality Instrumentation Guaran...

Страница 30: ...tomatic to normal or vice versa 4 3 3 Automatic Operating Mode To activate the ES1000 3 Power Supply Connect the device to an external voltage source vehicle power supply external power supply The ES1000 3 Power Supply is switched on for about five seconds setup is then executed and a standby supply voltage is activated The power supply of the VME backplane has not been activated yet The power sup...

Страница 31: ...ther automatically when the input voltage drops below the permissible rate of the ES1000 3 Power Supply buffer function or by switching it on in standalone operation Only Normal mode is possible in standalone battery pack operation Powering On To power on during battery pack operation Press the switch on the front of the battery pack Keep the switch pressed in Press the AUTO ON switch The ES1000 3...

Страница 32: ...ply Control Unit With remote using the ES1000 3 Power Supply Control Unit the 3 pin remote socket in the power supply control unit is used The delivery scope of the ES1000 3 Housing includes a connector for the remote socket which is assem bled by the customer for the appropriate use see section 5 1 4 on page 35 Remote Socket Pin Meaning Pin 2 to UBATT e g using terminal 15 Remote function activat...

Страница 33: ...nected PC is booted and an Eth ernet link detected the ES1000 3 Power Supply is activated via the VMEbus Note The use of this remote function is only possible with ES1120 3 and 1130 3 boards and their successors ES1120 2 and 1130 2 boards after an update to ES1120 3 or ES1130 3 respectively ES1120 1 and 1130 1 boards cannot use these functions Note If Pin 1 is connected to Pin 3 at the remote sock...

Страница 34: ...EN 55 022 B IEC CISPR22 EN 55 011 B IEC CISPR11 1997 EN 50 082 1 EN 61 000 4 2 IEC 61000 4 2 EN 61 000 4 3 IEC 61000 4 3 EN 61 000 4 4 IEC 61000 4 4 EN 61 000 4 5 IEC 61000 4 5 EN 61 000 4 6 IEC 61000 4 6 ENV50204 Artisan Technology Group Quality Instrumentation Guaranteed 888 88 SOURCE www artisantg com ...

Страница 35: ...ly 8 6 kg Standard VME64x No of slots 9 slots each 4 HP wide for standard Euro card sized boards 100 mm x 160 mm Compatibility Standard VMEbus VME64x without 3 3 V supply voltage Control Via the temperature sensor in the board area Ambient temperature during operation 40 C to 70 C Storage temperature 50 C to 85 C Artisan Technology Group Quality Instrumentation Guaranteed 888 88 SOURCE www artisan...

Страница 36: ... at least 8 V for continuous operation Power input Typ 50 to 100 W max 150 W depending on the output power Output voltage current 5 V max 15 A 12 V max 1 A Residual ripple 50 mVss Note To provide a wide input voltage range the power supply interface on the ES1000 3 Power Supply Control Unit is not fused It must be protected exter nally Pin Function Pin Function 1 UBATT 3 Ground 2 UBATT 4 Ground 1 ...

Страница 37: ... Side View Pin Function 1 Locking of the remote interface 2 Remote 3 External operating voltage ground Remote Interface Connector LEMO FGG OB 303 CLAD35 Pin Description 2 RxD Receive Data 3 TxD Transmit Data 4 DTR Data Terminal Ready 5 GND System Ground 1 2 3 5 9 2 8 7 4 3 6 1 Artisan Technology Group Quality Instrumentation Guaranteed 888 88 SOURCE www artisantg com ...

Страница 38: ...ce free operation Standard housing material Virtually flameproof in acc with UL 94 HB Dangerous goods Not dangerous acc to IATA IEC 896 2 Conforms to IEC 896 2 Cyclability At 50 average discharge depth more than 500 discharge recharge cycles Service life At T 25 C approx 6 years Note An increase in temperature by 10 K halves the battery pack s service life Height 50 mm Width 237 mm Depth 347 mm We...

Страница 39: ...ing operation 40 C to 60 C Storage temperature 0 C to 60 C ES1050 1 Battery Pack fuse protection T10L250V Battery pack capacity 7 Ah with 24 V output voltage Charging using ES1000 3 Power Sup ply 12 to 16 hours Charging using external power supply Approx 3 5 hours at 20 C Artisan Technology Group Quality Instrumentation Guaranteed 888 88 SOURCE www artisantg com ...

Страница 40: ...terface boards and the ambient conditions determines the length of time of standalone operation The table describes a sample of this interdependence System Auton omy Ambient Temperature ES1000 3 Configuration 2 hours 20 C 68 F ES1120 3 ES1130 3 ES1222 2 ES1232 1 ES1303 1 ES1310 1 15 30 45 60 75 90 105 120 20 0 20 40 40 60 Operating time min temperatur C Pout 45 W Pout 75 W Pout 100 W Artisan Techn...

Страница 41: ...Side B Connector LEMO FGJ 3B 304 CYMD92 KT425 multi contact black KT425 multi contact red Note The standard cable required for the update is not supplied by ETAS Please contact your local specialist dealer or have the cable made based on the following information K100 F 00K 000 825 schwarz rot 1 2 3 4 Artisan Technology Group Quality Instrumentation Guaranteed 888 88 SOURCE www artisantg com ...

Страница 42: ...ta DTR Data Terminal Ready 4 6 and 1 DSR Data Set Ready DCD Data Carrier Detect GND System Ground 5 5 GND System Ground DSR Data Set Ready DCD Data Carrier Detect 6 and 1 4 DTR Data Terminal Ready RTS Request To Send 7 8 CTS Clear To Data CTS Clear To Data 8 7 RTS Request To Send 5 GND 2 RxD 3 TxD 7 RTS 8 CTS 4 DTR 6 DSR 1 DCD GND 5 RxD 2 TxD 3 RTS 7 CTS 8 DTR 4 DSR 6 DCD 1 Artisan Technology Grou...

Страница 43: ...Technical Data 42 Artisan Technology Group Quality Instrumentation Guaranteed 888 88 SOURCE www artisantg com ...

Страница 44: ...ctor documentation ES1000 3 F 00K 103 091 Note Please note that the ES1050 1 Battery Pack has to be ordered separately Order Name Short Name Order Number Power supply cable type 3 K100 F 00K 000 825 Order Name Short Name Order Number ES1050 1 Battery Pack ES1050 1 F 00K 103 093 Order Name Remark Remote connector Lemo FGG 0B 303 Available from your local Lemo distributors Artisan Technology Group Q...

Страница 45: ...Ordering Information 44 Artisan Technology Group Quality Instrumentation Guaranteed 888 88 SOURCE www artisantg com ...

Страница 46: ...3 Fax 1 734 997 9449 USA E mail sales etas us WWW www etasgroup com Queen s Tower C 17F Phone 81 45 222 0900 2 3 5 Minatomirai Nishi ku Fax 81 45 222 0956 Yokohama 220 6217 E mail sales etas co jp Japan WWW www etasgroup com Studio 3 Waterside Court Phone 44 1283 54 65 12 Third Avenue Centrum 100 Fax 44 1283 54 87 67 Burton upon Trent E mail sales etas uk net Staffordshire DE14 2WQ WWW www etasgro...

Страница 47: ... www etasgroup com 4F 705 Bldg 70 5 Phone 82 2 57 47 016 Yangjae dong Seocho gu Fax 82 2 57 47 120 Seoul 137 889 E mail sales etas co kr Korea www etasgroup com 2404 Bank of China Tower Phone 86 21 5037 2220 200 Yincheng Road Central Fax 86 21 5037 2221 Shanghai 200120 P R China E mail sales cn etasgroup com WWW www etasgroup com Artisan Technology Group Quality Instrumentation Guaranteed 888 88 S...

Страница 48: ...harging 23 control elements 17 discharge behavior 39 dismantling 21 display elements 17 electrical data 38 environmental conditions 38 feature 8 fuse protection 18 38 general data 37 independent operation 14 initial charging 23 interface 18 mechanical data 37 operating position 25 operation 24 service life 24 storage 24 Block diagram 9 Artisan Technology Group Quality Instrumentation Guaranteed 88...

Страница 49: ...1050 1 Battery Pack 13 delivery scope 43 ETAS Contact Addresses 45 External power supply 13 F Fan 14 34 Feature battery pack 8 housing 7 Firmware 14 Fuse protection 13 Fuse protection battery pack 18 38 G General data ES1050 1 37 H Housing feature 7 mechanical data 34 I Initial charging 23 Interface remote 14 service 14 Interface battery pack 18 Introduction 7 K K100 cable 40 M Mechanical data bat...

Страница 50: ... power supply 13 pin assignment 35 R Recharging 25 Remote connector pin assignment 36 Remote control ES1120 x ES1130 x 32 Remote interface 14 RS232 cable 40 RS232 standard interface 14 S Service interface 14 pin assignment 36 Service life battery pack 24 Slots 11 Storage battery pack 24 System autonomy 39 Artisan Technology Group Quality Instrumentation Guaranteed 888 88 SOURCE www artisantg com ...

Страница 51: ...Index 50 Artisan Technology Group Quality Instrumentation Guaranteed 888 88 SOURCE www artisantg com ...

Страница 52: ...quipment Have surplus equipment taking up shelf space We ll give it a new home Learn more Visit us at artisantg com for more info on price quotes drivers technical specifications manuals and documentation Artisan Scientific Corporation dba Artisan Technology Group is not an affiliate representative or authorized distributor for any manufacturer listed herein We re here to make your life easier How...

Отзывы: