ESX VNC711 FI-DUCATO Скачать руководство пользователя страница 8

8

INSTALLATION EXAMPLE / Einbaubeispiel

1

2

3

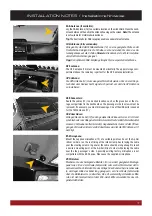
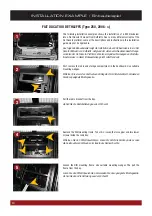
First, remove the radio and storage compartment in the dashboard. Use suitable 
mounting wedges.

Entfernen Sie als erstes das Radio und Ablagefach im Armaturenbrett. Verwenden 
Sie dazu geeignete Montagekeile.

The following installation examples shows the installation of a ESX Naviceiver 
into a Fiat Ducato III model from Dethleffs. Due to many different variants of the 
Fiat Ducato platform, some of the descriptions and instructions in this installation 
guide may not be applicable.

Das folgende Einbaubeispiel zeigt die Installation eines ESX Naviceivers in ein Fiat 
Ducato III Modell von Dethleffs. Aufgrund der vielen verschiedenen Ausstattungs-
varianten der Fiat Ducato-Plattform, könnten einige Beschreibungen und Installa-
tionshinweise in dieser Einbauanleitung nicht zutreffend sein.

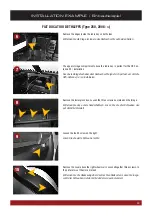
Pull the radio bracket from the bay.

Ziehen Sie die Radiohalterung aus dem Schacht.

Remove the DIN mounting frame. To do this, loosen the two upper and two lower 
screws inside the radio bay.

Entfernen Sie den DIN-Einbaurahmen. Lösen Sie dafür die beiden oberen sowie 
die beiden unteren Schrauben im Innern des Radioschachts.

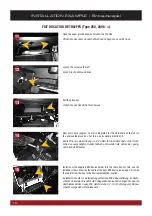
Loosen the DIN mounting frame. Use suitable mounting wedges. The pull the 
frame from the bay.

Lösen Sie den DIN-Einbaurahmen. Verwenden Sie dazu geeignete Montagekeile. 
Ziehen Sie dann die Halterung aus dem Schacht.

4

5

FIAT DUCATO III DETHLEFFS (Type 250, 2006 ->)

Содержание VNC711 FI-DUCATO

Страница 1: ...E IN B A U A N L E IT U N G IN S T A L L A T IO N G U ID E V 1 3 VNC711 FI DUCATO VNC711 FI DUCATO DAB...

Страница 2: ...hmen inkl Schrauben 1 2 STYLUS Markierstift 1 3 MICRO SD CARD 8GB INKL NAVIGATION SOFTWARE MicroSD Speicherkarte 8GB Navigationssoftware 1 4 REMOTE CONTROL Fernbedienung 1 5 VIDEO INPUT CABLE SET Vide...

Страница 3: ...H 2 CONNECTORS USB Kabelsatz mit 2 Anschl ssen D10 1 13 BT MICROPHONE BT Mikrofon G2 1 14 GPS ANTENNA GPS Antenne GPS 1 15 HANDBRAKE CONNECTION 1 WITH STEE RING WHEEL REMOTE CONNECTOR Handbremsen Ansc...

Страница 4: ...n AUDIO OUT 2X FRONT 2 X REAR Audio Ausgang 2 x Front 2 x Rear AUDIO OUT SUBWOOFER CENTER Audio Ausgang Subwoofer Center VIDEO INPUT CABLE SET Video Eingang Kabelsatz WITHOUT FUNCTION Ohne Funktion AN...

Страница 5: ...Teile des Soundsystems und die Komponenten Ihres Fahrzeugs grunds tzlich mit Vorsicht 2 Beachten Sie unter allen Umst nden die Vorschriften des Fahrzeugherstellers und nehmen Sie keine Ver nderungen a...

Страница 6: ...lay the an tenna to a suitable location on the windscreen For optimal reception it should be fastened to the windscreen by using the suction cups A hidden installation e g under the A pillar or the da...

Страница 7: ...oid laying the cable over the steering column In general the cable should be long enough to reach a desired mounting point at the A pillar driver s side while laying the cable over the the passenger s...

Страница 8: ...n Fiat Ducato III Modell von Dethleffs Aufgrund der vielen verschiedenen Ausstattungs varianten der Fiat Ducato Plattform k nnten einige Beschreibungen und Installa tionshinweise in dieser Einbauanlei...

Страница 9: ...u installieren Remove the lower glove box Loosen the three screws as marked on the image Entfernen Sie das untere Handschuhfach L sen Sie die drei Schrauben wie auf dem Bild markiert Loosen the fourth...

Страница 10: ...die im Lieferumfang enthaltene ESX Einbauhalterung im Radio schacht Verwenden Sie daf r die beiliegenden Schrauben Verlegen Sie nun die Anschlusskabel des neuen ESX Ger ts siehe S 2 3 im Fahrzeug vom...

Страница 11: ...stalla tion of the new ESX device check its function Please note that it may take up to 15 minutes until a GPS signal can be received in the open Schieben Sie das ESX Ger t vorsichtig in den Radioscha...

Страница 12: ...D E S I G N ESX Car Media Systems Audio Design GmbH Am Breilingsweg 3 D 76709 Kronau Germany Tel 49 7253 9465 0 Fax 49 7253 946510 www esxnavi de www audiodesign de 2017 All Rights Reserved...

Отзывы: