


6
INSTALLATION NOTES / Installationshinweise
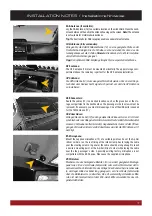
Transportation lock:
Remove both transportation locks on top of the DVD drive before you start the
installation.
Transportsicherung:
Entfernen Sie beide Transportsicherungen auf der Oberseite des DVD-Lauf-
werks bevor Sie mit der Installation beginnen.
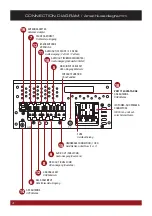
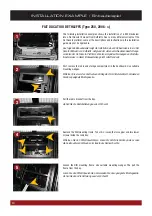
Power supply:
To operate the ESX device up to 30 minutes without switched-on ignition, you
must ensure that at pin 34 (BATT) of the ISO power connector of the vehicle,
the steady plus (+ 12V) is applied. See figure on the left and on the top panel
of the device. To turn on the ESX device normally, on pin 32 the ACC/ignition
(+12V) must be applied.
Note: Never connect Pin 32 with the steady plus (+ 12V), otherwise the ESX
device is switched on permanently.
Stromversorgung:
Um das ESX-Gerät auch ohne eingeschaltete Zündung bis zu 30 Minuten be-
treiben zu können, müssen Sie sicherstellen, dass an Pin 34 (BATT) am ISO-
Stromanschluss des Fahrzeugs, Dauerplus (+12V) anliegt. Siehe Abbildung
links sowie auf der Geräteoberseite. Um das ESX-Gerät normal einschalten zu
können, muss an Pin 32 die ACC/Zündspannung (+12V) anliegen.
Hinweis: Pin 32 darf keinesfalls mit Dauerplus (+12V) verbunden werden, da
sonst das ESX-Gerät dauerhaft eingeschaltet bleibt.
USB-VDD
CANH
AMP-RR+
AMP-FR+
AMP-FL+
AMP-RL+
AMP-RR-
AMP-FR-
AMP-FL-
19
24
26
27
25
23
22
21
20
9
MIC+
MIC-
AUX-R
AUX-L
NC
USB D-
CANL
NC
NC
1
2
8
7
6
5
4
3
GND
NC
USB D+
GND
NC
NC
SWC
SWC-GND
AMP-STB
10
15
17
18
16
14
13
12
11
AMP-RL-
NC
NC
ANT-CON
ACC
NC
BATT
ILL+
GND
28
33
35
36
34
32
31
30
29
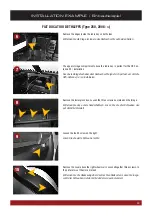
TMC cable antenna:
Connect the enclosed TMC antenna (17) with the USB port and then lay the an-
tenna to a suitable location on the windscreen. For optimal reception it should
be fastened to the windscreen by using the suction cups, A hidden installation
e.g. under the A-pillar or the dashboard is also possible.
TMC Kabelantenne:
Schließen Sie die beiliegende TMC Antenne (17) an den USB Anschluss an und
verlegen Sie dann die Wurfantenne an eine geeignete Stelle an der Frontschei-
be. Für einen optimalen Empfang kann diese an der Scheibe mithilfe der Saug-
näpfe befestigt werden, auch ein verstecktes Verlegen z.B. unter der A-Säule
oder unter dem Armaturenbrett ist möglich.
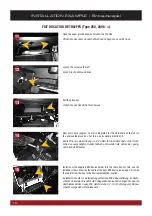
Handbrake connection:
Connect the cable from the handbrake connection (15) with the handbrake
signal in your vehicle. The signal must be connected with ground while the
handbrake is applied. Please contact for a proper and safe installation your car
dealer! According to legal regulations, the device must playback a DVD or video
on the main screen only with the handbrake applied, Never connect the the
cable permanently with the vehicle‘s ground. To prevent accidents by inatten-
tion while driving, the screen is blanked. The video outputs (8) are not affected.
Handbremsen-Anschluss:
Schließen Sie den Handsbremsen-Anschluss (15 ) an das Handbremssignal im
Fahrzeug an. Das Signal muss bei angezogener Handbremse auf Masse lie-
gen. Bitte wenden Sie sich für eine korrekte und gefahrlose Installation an Ihre
KFZ-Fachwerkstatt! Gemäß den gesetzlichen Bestimmungen darf das Gerät
eine DVD bzw. Videowiedergabe auf dem Hauptbildschirm nur bei angezogener
Handbremse wiedergeben, das Anschlusskabel darf deshalb nicht dauerhaft
auf Masse angeschlossen werden. Während der Fahrt wird der Bildschirm zur
Vermeidung von Unfällen durch Unachtsamkeit dunkel geschaltet Die Video-
ausgänge (8) sind hiervon nicht betroffen.