background image


12-5


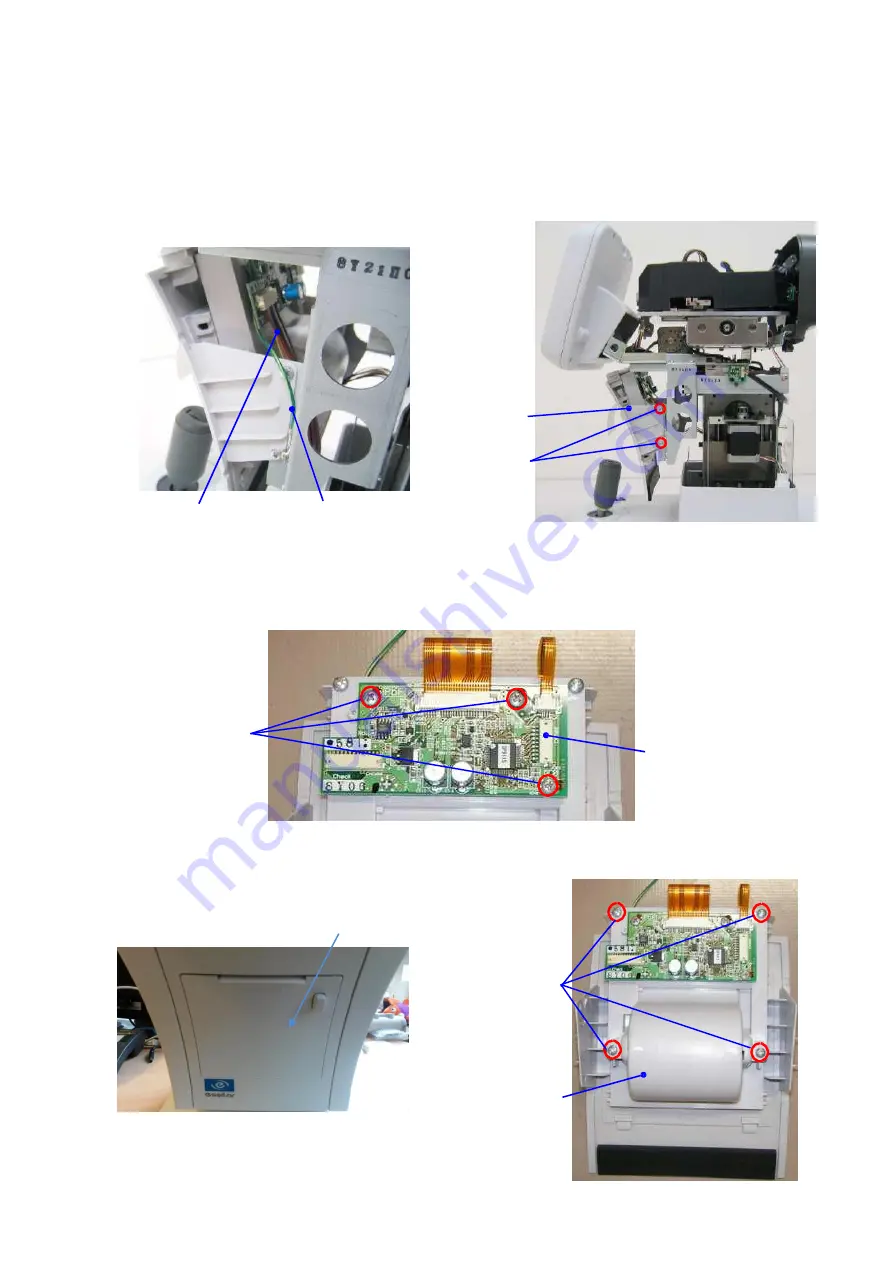
Replacement of the printer control board ASSY, the printer, the 
printer cover unit 

1)


Remove the main unit cover L and R (refer to 12-1). 

2)


Remove the harnesses and earth that are connected to the front cover ASSY and unscrew 
4 fixing screws. 


Front cover ASSY 


Fixing screws 


Harness 

Earth 


3)


Replace the printer control board ASSY after unscrewing 3 board fixing screws and 

removing the harnesses that are connected to. 


Fixing screws 


Printer control board ASSY 


4)


Replace the printer after removing the printer cover and unscrewing 4 printer case 

fixing screws. 


Printer cover 


Fixing screws 


Printer case 


52 


Printer Cover 

Содержание AKR 750

Страница 1: ...Auto kerato refractometer Maintenance Manual V1 09 2016 ...

Страница 2: ...onnection Diagram 6 6 Wiring Diagram 9 7 Troubleshooting 11 8 Cleaning of the Parts that Eyes Touch to the Accessory Model Eye ASSY 32 9 Functional Check 33 10 About Maintenance Mode 34 11 Evaluation of Freeze Image 45 12 Replacement Procedure of Each Unit 47 13 Software update procedure 61 14 Parking mode 64 ...

Страница 3: ...Rating plate 25 Chin holder 26 Eye mark 27 Chin rest ASSY 28 Face cover 29 Head rest rubber Code Name 1 LCD monitor 2 Main unit cover L 3 Main unit cover R 4 Clear switch 5 3D AUTO MANUAL switch 6 CUSTOM switch 7 Measurement mode select switch 8 Menu switch 9 Print switch 10 Printer cover 11 Chin holder vertical movement switch 12 Rubber leg 13 Base cover 2 14 Base cover 1 15 Front cover ...

Страница 4: ...al positioning mechanism 25 Horizontal detection sensor board 26 Measuring window ring 27 Head rest rubber 28 Chin rest ASSY 29 Chin rest vertical positioning mechanism Code Name 1 Measurement unit 2 Optical control board ASSY 3 Optical ASSY cover 4 PD sensor board 5 Horizontal movement motor 6 LCD cover 7 LCD 8 Main control board ASSY 9 Operation switch board ASSY 10 Printer control board 11 Prin...

Страница 5: ...ulated by the first measurement and auto fogging operation and focusing operation of eyeground images are started based on the data Then the actual measurement is started and the refractive power of the eye to be measured is calculated and displayed 2 Measurement of corneal curvature radius A ring shaped measurement pattern in projected onto a cornea of an eye to be measured The pattern projected ...

Страница 6: ...4 Block Diagram ...

Страница 7: ......

Страница 8: ...8 ...

Страница 9: ...9 6 Wiring Diagram 6 1 Overall view Optical unit ASSY Optical control board CMOS harness LCD Chin rest ASSY 3 axes control board Chin holder vertical movement switch board ASSY Joystick ASSY ...

Страница 10: ...1 0 6 2 LCD ASSY diagram Main control board LCD Operation switch harness Operation switch board ASSY LCD harness 6 3 Chin rest ASSY diagram Chin rest motor ASSY Chin rest sensor harness ...

Страница 11: ...10 6 4 Base unit wiring diagram Switching power supply PC I F board ASSY Power supply board ASSY Power supply switch Fuse holder ...

Страница 12: ...en turning the power on 7 9 No responses even though pressing switches 7 10 Result is not printed out printout is not normal 7 11 Ref measurement LED does not light up 7 12 Cannot see the fixation target 7 13 Illumination LED does not light up 7 14 Kerato LED does not light up 7 15 The fixation target LED for P K measurement does not light up 7 16 3 axes motor does not work even though operating a...

Страница 13: ...nt switch control image processing alignment control 2 Optical control board Control of each LED board in the optical unit ASSY control of the motor in the optical unit ASSY ranging sensor control Green LED on the optical control board blinks when the main control board and the optical control board are in communication 3 3 axes control board X Y and Z axes motor control chin rest control joystick...

Страница 14: ...tical control board or CMOS camera Failure of the measurement LED YES Check the condition of the eye to be measured Abnormal Measurement cannot be taken in case of disorder such as cataracts etc Abnormal If the pupil is smaller than the reticle mark the measurement might not be be taken Darken the surround and try to take a measurement again Refer to 11 3 Normal Realign correctly and take a measur...

Страница 15: ...EEPROM fault appears Failure of the optical control board Failure of the EEPROM board Replace the optical control board Does the message still appear Replace the optical unit ASSY Does the message still appear NO YES NO YES Replace the main control board OK EEPROM fault is displayed ...

Страница 16: ... optical control board or EEPROM board Failure of the forcus motor positioning sensor boardor the target motor positioning sensor board Does the message still appear Does the message still appear Motor fault is displayed Replace the optical control board NO YES Replace the optical unit ASSY NO YES Replace the main control board OK ...

Страница 17: ... main causes when the error message Printer head heat over appears Failure of the printer Failure of the printer control board Replace the printer control board Does the message still appear Printer head heat over is displayed Replace the printer NO YES OK ...

Страница 18: ...auses when the error message Paper empty appears No printer papers in the printer Failure of the printer Failure of the printer control board NO YES YES Replace the printer Replace the printer control board Does the message still appear NO YES OK Are printer papers set properly Reset the papers NO Set the papers ...

Страница 19: ... message Printer cutter fault appears The printer paper is stuck in the cutter portion Failure of the printer Failure of the printer control board NO Replace the printer Replace the printer control board Does the message still appear NO YES OK Are the printer papers stuck in the printer portion Remove the paper YES ...

Страница 20: ...tching power supply Failure of the power supply board Failure of the main control board Failure of LCD or LCD harness YES Is LCD harness normal Replace the LCD harness Replace the LCD Is screen display normal Replace the main control board Is screen display normal NO YES YES NO NO YES OK Does LED next to the operation switch blink and 3 axes motor start initializing when the power is on NO No powe...

Страница 21: ...ent switch Failure of the main control board Replace the operation switch board Is the performance of the operation switch normal Replace the operation switch harness Is the performance of the operation switch normal Is the performance of the measurement start switch normal No response when pressing the measurement button Replace the measurement start switch board YES YES NO YES NO Replace the mai...

Страница 22: ...ed out printout is not normal The main causes when the measurement result is not printed out printout is not normal The printer setting is OFF Failure of the printer Failure of the printer control board Failure of the main control board Replace the printer control board Is the printing normal Is the printer printing normal NO YES Replace the printer YES NO OK NO NO Replace the main control board N...

Страница 23: ... The main causes when the ref measurement LED does not light up Failure of the ref LED board the optical control board Failure of the main control board Does ref LED light up Does ref LED light up YES NO Replace the optical unit ASSY Replace the optical control board Ref LED does not light up ...

Страница 24: ...s on Failure of the fixation target LED board the optical control board Failure of the main control board NO NO NO Replace the main control board OK Can you see the fixation target OK YES Replace the optical unit ASSY Can you see the fixation target OK YES Replace the optical control board Is power saving mode on You cannot see the fixation target ...

Страница 25: ...ptical control board Failure of the main control board NO Do the infrared illumination LED and the white illumination LED light up NO Replace the main control board OK Replace the optical unit ASSY Do the infrared illumination LED and the white illumination LED light up The infrared illumination LED the white illumination do not light up Replace the optical control board ...

Страница 26: ...p Failure of Kerato LED board the optical control board Failure of the main control board NO NO Replace the main control board OK Does Kerato LED light up OK YES Replace the optical unit ASSY Does Kerato LED light up OK YES Replace the optical control board Kerato LED does not light up ...

Страница 27: ... for P K measurement does not light up Failure of the P K LED board the optical control board Failure of the main control board NO Replace the optical unit ASSY NO Replace the main control board OK Does P K LED light up OK YES Does P K LED light up OK YES P K LED does not light up Replace the optical control board ...

Страница 28: ...ing a joystick Failure of the X Y and Z axes motors Failure of 3 axes control board Failure of the X Y and Z axes sensor board Failure of the joystick sensor board the joystick switch board NO Replace 3 axes control board OK Does 3 axes motor work OK YES Replace the joystick ASSY 3 axes motor does not work even though operating a joystick ...

Страница 29: ...switch board Failure of the chin rest sensor board Failure of the chin rest motor Failure of 3 axes control board NO NO Replace the chin rest ASSY OK Does the chin rest move OK YES Replace 3 axes control board Does the chin rest move OK YES NO Replace the chin holder vertical movement switch board Replace the chin rest motor ASSY The chin rest does not move ...

Страница 30: ...nnot communicate with PC The main causes when it cannot communicate with PC The setting of the communication software is different Failure of PC I F board Failure of the main control board YES NO Replace the main control board OK Replace the PC I F board Is setting of the communication software correct Cannot communicate with PC ...

Страница 31: ...ht up it is the failure of the switching power supply Replace the switching power supply S3D3301 Green LED 2 Check the output voltage of the power supply board ASSY S3D1309 The output voltages are shown as below i Check if the voltage between CN2 pin1 and pin2 is 5V ii Check if the voltage between CN2 pin3 and pin4 is 24V iii Check if the voltage between CN2 pin5 and pin6 is 12V If the output volt...

Страница 32: ...stained The eye lens is stained Setting of VD is not 12 Shift SPH Data is not 0 Failure of the optical unit ES NO NO Is setting of VD 12 Set the value as VD 12 Set the setting value as 0 NO YES Is the setting value of Shift SPH Data of the Maintenance Mode 0 NO Refer to 10 2 YES Evaluate the Freeze Image Refer to 11 Are there any scratches or stains on the eye lens YES Cleaning of the eye lens rep...

Страница 33: ...uracy 1 Saturate K dry cleaning material or soft cloth with lens cleaner absolute alcohol 2 Clean the eye lens and the model eye ASSY in a circular motion from the center Repeat it until they get cleaned 3 Saturate soft cloth with neutral detergent and wipe lightly when measuring window filter has stains Measuring window filter Eye lens Model eye ASSY Do not use organic solvent to clean because it...

Страница 34: ... the model eye accurately by reference to the operation manual and take measurements 4 If the measurement values with the model eye ASSY are within the acceptable range as shown below there are no problems with measurement accuracy The accurate value of the model eye ASSY is attached on it The value is S spherical diopter power VD 12 C cylinder frequency is 0 00 so there is no indication about it ...

Страница 35: ...icons on the screen as shown on right side Descriptions of the switches are shown below The switch to choose the menu item Move the cursor to the upper direction The switch to choose the menu item Move the cursor to the lower direction The switch to specify the item The switch to go back to the previous screen or the measurement screen For Ver 1 06 4 Choose the menu item with or and press then the...

Страница 36: ...L REF Display the left eye ref measurement image KERATO Display the Kerato measurement image PHOTO Display the anterior eye part photo image ALIGN Display the anterior eye part image Go back to the menu screen If errors occur frequently or there are some troubles about measurement accuracy you can evaluate judge the measurement image with this function Refer to 11 Evaluation of Freeze Image about ...

Страница 37: ...ue is normal or not If you do not wish to print out press The screen will go back to the original 6 Hardware Check When you choose this menu you can check if the light source the camera the motor and the printer are working normally Each operation is started by pressing When the operation is finished the buzzer will start beeping The performance contents of each menu item are as show below Please ...

Страница 38: ... the fixation target for P K measurement is lighted up from the measurement window The fixation target will be lighted up 3 times in a clockwise direction 5 CMOS SENSOR You can check if CMOS sensor the camera for ref light receiving and Kerato displays the image correctly on the monitor Press after setting the accessory model eye ASSY and aligning CMOS sensor is switched and ref image and Kerato i...

Страница 39: ...der Model eye for adjustment 2 Move the cursor to the 7 Calibration with or Down switch and press 3 The screen will be changed to the selection screen of REF CALIBTRATION as shown on the right side Conduct calibration only to the model eye that has problems with the measurement value capability Up MAINTENANCE MODE 1 Arr ange Mo de 2 F ree ze Im age 3 Shift SPH Data 4 Shift Target Data 5 P r int Ad...

Страница 40: ...DOWN The cursor moves to the lower direction you do not use it usually The value of the cursor is changed to The value of the cursor is changed to RETURN The detail of calibration is stored and return to REF CALIBRATION screen The model eyes that correspond to the each item of MODEL EYE A F are as shown below Please do not use with different combinations 1 MODEL EYE A The model eye equivalent to 0...

Страница 41: ...d the screen will be back to the selection screen of REF CALIBRATION and the calibration contents values will be stored This is the end of calibration description about the model eye equivalent to 0D In case that you conduct the calibration of the model eye equivalent to 10D 10D and 5D choose MODEL EYE B F and perform as same as above If you turn the power off without pressing RETURN the contents ...

Страница 42: ... the lower direction you do not use it usually The value of the cursor is changed to The value of the cursor is changed to RETURN The detail of calibration is stored and returns switch The model eyes that correspond to the each item of MODEL EYE A C are as shown below Please do not use with different combinations 1 MODEL EYE A The model eye equivalent to R7 50 mm 2 MODEL EYE B The model eye equiva...

Страница 43: ...TURN switch The screen will go back to the selection screen of KRT CALIBRATION and the detail of calibration value will be stored This is the end of calibration description about the model eye equivalent to R7 50 In case that you conduct the calibration of the model eye equivalent to R10 00 and R5 00 choose MODEL EYE B C and perform as same as above If you turn the power off without pressing RETUR...

Страница 44: ... eye Acceptable range Equivalent to SPH 10D SPH within 0 12D of the model eye indicated value CYL within 0 12D Equivalent to SPH 0D Equivalent to SPH 10D Equivalent to SPH 4 75D Accessory model eye Equivalent to R 7 50 mm Both of R1 and R2 Within 0 01mm of the model eye indicated value Equivalent to R 10 00 mm Equivalent to R 5 00 mm If the measurement results are over the acceptable range recalib...

Страница 45: ...ion value of L F and B as same as 3 above 5 Press RETURN switch 2 times The screen will go back to the measurement screen and the detail of calibration values is stored If you turn the power off without pressing RETURN the detail of calibration will not be stored Make sure to return to the measurement screen Up MAINTENANCE MODE 1 Arrange Mode 2 Free ze Image 3 Shift SPH Data 4 Shift Target Data 5 ...

Страница 46: ... see the measurement light written above is blinking on the screen or from the measurement window it can be judged that the measurement light is applied correctly Please check this with good alignment condition In this case it can be thought that the control board has some troubles Replace the control board If you cannot see measurement light written above it can be though t that the measurement l...

Страница 47: ...s shown on the right when switching to the Freeze Image screen the measurement cannot be taken There are 2 causes of these symptoms When taking the measurement the examinee blinks Ask the examinee not to blink when it takes measurement The pupil of the examinee is small The pupil should be bigger Darken the brightness of the fixation target or the room c The measurement image is blurred If the mea...

Страница 48: ... the joystick ASSY 12 8 Replacement of the roller the measurement start switch board ASSY the joystick handle unit 12 9 Replacement of the switching power supply PC I F board ASSY the power supply board ASSY 12 1 0 12 1 1 12 1 2 12 1 3 Replacement of the power supply switch Replacement of the chin holder vertical movement switch board ASSY Replacement of the measuring window filter the face cover ...

Страница 49: ...usting internally with a thumb and pull them up to the direction of A 3 In case of replacement of the main unit cover replace it with the backward process 4 In case of replacement of the 3 axes control board replacement remove all of the harness that are connected to the 3 axes control board ASSY Unscrew 4 fixing screws of 3 axes control board ASSY and remove the ASSY 5 This is the end of disassem...

Страница 50: ... 2 Remove 6 harnesses that are connected to the optical control board ASSY Optical unit cover ASSY Harnesses 3 Unscrew 3 fixing screws of the optical control board ASSY and remove the ASSY This is the end of disassembling process Assemble the control board with the backward process of disassembly Fixing screws ...

Страница 51: ...ptical ASSY cover 6 In case of replacement of CMOS harness remove the harness that are connected to and replace it 7 In case of replacement of the optical unit ASSY unscrew 4 fixing screws and remove the optical unit Do not touch the internal optical parts because it might derange the adjustment and affect on the measurement accuracy Optical unit ASSY Fixing screws CMOS harnesses 8 This is the end...

Страница 52: ... 2 Fixing screw 1 Fixing screw 2 Fixing screw 3 Main control board Harness 1 LCD harness LCD base Harness 3 Operation switch harness Fixing screw 4 Operation switch board 4 Replace the LCD harness after removing the harness 1 5 Replace the main control board ASSY after removing the harness 1 2 and 3 and 4 fixing screw 3 6 Replace the LCD after removing harness 1 2 and 3 and 4 fixing screws 1 and 2...

Страница 53: ...er ASSY and unscrew 4 fixing screws Front cover ASSY Fixing screws Harness Earth 3 Replace the printer control board ASSY after unscrewing 3 board fixing screws and removing the harnesses that are connected to Fixing screws Printer control board ASSY 4 Replace the printer after removing the printer cover and unscrewing 4 printer case fixing screws Printer cover Fixing screws Printer case 52 Printe...

Страница 54: ...n unit Fixing screw short Fixing screws long Fixing screw long Earth harness Washer Tooth lock washer Printer main unit Printer case Earth unit wiring direction drawing 6 Remove the roller unit after unscrewing 2 fixing screws At the time of assembling set the roller unit parallel with the case Roller unit Fixing screws 7 Replace the printer cover unit after removing the roller unit in manner of 6...

Страница 55: ...crews that fix the head rest cover 3 Replace the chin rest sensor harness after removing the head rest cover in manner of 2 and unscrewing the fixing screw that fix the harness cover Chin rest motor BKT Chin rest motor harness Fixing screws Chin rest sensor harness Rubber belt 4 Replace the chin rest motor ASSY after removing the 2 covers in manner of 3 above remove the chin rest motor harness and...

Страница 56: ...ace it after unscrewing 4 fixing screws and removing the harnesses that are connected to Harness Joystick ASSY Fixing screws 3 Input the correction value indicated on the joystick ASSY complying with the procedure of 10 2 8 Joystick Calibration after replacing the joystick ASSY Example of indication of the correction value 55 RB 655 C02 ...

Страница 57: ...place the roller and the measurement start switch board ASSY after unscrewing 2 screws that fix the board Roller Measurement start switch board ASSY Fixing screw Nut 4 Replace the joystick handle unit after removing the measurement switch ASSY in manner of 2 above and the nut RB 655 C02 At the time of reassembling do not squeeze the harnesses between the surface of the device and the nut and be ca...

Страница 58: ...er to 12 6 5 Move the fluctuation mechanical unit to the upper end and back and forth mechanical unit to the edge of the joystick side Front cover AS 6 Remove the front cover ASSY refer to 12 5 7 Remove 3 harnesses that are connected to 3 axes control board ASSY and cut the tielap at the lower right side of the board 3 axes control board ASSY Chin holder vertical movement switch board ASSY Harness...

Страница 59: ... supply PC I F board ASSY Terminal plate Power supply board ASSY Fixing screws 13 At the time of replacement of the switching power supply remove all of the harnesses that are connected to the switching power supply after unscrewing the fixing screws of the terminal plate and removing the terminal plate 14 The base cover will be removed when you unscrew 4 fixing screws 15 Replace it after unscrewi...

Страница 60: ...the harnesses that are connected to the power supply switch 4 Insert the new power supply switch with care of the direction and put the harness removed at 3 above back together A To the brown B To the light blue fuse holder To the brown switching power supply To the light blue switching power supply 12 11 Replacement of the chin holder vertical movement switch board ASSY 1 Remove the harnesses tha...

Страница 61: ...ase of replacement of the face cover unit remove the measuring window filter and the slider from the removed unit and use them as the assembly parts 6 At the time of reassembly be careful about the position of the slider and slider holder on both side Slider Slider holder 12 13 Replacement of the base cover unit 1 Remove the main unit cover L and R refer to 12 1 2 Remove the chin rest ASSY refer t...

Страница 62: ...r for AKR750 USB connection Procedure 1 Switch on AKR750 and connect USB cable between AKR750 and PC 2 Message NEW HARDWARE FOUND will appear if necessary select the folder where you stored the driver and install it 3 Switch off Accuref AKR750 and switch on with the follow procedure immediately after the green led is off press 5 buttons in the sequence showed below in less than two seconds ...

Страница 63: ...activate Hyper see notes Notes first button from left to select 9600 bps press it again to select Hyper second button from left to select 38400 bps press it again to select Hyper third button from left to select 115200 bps press it again to select Hyper fourth button from left to select 460800 bps press it again to select Hyper ...

Страница 64: ...per to On 8 Click on Select and choose the file SP9095_Vxxx flash 9 Click on Send 10 During update 3 green belt will appear on AKR750 screen 11 When completed press measuring button to exit from Program mode 12 Switch off and switch on again AKR750 in Maintenance Mode to confirm the version of software 13 Update of AKR750 is finished ...

Страница 65: ... Parking Mode There is a standby packing mode on the AKR750 You have to press Clear and Print button at the same time and keep press during minimum 2 second Then the AKR750 come back to his packing position ...

Страница 66: ...65 ...

Отзывы: