background image


16 


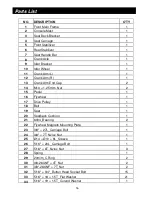
NO. 

DESCRIPTION 

O'TY 

Front Main Frame 

Console Mast 

Seat Back Bracket 

Seat Carriage 

Front Stabilizer 

Rear Stabilizer 

Seat Handle Bar 

Crank Axle 

Idler Bracket 

10 

Idler Wheel 

11 

Crank Arm (L) 

12 

Crank Arm (R) 

13 

Crank Arm End Cap 

14 

M10 × 1.25m/m_Nut 

15 

Pedal 

16 

Flywheel 

17 

Drive Pulley 

18 

Belt 

19 

Seat     

20 

Seatback Cushion 

21 

6004_Bearing   

22 

Flywheel Magnets Mounting Plate 

23 

3/8" × 27L_Carriage Bolt     

24 

3/8" × 7T_Nyloc Nut 

25 

Ø14 × Ø10 × 9L_Sleeve 

26 

5/16" × 20L_Carriage Bolt     

27 

5/16" × 6T_Nyloc Nut 

28 

Spring 

29 

20m/m_C Ring 

30 

3/8-26UNF × 4T_Nut 

31 

3/8"-26UNF × 7T_Nut 

32 

5/16" × 3/4"_Button Head Socket Bolt 

15 

33 

5/16" × 18 × 1.5T_Flat Washer 

21 

34 

5/16" × 19 × 1.5T_Curved Washer 

Parts List 


Содержание ESP0037 R6 Recumbent

Страница 1: ...PLEASE CAREFULLY READ THIS ENTIRE MANUAL BEFORE OPERATING YOUR RECUMBENT OWNER S MANUAL Esprit R6 Recumbent ESP0037...

Страница 2: ...nite a highly gaseous environment Never drop or insert any object into any openings Do not use outdoors To disconnect turn all controls to the off position then remove the plug from the outlet Do not...

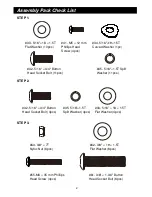
Страница 3: ...ead Screw 4pcs STEP 1 STEP 2 STEP 3 32 5 16 3 4 Button Head Socket Bolt 4pcs 33 5 16 18 1 5T Flat Washer 4pcs 35 5 16 1 5T Split Washer 4pcs 62 3 8 19 1 5T Flat Washer 6pcs 63 3 8 7T Nyloc Nut 6pcs 61...

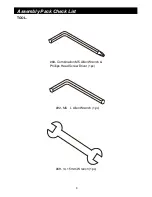
Страница 4: ...3 Assembly Pack Check List TOOL 68 Combination M5 Allen Wrench Phillips Head Screw Driver 1pc 92 M6 L Allen Wrench 1pc 69 14 15m m Wrench 1pc...

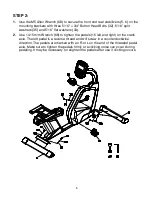
Страница 5: ...e mast and out the top Be careful when installing the console mast to the mainframe so as not to pinch or cut the wiring harness damage to the console may occur 3 Install the console mast on the mainf...

Страница 6: ...Use 14 15m m Wrench 69 to tighten the pedals 15 left and right on the crank axle The left pedal is a reverse thread and will screw in a counterclockwise direction The pedals are marked with an R or L...

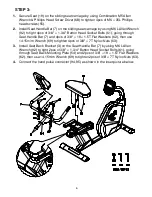
Страница 7: ...61 going through Seat Handle Bar 7 and 4pcs of 3 8 19 1 5T Flat Washers 62 then use 14 15m m Wrench 69 to tighten 4pcs of 3 8 7T Nyloc Nuts 63 3 Install Seat Back Bracket 3 on the Seat Handle Bar 7 b...

Страница 8: ...ecovery function Only works when the computer is receiving a heart rate value Recovery is an indication of Fitness Level It is a one minute measurement taken immediately after and exercise session and...

Страница 9: ...evels of work displayed in 8 bars in each column Each column represents 1 minute workout Unless time is changed to a new value for count down and each bar represents 3 levels of work 12 Music There is...

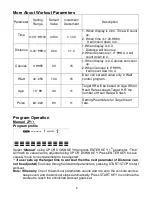
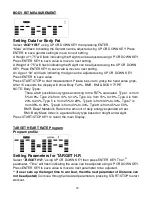
Страница 10: ...d on Age When Heart Rate exceeds Target H R the number of Heart Rate will flash Pulse 60 220 90 1 Setting Parameters for Target heart rate Program Operation Manual P1 Program profile Select Manual usi...

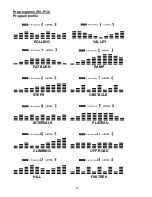
Страница 11: ...10 Pre programs P2 P13 Program profile ROLLING VALLEY FAT BURN RAMP STEPS OBSTACLE INTERVALS PLATEAU CLIMBING OFF ROAD HILL FASTREK...

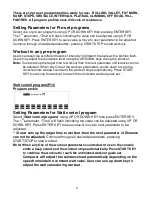
Страница 12: ...the workout parameters counts down to zero the console emits a beep sound and the workout stops automatically Press START KEY to continue the workout to reach the unfinished workout goals set Watt co...

Страница 13: ...Y TYPE NOTE Body Types There are 9 possible body types according to the FAT calculated Type 1 is from 5 to 9 Type 2 is from 10 to 14 Type 3 is from 15 to 19 Type 4 is from 20 to 24 Type 5 is from 25 t...

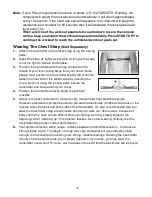
Страница 14: ...strap by inserting the round end and using the locking parts secure the transmitter and strap around your chest 4 Position the transmitter directly below the pectoral muscles 5 Sweat is the best condu...

Страница 15: ...s up the target time to workout then the next parameter of Distance can not be adjusted Continue through all desired parameters pressing START STOP to start workout Note If your Pulse measurement is a...

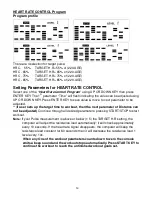
Страница 16: ...sted If user sets up the target time to workout then the next parameter of Distance can not be adjusted Continue through all desired parameters After completing parameter set up row 1 of the profile w...

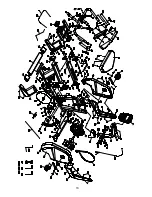
Страница 17: ...14 M10 1 25m m_Nut 2 15 Pedal 1 16 Flywheel 1 17 Drive Pulley 1 18 Belt 1 19 Seat 1 20 Seatback Cushion 1 21 6004_Bearing 2 22 Flywheel Magnets Mounting Plate 1 23 3 8 27L_Carriage Bolt 1 24 3 8 7T_Ny...

Страница 18: ...ding Assembly 1 52 Shaft 1 53 Shaft suspension 2 54 Seat Back Mounting Plate 1 55 M6 35L_Phillips Head Screw 4 56 M6 10L_Phillips Head Screw 4 57 5 16 1 1 4 _Hex Head Bolt 4 58 Adjusting Lever 1 59 Se...

Страница 19: ...Bracket 1 87 HGP Wire Grommet 1 88 Crank Arm Cover 2 89 PU Sleeve 1 90 3 5 20L_Sheet Metal Screw 2 91 5 16 2 1 2 _Button Head Socket Bolt 1 92 M6_L Allen Wrench 1 93 1150m m_Computer Cable 1 94 1950m...

Страница 20: ...19...

Страница 21: ...1800 465 070 For efficient processing of your enquiry please have relevant date of purchase retailer name you purchased the item from and the brand on the product This warranty does not extend to any...

Страница 22: ...tees that cannot be excluded under the Australian Consumer Law You are entitled to a replacement or refund for a major failure and for compensation for any other reasonably foreseeable loss or damage...

Страница 23: ...es Fitness to comply with a consumer guarantee under the Australian Consumer Law 3 The product was damaged through abnormal use no refund or repair can be offered The sending of replacements spare par...

Отзывы: