background image

Page:

10

User Manual:

VENTILATION REQUIREMENTS

►   The room containing the hob should have an air supply 

in accordance with AS/NZS5601.1 Gas Installations.

►   The room must have opening windows or equivalent; 

some rooms may also require a permanent vent. 

►   It will require an air vent of 300 mm² per MJ/h (eff ective 

area) to outside, or 600 mm² per MJ/h (eff ective area) to 
adjacent room. (See total gas consumption in MJ/h on 
the appliance rating plate).

►   If there are any other fuel burning appliances in 

the same room the standardAS/NZS5601.1 Gas 
Installations: should be consulted to determine air vent 
requirements. 

►   Ensure that the room containing the hob is well 

ventilated, keep natural ventilation holes or install 
a mechanical ventilation device (mechanical cooker 
hood). 

►   Prolonged intensive use of the appliance may call 

for additional ventilation, either by the opening of a 
window, or by increasing the level of the mechanical 
ventilation device (where present). 

►   This hob is not fi tted with a device for discharging the 

products of combustion. Ensure that the ventilation 
rules and regulations are followed. 

►   The walls behind and near the hob should be resistant 

to heat, steam and condensation. 

GAS CONNECTION

Install in accordance with relevant gas standards and/or 
codes of practice applicable.

Connect the elbow fi tting to the appliance gas manifold 
connection, and check that seals between the elbow and 
manifold connection are in place and in good condition.

►   For Natural gas: connect the natural gas appliance 

regulator (pictured below) with integral test point using 
approved gas thread tape or compound to the elbow 
fi tting.

►   For Universal LPG: connect the brass test point adaptor 

(pictured below) using approved gas thread tape or 
compound to the elbow fi tting.

Ensure the supply connection point, test point and natural 
gas regulator adjustment screw (for Natural gas installation) 
are accessible for testing and/or adjustment with the 
hotplate in the installed position.

Where a fl exible hose assembly is used, ensure it is 
approved to AS/NZS 1869, Class B or D and the maximum 
length is 1.5m. Any hose assembly used must be restrained 
from accidental contact with the fl ue outlet of an under 
bench oven. This hose assembly shall be suitable for 
connection to a fi xed consumer piping outlet located as 
follows:

►   Hotplates at a point 800 mm to 850 mm above the fl oor 

and in the region outside the width of the appliance to a 
distance of 250 mm.

Содержание ECG6F

Страница 1: ...Model Code s ECG6F Product Gas Cooktop 60cm Document User Manual...

Страница 2: ...atures of your cooktop and importantly taking care of your appliance when cleaning our Support Team are here to help You can use our online Support Centre at anytime by visiting http support residenti...

Страница 3: ...ge 03 User Manual Contents Page Safety Instructions 04 Your Esatto Cooktop 06 Installation Instructions 08 Cleaning Maintenance 14 Technical Data 14 Purchase Details 15 Warranty Information 16 Notes 1...

Страница 4: ...ions that are noted in the Warranty Terms and Conditions at the rear of this user manual The foregoing does not affect your statutory rights The use of this cooktop for any other purpose or in any oth...

Страница 5: ...please dispose of all elements of packaging in a way that will not cause damage to the environment All materials used for packaging the appliance are environmentally friendly they are 100 recyclable a...

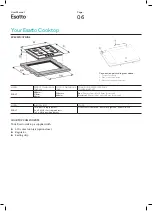
Страница 6: ...mm from rear MODEL BURNERS NG OTHER ECG6F 1 x 10 8 MJ h rapid burner 2 x 6 5 MJ h semi rapid burners 1 x 3 6 MJ h auxiliary burner Front control operation Automatic ignition Enamel trivets COOKTOP COM...

Страница 7: ...e minimum and maximum diameters given for the burner to you using A pan base which is too small will be unstable on the pan support If the pan diameter is too large flames can spread out to the sides...

Страница 8: ...in a bathroom or shower room This appliance is classified as Class 3 and therefore is to be built into a kitchen unit depending on size or 600mm deep worktop providing the following minimum distances...

Страница 9: ...to the cooktop but loose enough that you can still adjust it s position Now carefully turn the cooktop back over and gently lower it into the cut out On the underside of the cooktop adjust the clamps...

Страница 10: ...near the hob should be resistant to heat steam and condensation GAS CONNECTION Install in accordance with relevant gas standards and or codes of practice applicable Connect the elbow fitting to the a...

Страница 11: ...m the pipes 4 With the appliance operating check the outlet pressure When all burners of the appliance are operating at maximum When the smallest burner of the appliance is operating at minimum Under...

Страница 12: ...itter and in accordance with the current standards WARNING Always isolate the cooktop from the electricity and gas supply before changing the injectors and or adjusting the minimum flow of the burners...

Страница 13: ...ail by removing the fixing screws When fitting a new tap ensure that a new gasket is used Reconnect the gas tap perform a gas soundness test and then reassemble the hob ELECTRICAL CONNECTION IMPORTANT...

Страница 14: ...sidentiagroup com au TROUBLESHOOTING IMPORTANT If your appliance appears to be operating incorrectly then you should disconnect it from your mains gas and electrical supply and then contact the Reside...

Страница 15: ...nvoice The rating plate of your hob is located on the underneath of the appliance Therefore please fit the duplicate data plates or label on the outside of the cupboard to sure that the label can be e...

Страница 16: ...owing the date of original purchase of the Appliance h you means the purchaser of the Appliance not having purchased the Appliance for re sale and your has a corresponding meaning 2 This warranty only...

Страница 17: ...failure and for compensation for any other reasonably foreseeable loss or damage You are also entitled to have the Appliance repaired or replaced if the Appliance fails to be of acceptable quality an...

Страница 18: ...Page 18 User Manual Notes...

Страница 19: ...Page 19 User Manual...

Страница 20: ...Model Code s ECG6F...

Отзывы: