background image

Edition 040830

-- 16 --

ch25d_20

20AP1:6

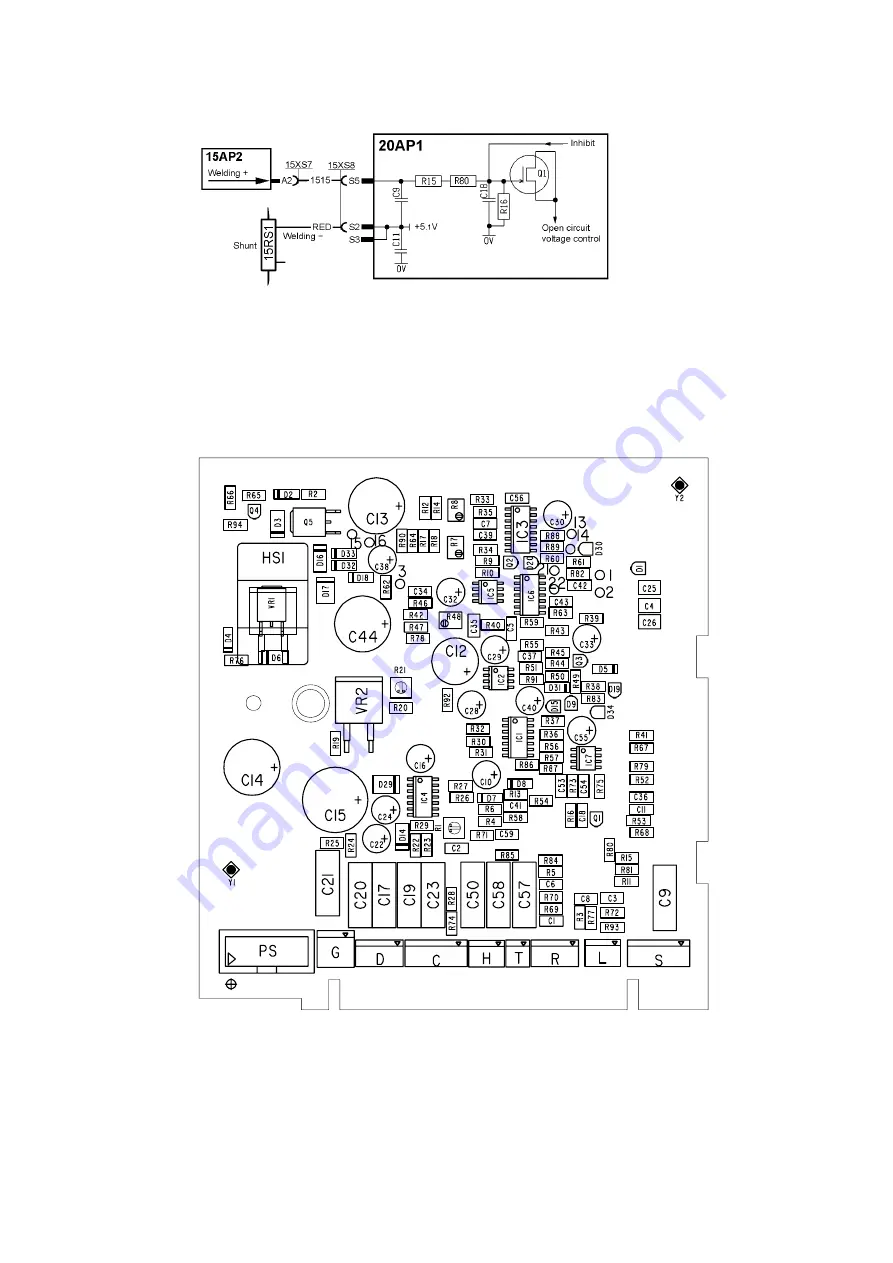
Arc voltage monitoring

The open--circuit voltage controller senses the voltage at the welding current

terminals and limits it to a level between 60 and 71 V. This function is inactive

during welding, i.e. when the shunt voltage is higher than 2.1 mV.
When the OrigoArc is in welding mode, the maximum output voltage is 110 V.

20AP1

Component positions

Содержание OrigoArc 150

Страница 1: ...0740 800 162 Valid for serial no 316 xxx xxxx to 405 xxx xxxx 040830 OrigoArc 150 Service manual ...

Страница 2: ...econdary board 13 15AP2 Component positions 13 20AP1 Control board 14 20AP1 1 Power supply 14 20AP1 2 Current reference input 14 20AP1 3 Pulse width modulator 14 20AP1 4 Temperature monitoring 15 20AP1 5 Shunt input 15 20AP1 6 Arc voltage monitoring 16 20AP1 Component positions 16 SERVICE INSTRUCTIONS 17 What is ESD 17 Special tools 17 Soft starting 18 Checking rectifier and freewheel diodes 20 Ch...

Страница 3: ...ails of all design changes that have been made up to and including August 2004 The manual is valid for OrigoArc 150 with serial no 316 xxx xxxx 328 xxx xxxx 341 xxx xxxx 405 xxx xxxx The OrigoArc 150 is designed and tested in accordance with international and European standards IEC EN 60974 1 and EN 50199 On completion of service or repair work it is the responsibility of the person s performing t...

Страница 4: ...iod that you can weld at a cer tain load without overloading Enclosure class The IP code indicates the enclosure class i e the degree of protection against penetration by solid objects or water Equipment marked IP23 is designed for indoor and outdoor use Application class The symbol indicates that the power source is designed for use in areas with increased electrical hazard WIRING DIAGRAM The pow...

Страница 5: ...must be wound two turns through the ferrite rings 2L2 Ferrite ring 2QF1 Mains switch 2XS1 Flat pin sockets Important to obtain a proper electrical connection the complete cord set must be replaced if the sockets have to be replaced 15 Power module 15AP1 Power board 15AP2 Secondary board 15C1 Smoothing capacitor 1000 uF 15D1 Diode module with rectifier and freewheel diodes 15EV1 Fan 15L1 Inductor 1...

Страница 6: ...Edition 040830 6 ch25d1 OrigoArc 150 ...

Страница 7: ...Edition 040830 7 ch25d1 ...

Страница 8: ...nd to the circuit board numbers and divisions into function blocks 2AP1 Power supply board The power supply board filters the mains voltage and generates internal supply voltages for the machine 2AP1 1 Interference suppressor circuit WARNING Dangerous voltage mains voltage The mains voltage is filtered by the power supply board Power board 15AP1 rectifies the mains voltage 2AP1 2 Primary and secon...

Страница 9: ...1 S1 is a fuse with high rupturing capacity Transistor Q3 is the switching element in a switched voltage supply The secondary voltage 24 V is sensed by IC2 and controlled by IC1 It has a tolerance of 0 6 V The isolation voltage of transformer T1 and optocoupler IC3 is 4 kV 2AP1 Component positions WARNING Dangerous voltage mains voltage ...

Страница 10: ...s failed a replacement board must be mounted in accordance with the instructions on page 23 The power board carries the mains rectifier the charging circuit the switching circuit and the gate circuit The mains rectifier and the switching transistors are integrated in a semiconductor module PM1 which is part of the power board Charging circuit When the mains power supply is turned on the rectified ...

Страница 11: ...iver stages Transformer TR1 is a gate driver transformer for galvanic isolation of the drive circuits from controller board 20AP1 Fuses S10 and S20 protect the gate driver circuit if the IGBT transistors fail Switching circuit The switching transistors are integrated in the semiconductor module They are parallel connected three and three ...

Страница 12: ...Edition 040830 12 ct27d_15 15AP1 Component positions Pin positions of the semiconductor module ...

Страница 13: ...elding current from inductor 15L1 If the diode module has failed a replacement module must be fitted in accordance with the instructions on page 23 Inductor L1 forms an LC circuit with C3 C4 and D1 to reduce the risk of arc extinction at low welding currents When rectifier diode 15D1 conducts the LC circuit charges up The circuit is capable of temporarily maintaining a high arc voltage at low curr...

Страница 14: ...tions on page 18 20AP1 1 Power supply Voltage regulator VR1 produces an output voltage of 20 1 0 V All circuits on the control board except the current reference are supplied from VR1 20AP1 2 Current reference input The reference input is supplied with 5 1 V generated by IC3 the pulse width modulator Potentiometer R1 adjusts the reference voltage from potentiometer 20RP1 for correct maximum curren...

Страница 15: ...e normally closed which means that input T2 is at about 9 V 15ST2 opens at 85 _C and is fitted on the heat sink 15ST1 opens at 130 _C and is fitted in the winding of the main transformer 15TM1 If either of the switches operates the power source is stopped and 1D2 the yellow LED on the front panel lights The power source cannot be restarted until it has cooled sufficiently for the switch es to recl...

Страница 16: ...ller senses the voltage at the welding current terminals and limits it to a level between 60 and 71 V This function is inactive during welding i e when the shunt voltage is higher than 2 1 mV When the OrigoArc is in welding mode the maximum output voltage is 110 V 20AP1 Component positions ...

Страница 17: ...rs e g plastics generate and hold static charge so you should not bring unnecessary nonconductive items into the work area It is obviously difficult to avoid all such items so various means are used to drain off any static discharge from persons to prevent the risk of ESD damage This is done by simple devices wrist straps connected to ground and conductive shoes Work surfaces carts and containers ...

Страница 18: ...ting 2 Connect the 230 V AC input of the SST 1 to terminals B1 and B2 on circuit board 2AP1 3 Connect the 325 V DC output of the SST 1 to terminals F1 and F3 on circuit board 2AP1 The SST 1 connected to 2AP1 4 Disconnect connector 20XS4 from terminal PS of power supply board 2AP1 Connect the voltage test cable of the SST 1 to terminal PS of power supply board 2AP1 5 Connect the power source to the...

Страница 19: ...points for soft starting 10 Switch on the machine and set it to MMA mode 11 Check that the DC voltage across smoothing capacitor 15C1 is 22 24 V 12 Check that the DC voltage at the welding terminals is 7 8 V 13 If all the measurements are as described above reconnect the wires to restore the power source to normal operation mode and make a test weld ...

Страница 20: ...marked on the picture below 4 Bend out the circuit board so that it has no contact with the connections of the diode module 5 Use a multimeter in diode test position to measure the forward voltage drop of the two diodes see the picture below The voltage drop must be 0 3 to 0 5 V 6 If the diode module has to be replaced follow the instructions on page 23 Measuring points circuit board 15AP2 Circuit...

Страница 21: ... 20AP1 3 Connect the cable marked 20AP1 S1 S2 to terminal S 4 Disconnect connector 20XS5 from terminal G on control board 20AP1 5 Connect the gate pulse test cable of the SST 1 to terminal G on control board 20AP1 6 Switch on the machine 7 Connect an oscilloscope to the SST 1 with the probe to terminal G2 and the screen to terminal G1 8 Set the current reference to 70 A or more This will set the p...

Страница 22: ...orward voltage drop must be 0 4 to 0 6 V 3 Diode N1D measure between the negative of capacitor 15C1 and terminal C pin 1 Diode N2D measure between the negative of capacitor 15C1 and terminal C pin 2 The forward voltage drop must be 0 4 to 0 6 V 4 Diode D1 connected in parallel with D4 measure between the negative of capacitor 15C1 and terminal T2 The forward voltage drop must be 0 3 to 0 5 V 5 Dio...

Страница 23: ...the board and tighten the screws to a torque of 2 5 Nm and then further tighten them to 4 5 Nm 3 Tighten the screws that connect transformer 15TM1 and capacitor 15C1 to circuit board 15AP1 to a torque of 4 5 Nm Warning Incorrectly fitted components can cause failure Do not tighten the screws to more than 4 5 Nm Note If capacitor 15C1 or transformer 15TM1 have to be replaced the power board must be...

Страница 24: ...ion S relevant safety precautions S welding 2 The operator must ensure that S no unauthorized person is stationed within the working area of the equipment when it is started up S no one is unprotected when the arc is struck 3 The workplace must S be suitable for the purpose S be free from drafts 4 Personal safety equipment S Always wear recommended personal safety equipment such as safety glasses ...

Страница 25: ...nd that it is protected by the correct fuse rating The standards for the country in question must be complied with as regards the mains cable area A protective earth connection must be made in accordance with regulations Recommended fuse ratings and minimum cable areas Mains voltage 230 V 10 1 phase Mains frequency 50 60 Hz Fuse delayed action 85A 35 duty cycle 120A 20 duty cycle 150A 25 duty cycl...

Страница 26: ... a thermal overload trip which operates if the temperature becomes too high interrupting the welding current and lighting a yellow indicating lamp on the front of the power source The thermal overload trip resets automatically when the temperature has fallen MAINTENANCE Regular maintenance is important for safe reliable operation Note All guarantee undertakings from the supplier cease to apply if ...

Страница 27: ... 27 notes NOTES ...

Страница 28: ...nal AB Gothenburg Tel 46 31 50 90 00 Fax 46 31 50 93 60 SWITZERLAND ESAB AG Dietikon Tel 41 1 741 25 25 Fax 41 1 740 30 55 North and South America ARGENTINA CONARCO Buenos Aires Tel 54 11 4 753 4039 Fax 54 11 4 753 6313 BRAZIL ESAB S A Contagem MG Tel 55 31 3369 4333 Fax 55 31 3369 4440 CANADA ESAB Group Canada Inc Missisauga Ontario Tel 1 905 670 02 20 Fax 1 905 670 48 79 MEXICO ESAB Mexico S A M...

Отзывы: