background image


14 


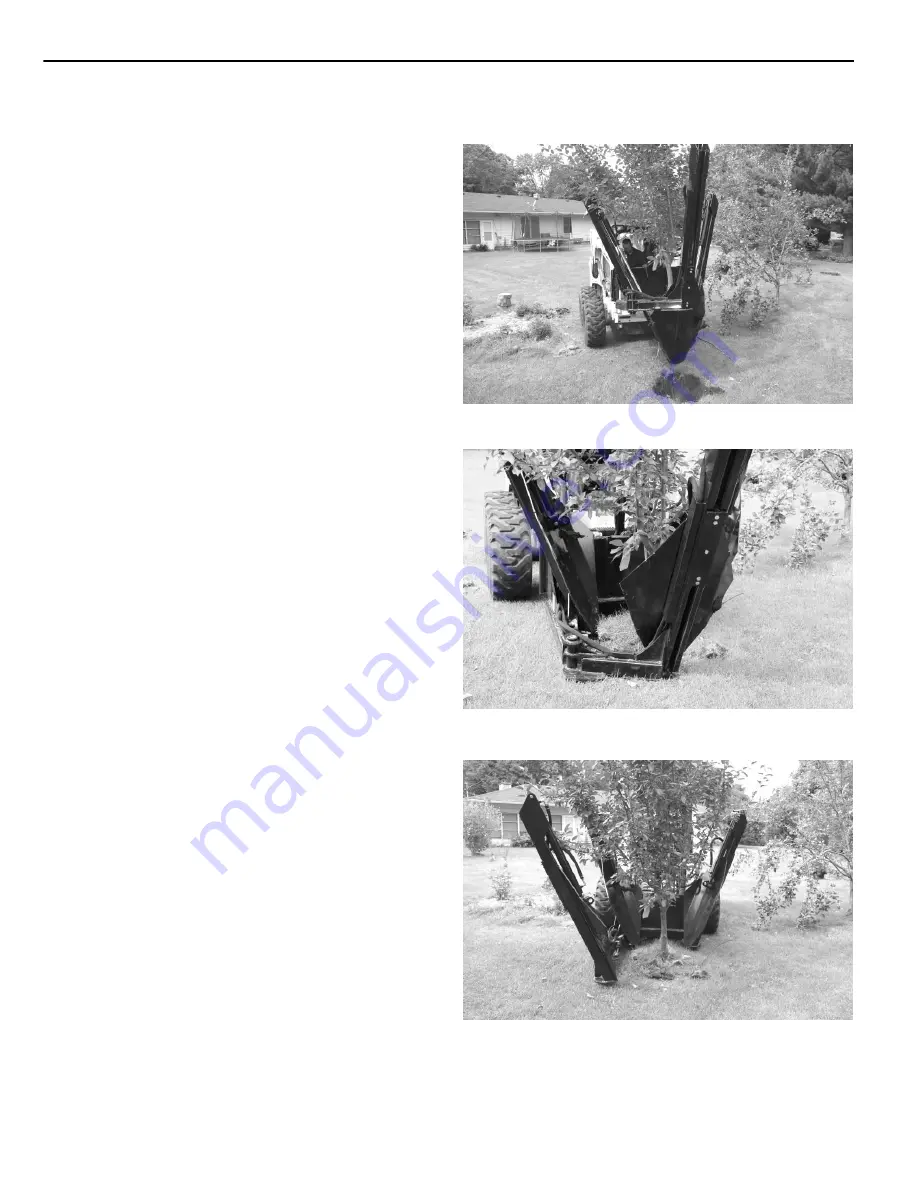
        PLANTING PROCEDURE 


With the tree in the tree spade, use the following procedure to plant or basket the tree. 


1.  Position  the  tree  spade  so  that  it  lines  up 

with  the  hole  where  the  tree  is  to  be 
planted.


2.  Lower  the  tree  spade  into  the  hole, 

ensuring that the root ball is well centered. 


3.  Retract  each  blade  one inch  until  the root 

ball  is  loose;  then  retract  each  blade 
completely. 


4.  Once  all  blades  are  fully  retracted,  raise 

the  tree  spade  4-6  inches  above  the 
ground,  open  the  hinged  base,  and  back 
the loader away from the tree. 


Содержание 3S

Страница 1: ...Tree Spade Models 3S 4S For Skid Steer Loaders Operator s Manual Maintenance Parts Information Read this Manual Before Use ...

Страница 2: ...MATION 17 30 GENERAL SPECIFICATIONS 31 TROUBLESHOOTING 32 33 TREE CARE 34 WARRANTY 35 REFERENCE INFORMATION Write the correct information for your attachment in the spaces below Always use these numbers when referring to your attachment Serial Number YOUR ATTACHMENT DEALER ADDRESS PHONE CONTACT NOTE Erskine Attachments LLC reserves the right to make improvements in design or changes in specificati...

Страница 3: ... CAUTION WARNING or DANGER are used to indicate hazards Indicates a potentially hazardous situation which if not avoided may result in minor or moderate injury Indicates a potentially hazardous situation which if not avoided could result in death or serious injury Indicates a potentially hazardous situation which if not avoided will result in death or serious injury The word IMPORTANT is used in t...

Страница 4: ...re starting the engine To avoid electric shock or electrocution NEVER operate the attachment near overhead power lines SAFETY____________ Operation continued Keep people away from loader and attachment when in use This attachment lifts objects and has moving parts NEVER attempt to lift a tree larger than the specified capacity of tree spade model NEVER operate near embankments or terrain that is s...

Страница 5: ... It is important to refer to the serial number of your attachment when making repairs or ordering parts Early or later models identification made by serial number may use different parts or it may be necessary to use different procedures in doing a specific operation ...

Страница 6: ...g damaged or painted over they must be replaced Call Erskine Attachments LLC 218 435 4045 for replacement decals Part Number 202152 ON 3S ONLY Location On mounting plate top left Quantity 1 C Part Number 316904 Location On right rear tower facing controls Quantity 1 A D Part Number 316855 Location On mounting plate top centered under hyd controls bracket Quantity 1 E Part Number 316856 ON 3S ONLY ...

Страница 7: ...ff and cause injury or death 1 Use the step safety treads and grab handles to get on and off the loader and attachment 2 Sitting in the operator s seat lower seat bar and fasten the seat belt 3 Drive the loader to the rear of the attachment Put the loader quick attach coupler into the attachment mounting bracket 4 Tilt the loader coupler backward a small amount until it is fully engaged in the att...

Страница 8: ...ends of the lead hoses 8 Make sure the hoses are properly routed to fit your specific loader If the hoses are not routed correctly hoses may get pinched or rub on tires Be sure to check the hose routing through the full range of intended motion of the attachment before operating it More than one routing may be acceptable depending on the loader Pick the routing that best suits your loader IMPORTAN...

Страница 9: ... lowered if so equipped start the engine 2 Raise the attachment slightly off the ground 3 Engage the auxiliary hydraulics in continuous flow Using the levers on the valve the tree spade can be operated as detailed below NOTE The loader should be run at about half throttle when operating the tree spade Operating the tree spade while the loader is at full throttle may overload the valve and cause th...

Страница 10: ...ded motion before operating 2 With the operator in the seat of the loader the seat belt fastened and the seat bar lowered if so equipped start the engine 3 Raise the attachment slightly off the ground 4 Engage the auxiliary hydraulics turn on the 12V connector switch and push the POWER button on the controller The green LED will blink rapidly 3 times per second to indicate that communication has b...

Страница 11: ...t F Insert Blade 3 G Retract H Insert A B C D E F G H 4S Wired Controller Function Toggle Switch Blade 4 A Up Retract Down Insert Blade 3 B Up Retract Down Insert Blade 1 C Up Retract Down Insert Hinge LH D Up Open Down Close Hinge RH E Up Open Down Close Blade 2 F Up Retract Down Insert A B C F E D 4S Wireless Controller Function Buttons Hinge LH A Open B Close Hinge RH C Open D Close Blade 1 E R...

Страница 12: ...when digging the new hole and the tree This will help the blades line up better in the hole reducing air pockets under the root ball 4 Close the hinged base 5 Lower the tree spade to apply down pressure 6 Insert the left rear blade closest to loader about a quarter of its length or until the frame begins to lift off of the ground Then retract the blade until the frame touches the ground again IMPO...

Страница 13: ... result in damage to the couplers 10 Stop the loader engage the park brake and have a second person cut any protruding roots To avoid injury or death do not leave operator s seat while tree spade is raised and do not allow anyone to be underneath the load or tree spade 11 Once all roots are cut move the tree to its new location Use a spotter to avoid obstacles and stay in operator s seat To avoid ...

Страница 14: ...the hole where the tree is to be planted 2 Lower the tree spade into the hole ensuring that the root ball is well centered 3 Retract each blade one inch until the root ball is loose then retract each blade completely 4 Once all blades are fully retracted raise the tree spade 4 6 inches above the ground open the hinged base and back the loader away from the tree ...

Страница 15: ...MPORTANT Bolts and set screws can loosen after initial usage After the first hour of operation check all bolts and set screws No 2 Lithium base gun grease Clean engine oil Use No 2 lithium base gun grease when lub ricating all attachment grease fittings Grease all hinge pins A once every eight 8 hours or more frequently during heavy use Keep slides B clean and free from obstructions DO NOT grease ...

Страница 16: ...16 BOLT TORQUE INFORMATION ...

Страница 17: ...LATE SPADE RETENTION PNT UNPAINTED P N 316844 7 3 316854 PIN 1 X 2 25 SNP RNG Z 8 3 316853 PIN 1 X 5 75 SNP RNG Z 9 13 28279 RING SNAP EXT 1 X 042 13 2 300581 PIN SNAPPER 5 16 X 3 14 4 33008 WASHER FLAT 3 8 15 3 37212 NUT REV LOCK 3 8 NC 16 2 13114 BOLT HEX 3 8 X 2 3 4 NC GR5 17 3 13051 BOLT HEX 5 16 X 1 2 NC GR 5 18 3 33620 WASHER LOCK 5 16 19 15 13209 BOLT HEX 1 2 X 1 1 2 NC GR 5 21 3 316898 CYL...

Страница 18: ...XT 1 X 042 10 1 318731 PIN 1 X 4 88 GRS W A 11 1 316852 PIN 1 5 X 10 13 GRS W H Z 12 1 316851 PIN 1 X 2 19 SNP RNG GRS Z 15 3 37212 NUT REV LOCK 3 8 NC 20 1 316896 CYLINDER 2 X 7 B C HINGE CYLINDER 22 1 13105 BOLT HEX 3 8 X 1 NC GR 5 23 1 37210 NUT REV LOCK 1 4 NC 24 1 13015 BOLT HEX 1 4 X 3 NC GR 5 ...

Страница 19: ...19 TREE SPADE 3S 30 PARTS INFORMATION ...

Страница 20: ... 4 316851 PIN 1 X 2 19 SNP RNG GRS Z 11 2 316852 PIN 1 5 X 10 13 GRS W H Z 13 2 300581 PIN SNAPPER 5 16 X 3 14 4 33008 WASHER FLAT 3 8 15 2 37212 NUT REV LOCK 3 8 NC 16 2 13114 BOLT HEX 3 8 X 2 3 4 NC GR5 17 3 13051 BOLT HEX 5 16 X 1 2 NC GR 5 18 3 33620 WASHER LOCK 5 16 19 20 13209 BOLT HEX 1 2 X 1 1 2 NC GR 5 20 2 316897 CYLINDER 2 X 4 5 C C HINGE CYLINDER 21 4 316898 CYLINDER 2 5 X 30 B C SPADE...

Страница 21: ...21 TREE SPADE 4S 40 PARTS INFORMATION ...

Страница 22: ...4S ASSM W WIRELESS CTRL WIRELESS ELEC PKG 1 316926 RADIO RCVR ONLY 4S PARTS ONLY INCLUDED IN 316918 42 4 13055 BOLT 5 16 X 1 NC GR 5 OPT ELECTRIC PACKAGES 43 8 33006 WASHER FLAT USS 5 16 OPT ELECTRIC PACKAGES 44 4 13053 BOLT 5 16 X 3 4 NC GR 5 OPT ELECTRIC PACKAGES 45 2 37206 NUT REV LOCK 8 32 OPT ELECTRIC PACKAGES 46 8 37211 NUT REV LOCK 5 16 NC OPT ELECTRIC PACKAGES 47 2 0148120 BOLT 8 32 X 1 2 ...

Страница 23: ...51 BOLT HEX 5 16 X 1 2 NC GR 5 18 3 33620 WASHER LOCK 5 16 25 2 316891 HOSE 1 2 X 48 8FJX 10FJX 90 LEAD HOSES 34 1 316894 VALVE ASSM 3S 4 LEVER 1 316895 VALVE ASSM 4S 6 LEVER 35 1 318295 ADPT STR 10MB 10MJ CHECK INCLUDED IN VALVE ASSM 36 1 300902 ADPT STR 8MB 10MJ RED ZIP TIE ON PRESSURE HOSE ...

Страница 24: ...FJX 10FJX 90 LEAD HOSES 35 1 318295 ADPT STR 10MB 10MJ CHECK INCLUDED IN VALVE ASSM 39 1 316915 VALVE ASSM 3S ELECTRIC OPT ELECTRIC PACKAGES 1 316916 VALVE ASSM 4S ELECTRIC OPT ELECTRIC PACKAGES 48 1 201852 ADPT STR 10MB 10MJ OPT ELECTRIC PACKAGES 49 2 330643 ADPT PLUG 10MB INCLUDED IN VALVE ASSM RED ZIP TIE ON PRESSURE HOSE ...

Страница 25: ... PART NO DESCRIPTION STOCK NO 21 3 316898 CYLINDER 2 5 X 30 B C SPADE CYLINDER 28 4 320089 ADPT ELB 8MB 6MJ 90 29 4 201925 ADPT STR 8MB 6MJ 30 2 318371 HOSE 3 8 X 140 6FJX 6FJX 90 REAR SPADE CYL BASE 31 2 316888 HOSE 3 8 X 140 6FJX 6FJX 90 LONG REAR SPADE CYL ROD ...

Страница 26: ... 320089 ADPT ELB 8MB 6MJ 90 29 2 201925 ADPT STR 8MB 6MJ 32 1 316889 HOSE 3 8 X 180 6FJX 6FJX 90 FRONT SPADE CYL BASE 33 1 316890 HOSE 3 8 X 180 6FJX 6FJX 90 LONG FRONT SPADE CYL ROD PLATE PULLED BACK FROM WELDMENT FOR HOSE ROUTING VISIBILITY ONLY TREE SPADE 3S FRONT SPADE HYD PARTS INFORMATION ...

Страница 27: ...316898 CYLINDER 2 5 X 30 B C SPADE CYLINDER 28 4 320089 ADPT ELB 8MB 6MJ 90 29 4 201925 ADPT STR 8MB 6MJ 32 2 316889 HOSE 3 8 X 180 6FJX 6FJX 90 FRONT SPADE CYL BASE 33 2 316890 HOSE 3 8 X 180 6FJX 6FJX 90 LONG FRONT SPADE CYL ROD PLATE PULLED BACK FROM WELDMENT FOR HOSE ROUTING VISIBILITY ONLY ...

Страница 28: ...1 316886 HOSE 1 4 X 96 6FJX 6FJX 90 HINGE CYLINDER ROD 3S 27 1 316887 HOSE 1 4 X 96 6FJX 6FJX 90 LONG HINGE CYLINDER BASE 3S 28 1 320089 ADPT ELB 8MB 6MJ 90 3S 29 2 201925 ADPT STR 8MB 6MJ 3S 37 1 300839 ADPT REST ELB 8MB 6MJ 90 04 HINGE CYL ROD END 3S TREE SPADE 3S HINGE HYD PARTS INFORMATION ...

Страница 29: ...7 CYLINDER 2 X 7 B C HINGE CYLINDER 4S 26 2 316886 HOSE 1 4 X 96 6FJX 6FJX 90 HINGE CYLINDER ROD 4S 27 2 316887 HOSE 1 4 X 96 6FJX 6FJX 90 LONG HINGE CYLINDER BASE 4S 28 2 320089 ADPT ELB 8MB 6MJ 90 4S 29 4 201925 ADPT STR 8MB 6MJ 4S 37 2 300839 ADPT REST ELB 8MB 6MJ 90 04 HINGE CYL ROD END 4S ...

Страница 30: ...30 VALVE BLOCK 316894 STANDARD VALVE BLOCK 316915 ELECTRIC TREE SPADE 3S HOSE ROUTING PARTS INFORMATION ...

Страница 31: ...31 TREE SPADE 4S HOSE ROUTING PARTS INFORMATION VALVE BLOCK 316895 STANDARD VALVE BLOCK 316916 ELECTRIC ...

Страница 32: ... Tree Size Hardwood 3S 4S 2 5 3 Maximum Tree Size Evergreen 3S 4S 3 4 Maximum Swing Opening 3S 4S 53 52 Operating Weight 3S 4S 1480 lbs 1910 lbs Weight with Root Ball 3S 4S 1980 lbs 3110 lbs GENERAL SPECIFICATIONS All dimensions are in INCHES ...

Страница 33: ...ary A hydraulic cylinder not functioning Insufficient hydraulic flow from skid steer Refer to loader s operator s manual Cylinder rod bent Visually inspect cylinder for damage Cylinder seals damaged Replace cylinder seals Obstruction in hydraulic lines Remove obstruction replace if necessary Damaged electrical wiring Test and replace if necessary Blades will not cut into ground Insufficient hydrau...

Страница 34: ... that receiver has power Red LED light blinking Battery voltage low Replace batteries Error code See Controller Error Codes table below Controller Error Codes Code Probable Cause 1 Low controller battery 2 Faulty circuit to Output 1 3 Faulty circuit to Output 2 4 Faulty circuit to Output 3 5 Faulty circuit to Output 4 6 Faulty circuit to Output 5 7 Faulty circuit to Output 6 8 Faulty circuit to Ou...

Страница 35: ...n tropical and sub tropical areas Mulching Mulching helps protect the tree by discouraging other plants from growing near it increasing water holding capacity in the soil and maintaining a uniform soil temperature around the tree Mulch can be applied almost any time of year but the best time is mid spring when the soil has warmed up enough for sufficient root growth Mulch should be applied 2 to 4 ...

Страница 36: ...______________________________________________________________ _____________________________________________________________________________________ _____________________________________________________________________________________ _____________________________________________________________________________________ _______________________________________________________________________________...

Страница 37: ...______________________________________________________________ _____________________________________________________________________________________ _____________________________________________________________________________________ _____________________________________________________________________________________ _______________________________________________________________________________...

Страница 38: ...______________________________________________________________ _____________________________________________________________________________________ _____________________________________________________________________________________ _____________________________________________________________________________________ _______________________________________________________________________________...

Страница 39: ... liable for incidental or consequential damages or injuries including but not limited to the loss of profit rental or substitute equipment or other commercial loss Purchaser s sole and exclusive remedy being as provided here in above Erskine Attachments LLC must receive immediate notification of defect and no allowance will be made for repairs without our consent or approval This warranty is in li...

Страница 40: ...40 P N 316899 Date Printed 9 17 2018 Erskine Attachments LLC Printed in U S A ...

Отзывы: