background image

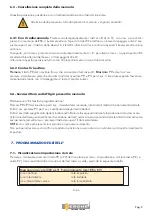
6.3  - Cancelling the entire memory

This operation is possible both with the receiver button and with the transmitter keys.

At the end of the procedure all the data present in the memory have been cancelled

6.3.1 By Radio

 :Keep keys 

( A+B)

 of a memorised transmitter pressed down until the buzzer emits a bip and 

both the leds flash for a while .
Within 2 sec press the key A of the same transmitter for 4 sec.
At his point the led LR remains lit and the buzzer emits a continous bip.
Within 4 sec, keep the keys (A+B) pressed down for further 4 sec until the buzzer emits 3 bips and both the led LR 
and LV flashes 3 times.

At the end of the procedure all the data present in the memory have been cancelled.

!

Tab.3

6 - MEMORY MANAGEMENT

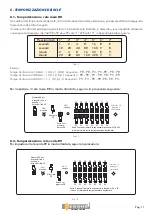
6.1  - Transmitter memory position display.

Throught the following procedure it is possible to display the memory position of a transmitter key 

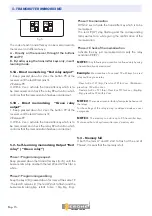
Press down the transmitter key to verify and check the relay activation and the led 
Press down the button 

PR 

for 1 second.

From this time on, a sequence of 7 flashes of the led LR and LV commences . By annotating the sequence it is 
possible to calculate the memory position of the transmitter key, referring to the following table:


Led lit


2° 

3° 

4° 

5° 

7° 

   Green colour weight 1

2

4

8

16

32

64

   Red colour weight

0

0

0

0

0

Example

 :

Led sequence : 

LR,   LR,   LV,   LV,   LR,   LR,   LR.

Equivalence to calculate:                  0 + 0 + 4 + 8 + 0 + 0 + 0 = 12 
The transmitter key was been memorised into the 12th memory position.

6.2 - Memory capacity display

Throught the following procedure it is possible to display the memory capacity

Press down the button 

PV 

for 1 second.

From this time on, a sequence of 7 flashes of the led LR and LV commences 
By annotating the sequence it is possible to calculate the number of memory positions occupied

6.3.2 With the receiver buttons

:

Press the button PR of the receiver until the led LR lits. Release PR and within 2 sec keep both the buttons PR 
and PV pressed down for 4 sec until until the buzzer emits 3 bips and both the led LR and LV flashes 3 times.

T H E S M A R T L I V I N G

Pag. 16

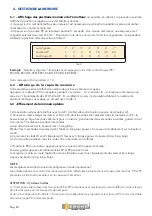
6.4  - TX code overwrite

Make a programming request ( as shown in chapter 5.2)

Press PR or PV on the receiver for 4 sec, the red led LR or green led LV remains lit, showing the relay operating 
mode. Within 2 sec, press PV for 1 sec and the led will turn off.
Within 2 sec start to input the sequence which represent the position to overwrite  by pressing down the buttons PR 
or PV. At the end of the sequence the led LR or LV remains lit.
Within 4 sec activate the transmitter key which has to be memorised.

NOTE : A transmitter key already memorised can’t be used for an overwriting.

Содержание SEL2641F433C2P

Страница 1: ...ZA 2 RELE 2 RELAY POWER RECEIVER RECEPTEUR 2 RELAYS PLUS LEISTUNGSEMPF NGER 2 KANAL Manuale d installazione ed uso Italiano Pag 4 Use and installation Manual English Pag 13 Notices d installation et u...

Страница 2: ...L39R30 P4 est conforme la directive 2014 53 UE Le texte int gral de la d claration de conformit est disponible l adresse internet suivante www erone com Declaration of Conformity SEL2641R433 P4 SEL39R...

Страница 3: ...F1 SicherungF1 Contatti Rel Verde Green relay contacs Contacts relais vert Kontakt gr n 5 Rel Verde Green relay Relais vert Leistungsrelais Morsetti alimentazione12 24 Vac dcModelli C2P Power supply t...

Страница 4: ...di radiofrequenza e di compatibilit elettromagnetica CE Il codice ricevuto dal trasmettitore cambia ad ogni attivazione evitando cos il rischio della copia e successiva riproduzione Un sistema interno...

Страница 5: ...portante 433 92 MHz 433 92 MHz Frequenza oscillatore locale 6 6128 MHz 6 6128 MHz Modulazione AM ASK FM FSK AM ASK FM FSK Impedenza d ingresso 50 Ohm 50 Ohm Larghezza di canale 25 KHz 25 KHz Frequenza...

Страница 6: ...6 NA 3 4 Rel RV 8 9 NC C Rel RR NA 3 Collegare l antenna come segue fig 8 se collegate un antenna non in dotazione collegare la calza al morsetto 14 ed il centrale al morsetto 13 oppure collegare il f...

Страница 7: ...o A B dello stesso TX per 4 sec il led LR LV si accende di luce continua rossa verde ed il buzzer emette un bip continuo Biiiiiiip alternato Bip Bip Bip Fase 3 Memorizzazione Premere entro 2 sec il ta...

Страница 8: ...za possibile risalire alla posizione di memoria in base alla tabella seguente Led acceso 1 2 3 4 5 6 7 Peso colore verde 1 2 4 8 16 32 64 Peso colore rosso 0 0 0 0 0 0 0 Esempio Sequenza di accensione...

Страница 9: ...re sovrascritto n spostato di posizione o associato ad un rel diverso da quello inizialmente impostato 7 PROGRAMMAZIONE DEI RELE Tab 4 6 3 Cancellazione completa della memoria Questa operazione possib...

Страница 10: ...re le procedure indicate delle tabelle seguenti Tenere premuto PR per 4 sec fino a quando LR si accende LR si accende Rilasciare PR Entro 2 sec premere ancora PR LR si spegne Dopo 4 sec LR lampeggia l...

Страница 11: ...equenza PV PV PR PR PR PR PV 8 TEMPORIZZAZIONE DEI RELE Tab 5 Per impostare il rel rosso RR in modo ritardato seguire la procedura seguente LR si accende LR si spegne Entro 2 sec premere ancora PR Pre...

Страница 12: ...o the device to control gate garage door rolling shutters awnings anti burglar appliances lighting etc The receiver has 2 output relays with NO Normally open and NO NC Normally open and normally close...

Страница 13: ...n 2 receivers should be more than 1 5 m Tab 2 2 TECHNICAL SPECIFICATIONS The Series R433 use AM ASK demodulation The Series F433 use AM ASK demodulation Characteristics Mod AM SEL 2641F433C2V SEL2641F...

Страница 14: ...1 12 fig 2 Terminal 10 24 Vac dc terminal 11 12 Vac dc terminal 12 0 2 Connect the loads to the relay outputs according the following table fig 3 terminal 5 C relay green RV terminal 6 NO relay green...

Страница 15: ...a while Phase 2 Programming enabling Keep the key A B pressed down for 4 sec of the same TX the led LR remains lit the led LV start to flash and the buzzer emits a long bip starts to bip Bip Bip Bip...

Страница 16: ...t 1 2 3 4 5 6 7 Green colour weight 1 2 4 8 16 32 64 Red colour weight 0 0 0 0 0 Example Led sequence LR LR LV LV LR LR LR Equivalence to calculate 0 0 4 8 0 0 0 12 The transmitter key was been memori...

Страница 17: ...e led LV turn on Within 2 sec press again PR After 4 sec LV flashes slowly Keep PR pressed down for 4 sec until the led LR turn on LR flashes Release PR Within 2 sec press again PR LR turns off After...

Страница 18: ...4 5 6 7 Seconds 1 2 4 8 16 PR PR Seconds 10 20 40 80 160 PV PR Minutes 2 4 8 16 32 PR PV Minutes 20 20 80 160 320 PV PV That means that if the release time to set is 2 seconds the sequence of pressur...

Страница 19: ...teurs de la gamme ERONE 433 peuvent emmagasiner dans le EEPROM un num ro de s rie une clef industrielle et un algorithme synchronis d autres metteurs La programmation peut tre faite sur le mode automa...

Страница 20: ...r quence de l oscillateur local 6 6128 MHz 6 6128 MHz D modulation AM ASK FM FSK AM ASK FM FSK Imp dence 50 Ohm 50 Ohm Largeur canal 25 KHz 25 KHz Fr quence interm diaire 10 7 MHz 10 7 MHz Sensibilit...

Страница 21: ...3 4 Relais RV 8 9 NC C Relais RR NA 3 si vous connectez une antenne option brancher l me sur la borne 13 et la tresse sur la borne 14 a d faut brancher le fil fourni sur la borne 13 Brancher le fil d...

Страница 22: ...x boutons et pousser imm diatement les clefs A ou B afin de s lectionner le contact correspondant cette programmation et maintenir la pression pendant 4 secondes La LED du contact correspondant s allu...

Страница 23: ...oir du r cepteur 2 1 Pousser en m me temps les clefs A et B d un TX dont les codes sont pr sents dans la m moire du RX le buzzer met un bip et les leds s allument pour un instant pendant les deux seco...

Страница 24: ...s 2 secondes suivantes LR s t int Apr s 4 sec LR clignote lentement 8 2 1 Relais rouge Impulsionnel Bi stable 8 2 3 Relais vert Impulsionnel Bi stable Pousser PR pendant 4 sec jusqu ce que la led LR s...

Страница 25: ...quence PV PV PR PR PR PV PR 8 CONFIGURATION DU TEMPS DES RELAIS Tab 5 Pour programmer le relais rouge RR comme temporis suivre la proc dure suivante Fig 7 LR s allume LR s et int Pousser PR pendant le...

Страница 26: ...Programmierung erfolgt selbstlernend durch 2 Tasten 2 TECHN DATEN Tab 2 Tab 1 1 EINLEITUNG DEUTSCH Daten SEL2641R433C2P SEL2641R433C2V Empf ngertyp Superheterodyne Superheterodyne Modulation AM ASK AM...

Страница 27: ...ramm 380 Gramm Abmessung 140x115 x 52 mm 140x115x52mm Modell 3 FUNKTION Funkfernprogrammierung ber Handsender Einlernen und L schen der Codes 85 100 Codes speicherbar Anzeige der gespeicherten Codes A...

Страница 28: ...24V Klemme 11 12V Klemme 12 0 V Minus 10 11 13 24 Abb 2 14 12 12 0 AC Sicherung F1 315 mA nur Model XX C2V F1 Abb 3 Relaisausg nge Klemme 5 Relais 1 C Klemme 6 Relais 1 NO Klemme 7 Relais 2 NC Klemme...

Страница 29: ...et kontinuierlich auf rot gr n und der Summer gibt einen kontinuierlichen piep Ton aus Wechsel piep piep Speicherung des neuen Handsenders innerhalb 2 Sek dr cken der zu speichernden Taste Die LED erl...

Страница 30: ...urz Innerhalb 2 Sek f r 4 Sek die Taste A des Handsenders erneut bet tigen die LED LR leuchtet st ndig und der Summer piept st ndig Innerhalb 4 Sek nochmals Taste A und B des Handsenders gleichzeitig...

Страница 31: ...rieben 8 4 Timerprogrammierung rotes Relais RR Die Programmierung der Zeitverz gerung kann nur vom Zustand monostabil erfolgen Die Taste PR des Empf ngers f r 4 Sek bet tigen die rote LED LR leuchtet...

Страница 32: ...vom inneren angezeigten Herstellungsdatum W hrend solcher Periode wenn das Ger t nicht korrekt wegen eines defekten Bauelements arbeitet wird es beseitigt oder nach Hersteller Entscheidung ersetzt Die...

Отзывы: