background image

20

21

The 

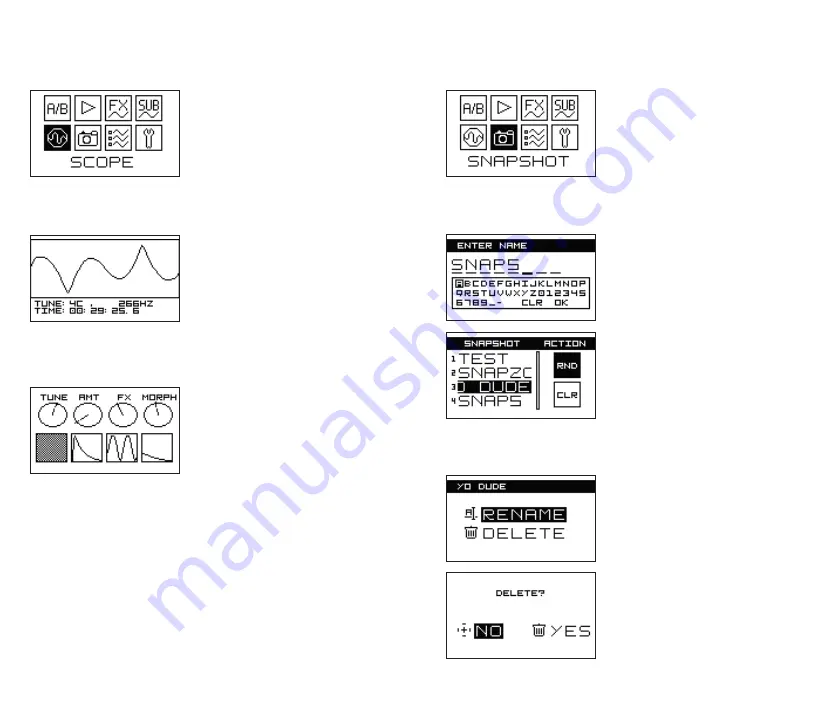
OSCILLOSCOPE  MENU

  is 

designed  to  monitor  signal  status 
during performance.
It  shows  a  waveform  being  played 
back  at  the  moment  including  mor-
phing  between  waves  and  FXes 
applied.

> OSCILLOSCOPE MENU <

Push the left encoder to access con-
trols status menu – it shows the po-
sition of controls and inputs used for 
the specific snapshot. In example on 
the  left  you  can  see  the  settings  of 
the  potentiometers  and  CV  shapes 
applied to CV inputs.

It also indicates the tune of the VCO in 
notes and Hz, as well as time passed 
from  the  powering  on  the  modular 
system. If you wish to reset the timer 
to  keep  timing  of  your  performance, 
just  push  the  right  encoder  and  the 
timer will reset to O.

To  delete  or  rename  the  snapshot, 
push  and  hold  the  left  encoder  for 
1”  and  delete/rename  screen  will 
appear.

Once you are happy how your designed 
waves or wavetables with suboscillator 
configuration  and  FXes  applied 
sound  you  can  save  a  SNAPSHOT  –  a 
combination of all your settings for a 
specific sound, which can be instantly 
recalled during the performance.

To save the snapshot 

PUSH AND HOLD THE BACK BUTTON FOR 2”


and the snapshot will be automatically saved.

As  the  snapshot  is  saved,  the 
snapshot name menu will appear.
Use  the  right  encoder  to  navigate 
thru  characters  and  click  to  confirm 
the selection. Click OK to confirm the 
name. 

Confirm delete or rename by pushing 
the left encored.

To  recall  the  snapshot,  open  the 
snapshots  menu  and  us  the  left 
encoder  to  select  the  snapshot  form 
the list. Click the encoder to confirm 
the selection. 
NB!  When  the  new  snapshot  is 
selected 

potentiometers 

(except 

TUNE) will start to have effect only when they are rotated to the position 
saved with the snapshot (see the Oscilloscope menu).

> SNAPSHOTS MENU <

Содержание GraphicVco

Страница 1: ...USER MANUAL...

Страница 2: ...Panel width 16HP Module depth 30mm Power consumption 152mA 12V 20mA 12V The Graphic VCO allows you to draw your own waveforms arrange them in wavetables and wavetable banks morph between two selected...

Страница 3: ...V to 8V for 8 octave tuning THIS IS FX AMOUNT CV INPUT It s unipolar and accepts 0 10V CVs THIS IS FX PARAMETER CV INPUT It s bipolar and accepts 10V 10V CVs In the Wavetable Matrix mode this CV input...

Страница 4: ...right encoders to navigate thru the list of A and B wavetables correspondingly and click to confirm selection then repeat the same to chose the waves form the list within the wavetable Once waveforms...

Страница 5: ...ncoder to split the marker and define width of the selection Now you have two options 1 Rotate the left encoder to move selection right or left 2 Click the right encoder and rotate it CW to draw the p...

Страница 6: ...he wave NAME menu will appear In the NAME menu you can name your waveform and save in user generated wavetables Follow the pop up screens to allocate the wave in a desired wavetable You can change the...

Страница 7: ...an alter the size of the matrix by clicking the left encoder At the first click the bold dot in the top left corner will appear and you can adjust the size of the matrix by rotating left and right enc...

Страница 8: ...ected effect appears in the top left corner of the screen Available effects in order of appearance are Frequency Modulation Ringmodulator Phase Distortion Wavefolder Wavewrapper Bitchrush Sample rate...

Страница 9: ...d divided frequencies Note that module will play back the resulting wave in real time and you can hear modulation sweetspots IF THE EXTERNAL MODULATOR IS SELECTED IN you can apply the modulation CV LF...

Страница 10: ...or settings The suboscillator is assigned to the OUT2 No FX except frequency modulation is applied on the suboscillator Rotate the left encoder to select settings you wish to alter and rotate the righ...

Страница 11: ...elete rename screen will appear Once you are happy how your designed waves or wavetables with suboscillator configuration and FXes applied sound you can save a SNAPSHOT a combination of all your setti...

Страница 12: ...m and hardware settings Rotate the left encoder to access various configuration settings Info menu contains information on firmware version and memory usage In the display configuration menu you can a...

Страница 13: ...TION MENU you can configure CV inputs by adjusting their gain and bias Use the left encoder to select the input or setting and right one to adjust the amount of the setting In the CALIBRATION MENU you...

Страница 14: ...ONS Please follow the instructions for use of the Erica Synths Graphic VCO below cause only this will guarantee proper operation of the module and ensure warranty from Erica Synths Water is lethal for...

Отзывы: