background image


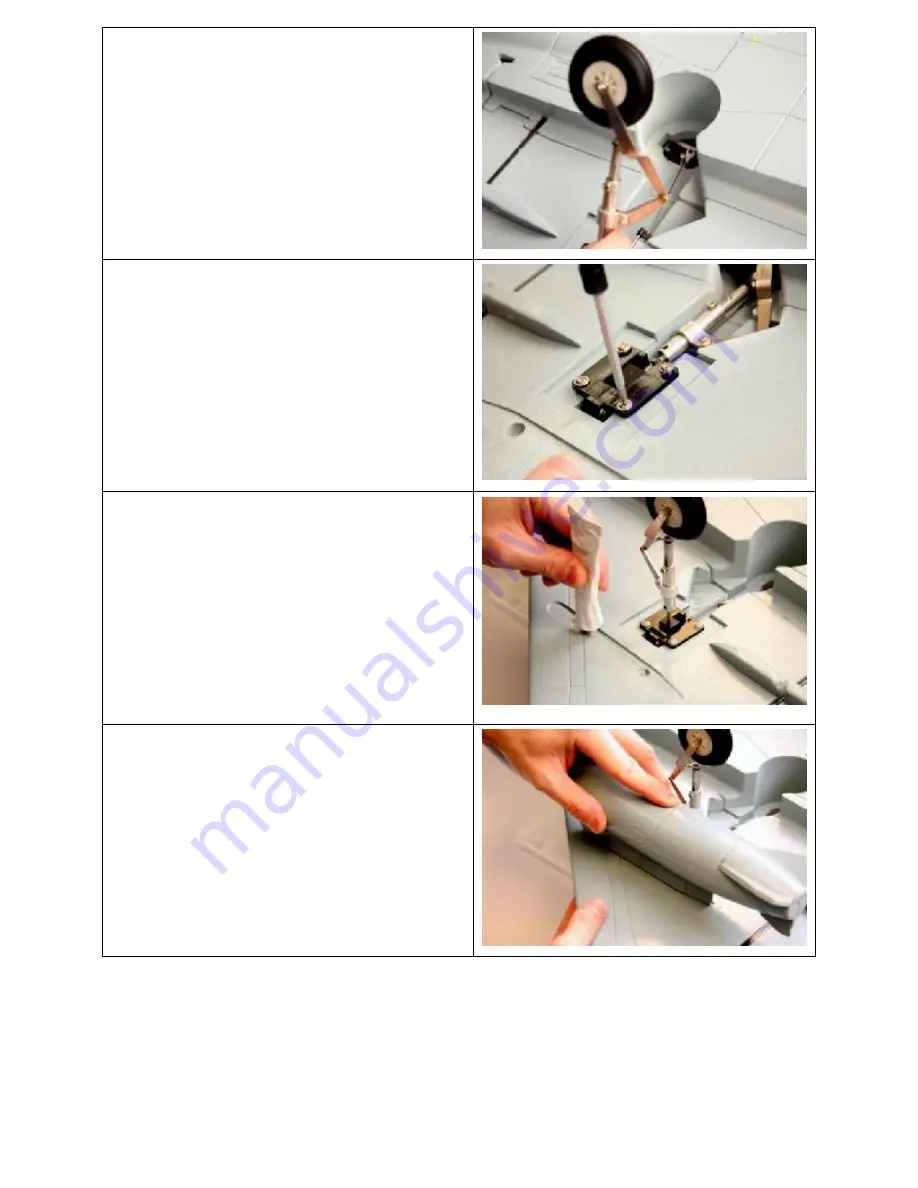
9.  Insert the pushrod wire into the retract 

servo as you fit the retract into position 
on the wing. 


10. Screw the retract into position.  


11. Using foam glue or epoxy, apply glue to 

the groove for the drop tanks. 


12. Position each drop tank and allow the 

glue to set.  


Содержание ERC1500 EUROFIGHTER

Страница 1: ...1...

Страница 2: ...A great deal of the assembly is pre done for you This is a receiver ready jet that only requires some simple assembly and the installation of the flight batteries and programming of your radio equipm...

Страница 3: ...stalled in 90mm Fan pre installed 85A Speed Control w 5A Switch Mode BEC and Genuine Deans Ultra Conns Wings with Navigation lights pre installed Vertical Tail with Navigation Light pre installed Func...

Страница 4: ...on the fuselage side 3 Check the alignment of the wing with the fuselage and wipe off any epoxy that squeezes out A small amount of rubbing alcohol on a paper towel works well 4 Make sure to check the...

Страница 5: ...white wire on the plug that exits the fuselage 6 Feed the connected plugs into the fuselage and carefully push the wires into the slot in the wing and fuselage 7 Locate the carbon rod wing reinforceme...

Страница 6: ...to the retract servo as you fit the retract into position on the wing 10 Screw the retract into position 11 Using foam glue or epoxy apply glue to the groove for the drop tanks 12 Position each drop t...

Страница 7: ...t making sure that you match the polarity red to red and black to black 14 Apply epoxy to the mating surfaces 15 Push the vertical tail into position and check for any glue that may have squeezed out...

Страница 8: ...the shaft inside the fuselage The nut works as a spacer Slip the control arm onto the shaft with the control arm pointing down Snug the mounting screw to the flat on the metal shaft 20 Attach the cana...

Страница 9: ...is held in place with the pre installed hook and loop fasteners 30 Use two 3 cell 3700mAh packs and plug one each into the two Series Deans connectors 31 If you are using a single 6s battery you will...

Страница 10: ...e to the right shows the positions for servo reversing Select REVERSING SW from the radio menu and set channels 2 3 and 5 to reverse REV All other channels will be in the NORM position 38 From the D R...

Страница 11: ...et the EXPO for 30 to make the elevons less responsive in pitch around the stick center Set the D R to 50 41 From the D R EXPO screen select the ELEV function Set the dual rate switch for the elevator...

Страница 12: ...P Make sure that the rates are both at 100 and that the switch is set to MIX There should be no offset for this mix 45 Select PROG MIX2 from the radio menu Set the mix for AILE to AUX2 Make sure that...

Страница 13: ...NOTE When the Elevons are in their neutral position the Thrust Vector Nozzles should be in their neutral position also If they are not you must adjust them mechanically by screwing or unscrewing the b...

Страница 14: ...he Canards should move 1 1 8 in both directions 52 Neutral position of control surfaces 53 When UP ELEVATOR is applied the surfaces should look like this 54 When DOWN ELEVATOR is applied the surfaces...

Страница 15: ...This is an all around good CG location you may adjust this to your own flying style after initial test flights Midnight Flyers LED Position Lights Your Eurofighter Typhoon is equipped with 7 pre inst...

Страница 16: ...d for the flying site I use I will not willfully fly my model aircraft in a reckless and or dangerous manner 4 I will not fly my model aircraft in sanctioned events air shows or model demonstrations u...

Страница 17: ...ficial AMA rules no powered model may be flown outdoors closer than 25 feet to any individual except for the pilot and located at the flightline 8 Under no circumstances may a pilot or other person to...

Отзывы: