Erbauer ERB109SDR Скачать руководство пользователя страница 12

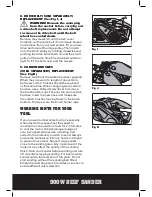
sanding belt.

Pull the lever to release the belt tension. Remove 

and fit a new belt over both rollers. Ensure the 

direction of rotation arrows on the belt and the 

sander are the same. Close the lever to tension 

the belt.

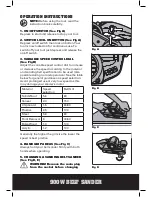
6. BELT CENTRING CONTROL (See Fig F)


WARNING! Wear eye protection 

before carrying out a belt centering 

adjustment.

Turn the machine upside down, hold it firmly 

with one hand, start the motor and release the 

switch immediately after observing tracking of 

sanding belt. If abrasive belt runs outward, turn 

tracking adjustment knob anti-clockwise and 

clockwise if belt runs inward. Adjust the belt until 

the outer edge of the belt is even with the outer 

edge of the base-plate. Belt life will be greatly 

increased by keeping the tracking adjustment set 

properly.

7. DUST BAG (See Fig G, H)

You must use the dust collection bag provided 

to collect the dust produced during sanding. The 

dust collection bag plastic bracket slides down 

onto the dust outlet on the belt sander. When the 

dust collection bag is full, remove and empty by 

opening the zip on the dust bag. 

Fig E

Fig H

Fig F

Fig G

Содержание ERB109SDR

Страница 1: ...900W BELT SANDER ERB109SDR WARRANTY YEARS ...

Страница 2: ......

Страница 3: ...e of the goods Thisguaranteedoesnotaffectyourstatutoryrights ThisguaranteeisonlyvalidintheUK For further technical advice spare parts or repair service outside of guarantee please contact the customer helpline number on 0845 607 6380 Congratulations on your purchase of a quality power tool from Erbauer UK Ltd This product should give you reliable service but for your peace of mind this power tool ...

Страница 4: ...ck d Do not abuse the cord Never use the cord for carrying pulling or unplugging the power tool Keep cord away from heat oil sharp edges or moving parts Damaged or entangled cords increase the risk of electric shock e When operating a power tool outdoors use an extension cord suitable for outdoor use Use of a cord suitable for outdoor use reduces the risk of electric shock f Use a Residual Circuit...

Страница 5: ...and must be repaired c Disconnect the plug from the power source before making any adjustments changingaccessories orstoringpowertools Suchpreventive safety measures reduce the risk of starting the power tool accidentally d Store idle power tools out of the reach of children and do not allow persons unfamiliar with the power tool or these instructions to operate the power tool Power tools are dang...

Страница 6: ...ise rating of over 85 dB A Gloves and face masks In all cases ensure that the safety equipment is in good condition WARNING Some dust created by using power tools contains chemicals known to cause cancer and birth defects or other reproductive harm Some examples of these chemicals are 1 Lead from lead based paint 2 Crystalline silica from bricks and cement and other masonry products 3 Arsenic and ...

Страница 7: ...ssion value may also be used in a preliminary assessment of exposure Warning The vibration emission value during actual use of the power tool can differ from the declared value depending on the ways in which the tool is used dependant on the following examples and other variations on how the tool is used How the tool is used and the materials being cut or drilled The tool being in good condition a...

Страница 8: ...er of days Health Surveillance All employees should be part of an employer s health surveillance scheme to help identity any vibration related diseases at an early stage prevent disease progression and help employees stay in work SYMBOLS Read the manual Warning WEEE marking Wear dust mask eye ear protection Double insulation ...

Страница 9: ...ELT SANDER 1 HAND GRIP AREAS 2 SWITCH LOCK ON BUTTON 3 ON OFF SWITCH 4 DUST OUTLET 5 VARIABLE SPEED CONTROL DIAL 6 BELT CENTRING CONTROL KNOB 7 DUST COLLECTION BAG 8 SANDING BELT LEVER 9 DRIVING BELT COVER 8 ...

Страница 10: ...Rated voltage Rated power No load speed Belt size Sanding area Protection class Weight ACCESSORIES 80 sanding belt 1pc on machine 2pc Dust bag 1pc 230 240 V 50Hz 900 W 200 380 m min 75 mm x 533 mm 75 x140 mm II 3 1 kg ...

Страница 11: ...material and sanding belt specification to be used also possible during no load operation See the table below for general guidance on speed selection Avoid prolonged use at very low speed as this may damage your sander s motor Material Speed selection Belt Grit Solid Wood 5 6 80 Veneer 2 4 150 Chipboard 1 5 60 80 Plastics 2 5 100 Steel 5 6 80 Paint Removal 6 40 60 Balsa Wood 1 3 100 Acrylic 1 2 100...

Страница 12: ...observing tracking of sanding belt If abrasive belt runs outward turn tracking adjustment knob anti clockwise and clockwise if belt runs inward Adjust the belt until the outer edge of the belt is even with the outer edge of the base plate Belt life will be greatly increased by keeping the tracking adjustment set properly 7 DUST BAG See Fig G H You must use the dust collection bag provided to colle...

Страница 13: ... When changing worn carbon brushes use a slotted screwdriver to remove the brush holder caps Take out the worn carbon brushes insert the new ones and make sure the carbon brushes moving freely in the brush holders Finally secure the brush holder caps WORKING HINTS FOR YOUR TOOL If your power tool becomes too hot especially when used at low speed set the speed to maximum and run with no load for 2 ...

Страница 14: ...ll not damage your power tool If the supply cord is damaged it must be replaced by the manufacturer its service agent or similarly qualified persons in order to avoid a hazard TROUBLESHOOTING 1 If your sander will not operate check the power at the mains plug 2 If the sander does not abrade surface checking the sanding belt If the sanding belt has been worn replace the new sanding belt and try agai...

Страница 15: ...ew plug follows the instruction below IMPORTANT The wire in the mains lead are coloured in accordance with the following code Blue Neutral Brown Live The wire that is coloured blue must be connected to the terminal that is marked with the letter N The wire that is coloured brown must be connected to the terminal that is marked with the letter L A 13AMP BS1363 or BS1363 A plug must be used and a 13...

Страница 16: ...ve 2006 95 EC Electromagnetic Compatibility Directive 2004 108 EC Restrictions of the Use of Certain Hazardous Substances in Electrical and Electronic Equipment 2002 95 EC Standards and technical specifications referred to EN60745 1 2006 EN60745 2 4 2003 A11 2007 EN55014 1 2006 EN55014 2 1997 A1 2001 EN61000 3 2 2006 EN61000 3 3 1995 A1 2001 A2 2005 2008 Authorised Signatory Date 01 03 08 Signature...

Страница 17: ...900W BELT SANDER ...

Отзывы: