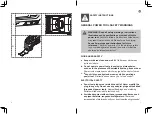
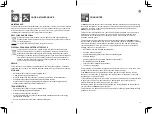
Erbauer EMT18-Li-QC Скачать руководство пользователя страница 11

21

20


ASSEMBLY

01


SYMBOLS

Read the instruction manual

Wear eye protection

Wear hearing protection.

Wear a dust mask.

Do not dispose of battery packs in rivers or immerse in water.

Do not dispose of battery packs in fire. They will explode and 

cause injury.

Do not expose battery packs to heat in excess of 40°C

For wood cutting

For soft metals cutting


Brushless motor

Keep Cool Battery Technology

Quick Change Accessory Technology

yyWxx

Manufacturing date code: Year of manufacturing (20yy) and week 

of manufacturing (Wxx)

02


UNPACKING

Unpack all parts and lay them on a flat, stable surface.

•  Remove all packing materials and shipping devices, if applicable.
• 

Make sure the delivery contents are complete and free of any damage. If you find that parts 

are missing or show damage do not use the product but contact your dealer. Using an 

incomplete or damaged product represents a hazard to people and property.

•  Ensure that you have all the accessories and tools needed for assembly and operation. This 

also includes suitable personal protective equipment.

WARNING!


The product and the packaging are not children’s toys! 

Children must not play with plastic bags, sheets and small parts! There is a 

danger of choking and suffocation!

03


ASSEMBLING THE MACHINE

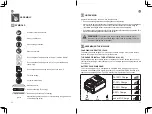
CHARGING YOUR BATTERY PACK

The battery has been shipped in a low charge condition. Charge it fully before first use. 

Refer to the charger instruction manual for the details.

TO REMOVE OR INSTALL THE BATTERY PACK (A1, A2)

Depress the battery pack release button to release and slide the battery pack out from 

your tool. After recharge, slide it back into your tool. A simple push and slight pressure will 

be sufficient.

BATTERY PACK POWER BAR

The Li-Ion battery pack (7) is equipped with a POWER BAR which is used to give an 

indication of the battery pack’s remaining charge. Press the POWER BAR button (6) to 

check battery charge as below. The LED will stay lit for approximately 5 seconds

.

6

76-100% Charge

51-75% Charge

26-50% Charge

5-25% Charge

under 5% Charge

Flash

On

Off

Содержание EMT18-Li-QC

Страница 1: ...MNL_EMT18 Li QC_V01_180608 EMT18 Li QC EAN 3663602795148 ORIGINAL INSTRUCTIONS...

Страница 2: ...e read all safety warnings carefully and be sure that they are fully understood before handling the tool x1 x 2 Safety instructions Product description Assembly Use Care maintenance Guarantee Declarat...

Страница 3: ...5 4 PRODUCT DESCRIPTION 6 7 8 9 10 11 2 3 4 5 1 12 17 14 13 16 15 A1 1 2 A2 B1 P R E S S B2 B3 B4 B5 P R E S S B6 C D...

Страница 4: ...dark areas invite accidents b Do not operate power tools in explosive atmospheres such as in the presence of flammable liquids gases or dust Power tools create sparks which may ignite the dust or fum...

Страница 5: ...y e Do not overreach Keep proper footing and balance at all times This enables better control of the power tool in unexpected situations f Dress properly Do not wear loose clothing or jewellery Keep y...

Страница 6: ...ed or modified Damaged or modified batteries may exhibit unpredictable behaviour resulting in fire explosion or risk of injury f Do notexposeabatterypackortooltofireorexcessive temperature Exposure to...

Страница 7: ...25 C charged to about 30 50 of capacity When storing for very long periods boost charge the battery once per year to prevent over discharge The following information applies to professional users onl...

Страница 8: ...opean Physical Agents Vibration Directive has been brought in to help reduce hand arm vibration syndrome injuries to power tool users The directive requires power tool manufacturers and suppliers to p...

Страница 9: ...whereappropriate Avoid using tools in temperatures of 10 C or less Plan your work schedule to spread any high vibration tool use across a number of days NOTE The use of other tools will reduce the use...

Страница 10: ...A Uncertainty KPA KWA 3 0dB A The noise for the operator may exceed 80 dB A and ear protection measures are necessary VIBRATION DATA With sanding pad ah 4 2m s Uncertainty K 1 5m s2 The declared vibr...

Страница 11: ...Ensure that you have all the accessories and tools needed for assembly andoperation This alsoincludessuitablepersonalprotectiveequipment WARNING The product and the packaging are not children s toys...

Страница 12: ...WARNING Always wear protective gloves when changing accessories The edges of the application tools are sharp and can became very hot after working Always disconnect the tool from the power source when...

Страница 13: ...according to the accessory being used and material being cut scrapped or sanded The speed dial 9 is numbered 1 to 6 with position 1 being the lowest speed and position 6 being the highest speed ON OFF...

Страница 14: ...s Possible cause Solution Overload protection Product suddenly Stops The LED work light if fitted is flashing Extremely high torque binding and stalling situations overloading of the tool Relieve the...

Страница 15: ...n in vehicles Secure the product to prevent it from slipping or falling over GUARANTEE At Erbauer we take special care to select high quality materials and use manufacturing techniques that allow us t...

Страница 16: ...y Directive References to the following harmonized standard were made EN 62841 1 2015 EN 62841 2 4 2014 2014 30 EU Electromagnetic Compatibility directive References to the following harmonized standa...

Страница 17: ...eldon Square London W2 6PX United Kingdom www kingfisher com products DISTRIBUTOR B Q plc Chandlers Ford Hants SO53 3LE United Kingdom www diy com Screwfix Direct Limited Trade House Mead Avenue Yeovi...

Отзывы: