background image

www.equiptec.co 

     April 

2022

Monkey Assembly Instructions                   MX21 - SB 1.0

63

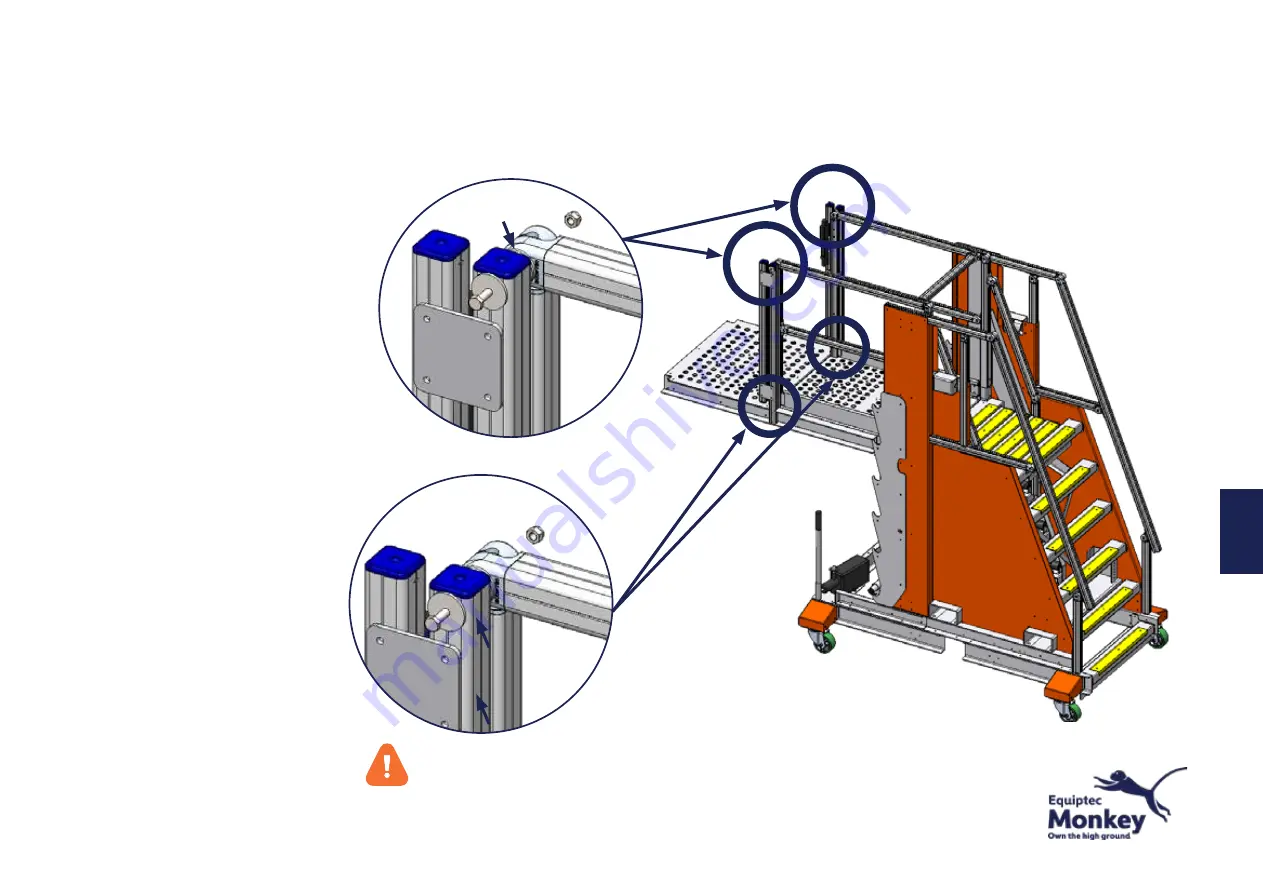
1. Fit the Gate Lock Posts to the Extended

    Cantilever deck as shown

2. Insert 3 bolts each side as shown

     and tighten

Fastening List

  2 x M8 x 100mm Bolt

  4 x M8 x 130mm Bolt

  6 x M8 Nyloc Nut

  8 x M8 Flat Washer

  6 x M8 Heavy Washer

Step 10 - Fit Gate Lock Posts

5

DO NOT OVERTIGHTEN

 Max tighting torque

 10Nm (7.5 ft/lbs)

M8 x 100mm Bolt

M8 x 130mm Bolt

3 x Heavy 

Washer

Содержание Monkey MX21

Страница 1: ...MX21 Assembly Manual www equiptec co ...

Страница 2: ...shown on the illustrations If no details are shown ensure washers in the appropriate fastening list are fitted immediately under the bolt head and also under the nut in every case www equiptec co April 2022 Monkey Assembly Instructions MX21 SB 1 0 1 Section Unit Accessory Kit Page 1 Monkey MX21 Base Unit 3 2 Monkey MX 21 Go Base 18 3 Monkey MX21 All Terrain Kit 26 4 Monkey MX21 4 Step Sub Chassis ...

Страница 3: ... Sub Chassis MX21 Go Base MX21 Hydraulic Kit 1 4 2 6 MX21 Base Unit MX21 Go Base MX21 Hydraulic Kit MX21 Extended Cantilever Kit 1 2 6 5 MX21 Base Unit MX21 4 Step Sub Chassis MX21 Go Base MX21 Hydraulic Kit MX21 Extended Cantilever Kit 1 4 2 6 5 MX21 Base Unit MX21 All Terrain Kit 1 3 MX21 Base Unit MX21 4 Step Sub Chassis MX21 All Terrain Kit 1 4 3 MX21 Base Unit MX21 All Terrain Kit MX21 Hydrau...

Страница 4: ...quiptec co April 2022 Monkey Assembly Instructions MX21 SB 1 0 3 WARNING The upper unit is under spring tension and these brackets must not be removed until steps 9 and 10 Monkey MX21 Base unit as shipped with packaging and seperate parts removed 1 ...

Страница 5: ... Assembly 1 Striker Post Assembly 1 Platform Mid Rail 2 Platform Handrail LH 1 Platform Handrail RH 1 Toeboard 2 Platform Rear Gate 1 www equiptec co April 2022 Monkey Assembly Instructions MX21 SB 1 0 4 Height Adjusting Handle Front Gate Hinge Post Assembly Striker Post Assembly Platform Mid Rail Platform Handrail LH MX21 043L Platform Handrail RH MX21 043R Toeboard Platform Rear Gate 1 ...

Страница 6: ... and handrail spacers are correctly inserted before tightening Fastening List 4 x M8 x 50mm Cap Screw 6 x M8 x 60mm Bolt 10 x M8 Nyloc Nut 4 x M8 Flat Washer 16mm fit inside 4 x M8 Flat Washer 22mm fit outside www equiptec co April 2022 Monkey Assembly Instructions MX21 SB 1 0 5 Handrail Spacer M8 x 60mm Bolt DO NOT OVERTIGHTEN Max tighting torque 10Nm 7 5 ft lbs 1 ...

Страница 7: ...strap and rotate Deck down into position 2 Hold Deck in position and insert Bolts in to holes shown Ensure bolt heads are on the outside Fastening List 4 x M8 x 25mm Bolt 4 x M8 Nyloc Nut 8 x M8 Flat Washer Step 3 Deck Installation Rotate Deck down into position www equiptec co April 2022 Monkey Assembly Instructions MX21 SB 1 0 6 1 ...

Страница 8: ...ion shown 3 Reinsert M8 x 30mm Bolts with Washers Spring Washers as shown and tighten M8 Spring Washer www equiptec co April 2022 Monkey Assembly Instructions MX21 SB 1 0 7 M8 Flat Washer M8 x 30mm Bolt 1 WARNING DO NOT stand or place any weight on the deck until a Equiptec MX21 base system has been fully and correctly installed ...

Страница 9: ...orque 3 Install locking pins as shown in detail B Fastening List 2 x M8 x 65mm Bolt 2 x M8 Nyloc Nut 4 x M8 Flat Washer M8 Crush Tube DO NOT OVERTIGHTEN 10Nm 7 5 ft lbs maximum www equiptec co April 2022 Monkey Assembly Instructions MX21 SB 1 0 8 1 A B WARNING DO NOT stand or place any weight on the deck until a Equiptec MX21 base system has been fully and correctly installed ...

Страница 10: ... tighten at this stage Fastening List 3 x M8 x 65mm Bolt 3 x M8 Nyloc Nut 6 x M8 Flat Washer www equiptec co April 2022 Monkey Assembly Instructions MX21 SB 1 0 9 DO NOT FULLY TIGHTEN AT THIS STAGE 1 WARNING DO NOT stand or place any weight on the deck until a Equiptec MX21 base system has been fully and correctly installed ...

Страница 11: ... at this stage Fastening List 3 x M8 x 65mm Bolt 3 x M8 Nyloc Nut 6 x M8 Flat Washer www equiptec co April 2022 Monkey Assembly Instructions MX21 SB 1 0 10 DO NOT FULLY TIGHTEN AT THIS STAGE 1 WARNING DO NOT stand or place any weight on the deck until a Equiptec MX21 base system has been fully and correctly installed ...

Страница 12: ...at this stage Fastening List 4 x M8 x 35mm Cap Screw 4 x M8 Nyloc Nut www equiptec co April 2022 Monkey Assembly Instructions MX21 SB 1 0 11 DO NOT FULLY TIGHTEN AT THIS STAGE 1 WARNING DO NOT stand or place any weight on the deck until a Equiptec MX21 base system has been fully and correctly installed ...

Страница 13: ...o not fully tighten at this stage Fastening List 2 x M8 x 35mm Cap Screw 2 x M8 Nyloc Nut www equiptec co April 2022 Monkey Assembly Instructions MX21 SB 1 0 12 DO NOT FULLY TIGHTEN AT THIS STAGE 1 WARNING DO NOT stand or place any weight on the deck until a Equiptec MX21 base system has been fully and correctly installed ...

Страница 14: ... all handrails mid rails are aligned 4 Tighten all bolts from steps 6 thru till 10 DO NOT OVERTIGHTEN the corner post fastenings maximum of 15Nm 11 ft lbs Fastening List 2 x M8 x 35mm Cap Screw 2 x M8 Nyloc Nut www equiptec co April 2022 Monkey Assembly Instructions MX21 SB 1 0 13 1 WARNING DO NOT stand or place any weight on the deck until a Equiptec MX21 base system has been fully and correctly ...

Страница 15: ...oeboards into place as shown www equiptec co April 2022 Monkey Assembly Instructions MX21 SB 1 0 14 Toeboard 1 WARNING DO NOT stand or place any weight on the deck until a Equiptec MX21 base system has been fully and correctly installed ...

Страница 16: ...ening List 1 x M6 x 65mm Bolt 1 x M6 Nyloc Nut 2 x M6 Flat Washer www equiptec co April 2022 Monkey Assembly Instructions MX21 SB 1 0 15 M6 Crush Tube DO NOT OVERTIGHTEN 10Nm 7 5 ft lbs maximum 1 WARNING DO NOT stand or place any weight on the deck until a Equiptec MX21 base system has been fully and correctly installed ...

Страница 17: ... 1 Raise the Deck to the highest position and secure into the sawtooth bracket 2 Ensure the deck pivot bolt as shown on both sides is tightened to 40Nm 29 5 ft lbs on both sides 1 WARNING DO NOT stand or place any weight on the deck until a Equiptec MX21 base system has been fully and correctly installed ...

Страница 18: ...eady for the customers specified base and accessories to be fitted www equiptec co April 2022 Monkey Assembly Instructions MX21 SB 1 0 17 1 WARNING DO NOT stand or place any weight on the deck until a Equiptec MX21 base system has been fully and correctly installed ...

Страница 19: ...Section 2 Equiptec Monkey MX21 Go Base www equiptec co April 2022 Monkey Assembly Instructions MX21 SB 1 0 18 2 ...

Страница 20: ... list below 2 Locate assembled MX21 Base unit the Go Base is to be fitted to Description Qty Go Base Front Section 1 Go Base Rear Section 1 Actuating Arm 2 Actuating Arms Go Base Rear Section Go Base Front Section www equiptec co April 2022 Monkey Assembly Instructions MX21 SB 1 0 19 2 ...

Страница 21: ...the MX21 with forklift and place safety blocks under the fork pockets to prevent the unit accidentally lowering 3 Place the Rear Go Base assembly under the MX21 chassis insert 3 bolts on both sides as per arrows in detailed view and tighten Fastening List 4 x M8 x 25mm Bolt 2 x M8 x 30mm Bolt 6 x M8 Nyloc Nut 12 x M8 Flat Washer 2 M8 x 25mm Bolt M8 x 30mm Bolt ...

Страница 22: ... Place the Front Go Base assembly under the MX21 chassis insert 3 bolts on both sides as per arrows in detailed view and tighten 2 Remove safety blocks from under fork pockets lower MX21 to the ground chock wheels and remove forklift Fastening List 6 x M8 x 25mm Bolt 6 x M8 Nyloc Nut 12 x M8 Flat Washer 2 ...

Страница 23: ...ther end in positions shown in detailed views 2 Tighten to a maximum of 10Nm 7 5 ft lbs torque Fastening List 4 x M6 x 20mm Bolt 4 x M6 Nyloc Nut 8 x M6 Flat Washer www equiptec co April 2022 Monkey Assembly Instructions MX21 SB 1 0 22 Step 4 Fit Actuating Arms 2 ...

Страница 24: ...ce rear Castor Bracket Covers insert bolts as shown and tighten to a maximum of 10Nm 7 5 ft lbs torque Note The spring washer fits immediately under the head of the bolt Fastening List 8 x M6 x 20mm Bolt 8 x M6 Spring Washer 8 x M6 Flat Washer Step 5 Fit Rear Castor Bracket Covers ...

Страница 25: ... MX21 moves freely on its castors 2 Step on the bottom tread to push down into position ready for climbing Ensure the MX21 brakes hold it firmly in position Step 6 Test Brake Action www equiptec co April 2022 Monkey Assembly Instructions MX21 SB 1 0 24 2 ...

Страница 26: ...rding to customer specification Once your Monkey MX21 is fully configured its now time to register your warranty at www equiptec co Ensure all users read understand and follow all safety notices and directions in the Owner s Manual www equiptec co April 2022 Monkey Assembly Instructions MX21 SB 1 0 25 2 ...

Страница 27: ...www equiptec co April 2022 Monkey Assembly Instructions MX21 SB 1 0 26 Section 3 Equiptec Monkey MX21 All Terrain Kit 3 ...

Страница 28: ...ist below 2 Locate assembled MX21 Base unit the All Terrain kit is to be fitted to Description Qty All Terrain Front Section 1 All Terrain Rear Section 1 Front Mount Beam 1 Rear Mount Beam Tread 1 Fixed Castor 2 Swivel Castor 2 Jack 4 Front Mount Beam All Terrain Front Section All Terrain Front Section Swivel Castor Rear Mount Beam Tread Fixed Castor Jack 3 ...

Страница 29: ...ns MX21 SB 1 0 28 Step 2 Fit Mount Beam to Front All Terrain Section 1 Fit Front Mount Beam to Front All Terrain section as shown 2 Insert 4 bolts on both sides as shown and tighten Fastening List 8 x M8 x 25mm Bolt 8 x M8 Nyloc Nut 16 x M8 Flat Washer 3 ...

Страница 30: ...p 3 Fit Castors to Front All Terrain Section 1 Fit the fixed Castors to the Castor Brackets on the Front All Terrain section as shown on both sides 2 Insert 4 bolts on both sides as shown and tighten Fastening List 8 x M10 x 25mm Bolt 8 x M10 Nyloc Nut 16 x M10 Flat Washer 3 ...

Страница 31: ... 0 30 Step 4 Fit Mount Beam to Rear All Terrain Section 1 Fit Rear Mount Beam and Tread to Rear All Terrain section as shown 2 Insert 2 bolts on both sides as shown and tighten Fastening List 4 x M8 x 75mm Bolt 4 x M8 Nyloc Nut 8 x M8 Flat Washer View inside tread 3 ...

Страница 32: ...tep 5 Fit Castors to Rear All Terrain Section 1 Fit the swivel Castors to the castor mount on the Rear All Terrain section as shown on both sides 2 Insert 4 bolts on both sides as shown and tighten Fastening List 8 x M10 x 25mm Bolt 8 x M10 Nyloc Nut 16 x M10 Flat Washer 3 ...

Страница 33: ...he MX21 with forklift and place safety blocks under the fork pockets to prevent the unit accidentally lowering 2 Place the Front All Terrain assembly under the MX21 chassis insert 3 bolts on both sides as per arrows in detailed view and tighten Fastening List 6 x M8 x 25mm Bolt 6 x M8 Nyloc Nut 12 x M8 Flat Washer 3 ...

Страница 34: ... Place the Rear All Terrain assembly under the MX21 chassis insert 3 bolts on both sides as per arrows in detailed view and tighten 2 Remove safety blocks from under fork pockets lower MX21 to the ground chock wheels and remove forklift Fastening List 6 x M8 x 25mm Bolt 6 x M8 Nyloc Nut 12 x M8 Flat Washer 3 ...

Страница 35: ...he ones fitted to the front have the jack fitting collar at the highest position over the top rib and the ones fitted to the back have the jack fitting collar in the middle position over the centre rib 2 Insert 2 bolts on each jack as shown and tighten Fastening List 8 x M10 x 25mm Bolt 8 x M10 Nyloc Nut 16 x M10 Flat Washer Rear Front Centre Rib Highest Rib 3 ...

Страница 36: ...cording to customer specification Once your Monkey MX21 is fully configured its now time to register your warranty at www equiptec co Ensure all users read understand and follow all safety notices and directions in the Owner s Manual www equiptec co April 2022 Monkey Assembly Instructions MX21 SB 1 0 35 3 ...

Страница 37: ...B 1 0 36 Section 4 Equiptec Monkey MX21 4 Step Sub Chassis Note These instructions show the 4 Step Sub Chassis being fitted to a Monkey MX21 with Go Base The 4 Step Sub Chassis can also be fitted to an All Terrain Base and in conjunction with any other accessory 4 ...

Страница 38: ...o be fitted to Description Qty Chassis Assembly 1 Stair Assembly 1 Front Upright LH 1 Front Upright RH 1 Actuating Arm 2 Handrail Assembly LH 1 Handrail Assembly RH 1 Adjusting Handle Extension 1 Front Cross Member 1 AHP Pivot Joiner 2 Front Upright LH Chassis Assembly Stair Assembly Adjusting Handle Extension Actuating Arms Front Cross Member AHP Pivot Joiners Front Upright RH Handrail Assembly L...

Страница 39: ...structions MX21 SB 1 0 38 Step 2 Assemble Chassis and Stair Sections 1 Fit the Stair assembly to Chassis assembly as shown 2 Insert 2 bolts on both sides as shown and tighten Fastening List 4 x M8 x 25mm Bolt 4 x M8 Nyloc Nut 8 x M8 Flat Washer 4 ...

Страница 40: ...embly Instructions MX21 SB 1 0 39 Step 3 Fit Front Uprights 1 Fit the Front Uprights to Chassis assembly as shown 2 Insert 3 bolts on both sides as shown and tighten Fastening List 6 x M8 x 25mm Bolt 6 x M8 Nyloc Nut 12 x M8 Flat Washer 4 ...

Страница 41: ...2 Monkey Assembly Instructions MX21 SB 1 0 40 Step 4 Fit Cross Member 1 Fit the Front Cross Member as shown 2 Insert 2 bolts on both sides 3 Tighten bolts Fastening List 4 x M8 x 25mm Bolt 4 x M8 Nyloc Nut 8 x M8 Flat Washer 4 ...

Страница 42: ...with forklift and place safety blocks under the chassis cross members to prevent the unit accidentally lowering 3 Place the Rear Go Base assembly under the MX21 chassis insert 3 bolts on both sides as per arrows in detailed view and tighten Fastening List in Go Base pack 4 x M8 x 25mm Bolt 2 x M8 x 30mm Bolt 6 x M8 Nyloc Nut 12 x M8 Flat Washer 4 M8 x 30mm Bolt M8 x 25mm Bolt ...

Страница 43: ...ront Go Base assembly under the Sub Chassis insert 3 bolts on both sides as per arrows in detailed view and tighten 2 Remove safety blocks from under chassis cross members lower MX21 to the ground chock wheels and remove forklift Fastening List in Go Base pack 6 x M8 x 25mm Bolt 6 x M8 Nyloc Nut 12 x M8 Flat Washer 4 ...

Страница 44: ...ctuating Arms together and tighten as shown in detail A 2 Position Actuating Arms on both sides and insert Bolts at either end in positions shown in detailed views B C 3 Tighten to a maximum of 10Nm 7 5 ft lbs torque Fastening List 4 x M6 x 20mm Bolt 4 x M6 Nyloc Nut 8 x M6 Flat Washer Step 7 Fit Actuating Arms A C B 4 ...

Страница 45: ...r Castor Bracket Covers insert bolts and tighten to a maximum of 10Nm 7 5 ft lbs torque Note the Spring Washer fits immediately under the head of the bolt Fastening List in Go Base pack 8 x M6 x 20mm Bolt 8 x M6 Spring Washer 8 x M6 Flat Washer Step 8 Refit Rear Castor Bracket Covers 4 ...

Страница 46: ...tec co April 2022 Monkey Assembly Instructions MX21 SB 1 0 45 1 Undo the 5 bolts holding the Sawtooth Bracket on each side to remove them keep these aside to be refitted later on Step 9 Remove Sawtooth Bracket 4 ...

Страница 47: ...www equiptec co April 2022 Monkey Assembly Instructions MX21 SB 1 0 46 1 Undo the 2 bolts holding the Height Adjusting Handle in place and remove Step 10 Remove Height Adjusting Handle 4 ...

Страница 48: ...tions MX21 SB 1 0 47 1 Undo the truck deck Screw holding the Handrail End Caps on as shown in A 2 Fit the Handrail Pivot Joiner and Screw in place as shown using the truck deck Screws from the Handrail End Caps Step 11 Remove Handrail Endcaps RH LH 4 A ...

Страница 49: ... wheels on the Sub Chassis are braked chocked 2 Forklift the Base unit on top of the Sub Chassis and align accurately 3 Insert the 3 bolts at the front and 2 bolts at the back as shown on both sides and tighten Fastening List 10 x M8 x 25mm Bolt 10 x M8 Nyloc Nut 20 x M8 Flat Washer 4 Sectional Plan View Sectional Plan View ...

Страница 50: ...usting Extension to the Height Adjusting Handle with the M8 x 60mm Bolts as shown in A 2 Refit the extended Height Adjusting Handle to the MX21 as shown in B Fastening List 4 x M8 x 60mm Bolt 4 x M8 x 65mm Bolt 6 x M8 Nyloc Nut 12 x M8 Flat Washer M8 Crush Tube DO NOT OVERTIGHTEN 10Nm 7 5 ft lbs maximum 4 B A Height Adjusting Extension ...

Страница 51: ...oth Brackets 1 Refit the Sawtooth Brackets to the chassis extension as shown insert 5 bolts on each side and tighten ensure the spring washers go immediately under the bolt head Fastening List reused from removal 10 x M8 x 25mm Bolt 6 x M8 Nyloc Nut 4 x M8 Spring Washer 16 x M8 Flat Washer 4 ...

Страница 52: ...andrails 1 Fit the Handrail Assemblies to the Sub Chassis with the 65mm bolts as shown in A 2 Connect the Sub Chassis handrail to the Base unit handrail with the Handrail Pivot Joiners as shown in B Fastening List 4 x M8 x 65mm Bolt 4 x M8 x 35mm Cap Screw 8 x M8 Nyloc Nut 8 x M8 Flat Washer 4 A B ...

Страница 53: ...Step Sub Chassis is now ready for use Other accessories could be fitted according to customer specification Once your Monkey MX21 is fully configured its now time to register your warranty at www equiptec co Ensure all users read understand and follow all safety notices and directions in the Owner s Manual 4 ...

Страница 54: ...Section 5 Equiptec Monkey MX21 Extended Cantilever www equiptec co April 2022 Monkey Assembly Instructions MX21 SB 1 0 53 5 ...

Страница 55: ...mbly 1 LH Gate Assembly 1 RH Gate Assembly 1 Gate Lock Post LH 1 Gate Lock Post RH 1 Chassis Extension Rail 2 Actuating Arm 2 Counterweight Bracket 2 Counterweight 7 LH Gate Assembly Deck Assembly www equiptec co April 2022 Monkey Assembly Instructions MX21 SB 1 0 54 Actuating Arm Gate Lock Post LH Chassis Extension Rail 5 Counterweight RH Gate Assembly Counterweight Bracket Gate Lock Post RH ...

Страница 56: ...r 2 Lift the MX21 with forklift and place safety blocks under the fork pockets to prevent the unit accidentally lowering 3 Place the Rear Go Base assembly under the MX21 chassis insert 3 bolts on both sides as per arrows in detailed view and tighten Fastening List in Go Base pack 4 x M8 x 25 Bolt 2 x M8 x 30mm Bolt 6 x M8 Nyloc Nut 12 x M8 Flat Washer 5 M8 x 25mm Bolt M8 x 30mm Bolt ...

Страница 57: ...B 1 0 56 Step 3 Fit Chassis Extension Rails 1 Place the Front Chassis Extension Rails on the front of the MX21 chassis insert 4 bolts on both sides as per arrows in detailed view and tighten Fastening List 8 x M8 x 30mm Bolt 8 x M8 Nyloc Nut 16 x M8 Flat Washer 5 ...

Страница 58: ... assembly under the MX21 chassis insert 3 bolts on both sides as per arrows in detailed view and tighten 2 Remove safety blocks from under fork pockets lower MX21 to the ground chock wheels and remove forklift Fastening List 2 x M8 x 25mm Bolt 4 x M8 x 30mm Bolt 6 x M8 Nyloc Nut 12 x M8 Flat Washer 5 M8 x 30mm Bolt M8 x 25mm Bolt ...

Страница 59: ...ctuating Arms together and tighten as shown in detail A 2 Position Actuating Arms on both sides and insert Bolts at either end in positions shown in detailed views B C 3 Tighten to a maximum of 10Nm 7 5 ft lbs torque Fastening List 4 x M6 x 20mm Bolt 4 x M6 Nyloc Nut 8 x M6 Flat Washer Step 5 Fit Actuating Arms A B C 5 ...

Страница 60: ...Castor Bracket Covers insert bolts and tighten to a maximum of 10Nm 7 5 ft lbs torque Note the Spring Washer fits immediately under the head of the bolt Fastening List reused from removal 8 x M6 x 20mm Bolt 8 x M6 Spring Washer 8 x M6 Flat Washer Step 6 Refit Rear Castor Bracket Covers 5 ...

Страница 61: ...1 Fit Hydraulic Kit as per instructions in section 6 page 72 of this manual 2 Remove Front Gate and Gate Lock as shown retain for refitting at step 11 Step 7 Fit Hydraulics Remove Front Gate 5 Remove 4 Tek Screws from each gate hinge Remove 6 Tek Screws from the gate lock ...

Страница 62: ...co April 2022 Monkey Assembly Instructions MX21 SB 1 0 61 1 Loosen the handrail posts by removing the fastenings as shown Retain fastenings for use later Step 8 Loosen Handrail Posts Remove Cap Screw Remove Bolts 5 ...

Страница 63: ...ns MX21 SB 1 0 62 Step 9 Fit Extended Cantilever Deck 5 1 Lift the Extended Cantilever deck into position and fit 2 bolts each side as shown 2 Tighten Bolts to 40 Nm 29 5 ft lbs torque Fastening List 4 x M8 x 30mm Bolt 4 x M8 Nyloc Nut 8 x M8 Flat Washer ...

Страница 64: ...antilever deck as shown 2 Insert 3 bolts each side as shown and tighten Fastening List 2 x M8 x 100mm Bolt 4 x M8 x 130mm Bolt 6 x M8 Nyloc Nut 8 x M8 Flat Washer 6 x M8 Heavy Washer Step 10 Fit Gate Lock Posts 5 DO NOT OVERTIGHTEN Max tighting torque 10Nm 7 5 ft lbs M8 x 100mm Bolt M8 x 130mm Bolt 3 x Heavy Washer ...

Страница 65: ... the Front Gate retained from step 7 hinges to the post on the RH Gate Assembly as shown 2 Apply supplied WLL sticker to inside face of flat area of front gate toeboard as shown Fastening List reused from removal 8 x 25mm Tek Screws Step 11 Fit Front Gate to Right Gate Assembly 5 ...

Страница 66: ... Gate Assembly to the Extended Cantilever deck as shown 2 Insert 3 bolts as shown Ensure Gates are aligned with Deck and tighten Fastening List 3 x M8 x 65mm Bolt 3 x M8 Nyloc Nut 6 x M8 Flat Washer Step 12 Fit Front Right Gate Assembly 5 DO NOT OVERTIGHTEN Max tighting torque 10Nm 7 5 ft lbs ...

Страница 67: ...2022 Monkey Assembly Instructions MX21 SB 1 0 66 1 Screw the Gate Lock retained from step 7 to the post on the LH Gate Assembly as shown Fastening List reused from removal 6 x 25mm Tek Screws Step 13 Refit Front Gate Lock 5 ...

Страница 68: ...bly to the Extended Cantilever deck as shown 2 Insert 3 bolts as shown and tighten 3 Check that the Gate automatically shuts and trips latch Fastening List 3 x M8 x 65mm Bolt 3 x M8 Nyloc Nut 6 x M8 Flat Washer Step 14 Fit Left Gate Assembly 5 DO NOT OVERTIGHTEN Max tighting torque 10Nm 7 5 ft lbs ...

Страница 69: ...weight Brackets one either side one the inside of the main side panels immediately above the rear fork pocket 2 Fit Bolts to both brackets as shown bolt heads to the outside and tighten Fastening List 4 x M6 x 20mm Bolt 4 x M6 Nyloc Nut 8 x M6 Flat Washer Step 15 Fit Counterweight Bracket 5 ...

Страница 70: ... directly on top of each other between the Counterweight Brackets as shown 2 Fit long bolts through holes on either side just above the Counterweights as shown Tighten bolts to a maximum of 10Nm 7 5 ft lbs torque Fastening List 2 x M8 x 200mm Bolt 2 x M8 Nyloc Nut 4 x M8 Flat Washer Step 16 Fit Counterweights 5 ...

Страница 71: ... Screw and 3 Heavy Washers through fittings in centre of each side handrail as shown 2 Fit the Nyloc Nut into the captive hexagonal hole and tighten the assembly Fastening List 2 x M8 x 90mm Cap Screw 2 x M8 Nyloc Nut 6 x M8 Heavy Washer Step 17 Connect Top Handrails 3 x M8 Heavy Washer 5 ...

Страница 72: ... for use CAUTION With this configuration the WLL is reduced to 150kg Other accessories could be fitted according to customer specification Once your Monkey MX21 is fully configured its now time to register your warranty at www equiptec co Ensure all users read understand and follow all safety notices and directions in the Owner s Manual 5 ...

Страница 73: ...ptec co April 2022 Monkey Assembly Instructions MX21 SB 1 0 72 Note These instructions show the Hydraulic Kit being fitted to a Monkey MX21 w Go Base The Hydraulic Kit can also be fitted to an All Terrain Base and in conjunction with any other accessory 6 ...

Страница 74: ...draulic Kit is to be fitted to Description Qty Hydraulic Ram Hoses 1 Hydrualic Pump Tank 1 Pump Handle 1 Pump Mount Bracket 1 Ram Cross Member 1 Ram Rod Bracket 2 Pump Handle Hydraulic Ram Hoses www equiptec co April 2022 Monkey Assembly Instructions MX21 SB 1 0 73 Hydraulic Pump Tank Ram Rod Bracket Pump Mount Bracket Ram Cross Member 6 ...

Страница 75: ...ise the MX21 deck up 1 or 2 positions 2 Fit pair of Ram Rod Brackets with 4 Bolts as shown Fastening List 4 x M8 x 25mm Bolt 4 x M8 Nyloc Nut 8 x M8 Flat Washer www equiptec co April 2022 Monkey Assembly Instructions MX21 SB 1 0 74 6 ...

Страница 76: ...applicable if fitting to All Terrain Kit 2 Install Pump Mount Bracket as shown 3 If applicable replace front left Castor Bracket Cover Fastening List 3 x M8 x 30mm Bolt 3 x M8 Nyloc Nut 6 x M8 Flat Washer www equiptec co April 2022 Monkey Assembly Instructions MX21 SB 1 0 75 6 ...

Страница 77: ...ith Bolts as shown 2 Insert Pump Handle and locate Grub Screw at handle base Fastening List 4 x M8 x 40mm Bolt 4 x M8 Nyloc Nut 8 x M8 Flat Washer www equiptec co April 2022 Monkey Assembly Instructions MX21 SB 1 0 76 6 When fitted to All Terrain kit ...

Страница 78: ...Step 5 Remove Front Panel 1 Remove Front Panel as shown retain fastenings to replace panel later www equiptec co April 2022 Monkey Assembly Instructions MX21 SB 1 0 77 6 ...

Страница 79: ...the blocks and lower the MX21 back down after this step is completed 1 Insert Ram Cross Member between chassis rails as shown 2 Install Bolts either side in position shown Fastening List 4 x M8 x 30mm Bolt 4 x M8 Nyloc Nut 8 x M8 Flat Washer www equiptec co April 2022 Monkey Assembly Instructions MX21 SB 1 0 78 6 ...

Страница 80: ...ert Ram and install mounting Bolt at the base as shown by the arrow 3 Tighten to a maximum of 10Nm 7 5 ft lbs torque Fastening List 1 x M12 x 40mm Bolt 1 x M12 Nyloc Nut 2 x M12 Flat Washer www equiptec co April 2022 Monkey Assembly Instructions MX21 SB 1 0 79 6 ...

Страница 81: ...on t fall down or drag on the ground or foul with upper unit as it descends 5 Put Front Panel back on with the original 6 Bolts Washer sets note that spring washer goes directly under bolt head Do not overtighten maximum of 10Nm 7 5 ft lbs torque Fastening List reused from removal 6 x M8 x 30mm Bolt 6 x M8 Nyloc Nut 12 x M8 Flat Washer 6 x M8 Spring Washer www equiptec co April 2022 Monkey Assembl...

Страница 82: ...e mount hole with the Ram Rod Bracket mount hole 2 Insert Bolt as shown 3 Tighten to a maximum of 10Nm 7 5 ft lbs torque Fastening List 1 x M10 x 55mm Bolt 1 x M10 Nyloc Nut 2 x M10 Flat Washer www equiptec co April 2022 Monkey Assembly Instructions MX21 SB 1 0 81 6 ...

Страница 83: ... April 2022 Monkey Assembly Instructions MX21 SB 1 0 82 Step 10 Commission Hydraulics 1 Put Floating Treads back into position 2 Fill Hydraulic system with 3 litres of ISO46 oil 3 Test system and bleed if necessary 6 ...

Страница 84: ...h Hydraulics is now ready for use Other accessories could be fitted according to customer specification Once your Monkey MX21 is fully configured its now time to register your warranty at www equiptec co Ensure all users read understand and follow all safety notices and directions in the Owner s Manual 6 ...

Страница 85: ...www equiptec co April 2022 Monkey Assembly Instructions MX21 SB 1 0 84 Notes ...

Страница 86: ...www equiptec co April 2022 Monkey Assembly Instructions MX21 SB 1 0 85 Notes ...

Страница 87: ...y queries and one of our team will be very happy to assist in you Ph 64 6 842 0222 E sales equiptec co W www equiptec co Physical address 144 Taradale Road Onekawa Napier 4110 New Zealand Postal address PO Box 3351 HBMC Napier 4142 New Zealand www equiptec co April 2022 Monkey Assembly Instructions MX21 SB 1 0 86 ...

Страница 88: ...www equiptec co Ph 64 6 842 0222 Manufacturers of Giraffe Monkey and Squirrel Adjustable Height Platforms ...

Отзывы: