background image

WF-C20590 Installation Guide

Site Preparation

1

Site Preparation

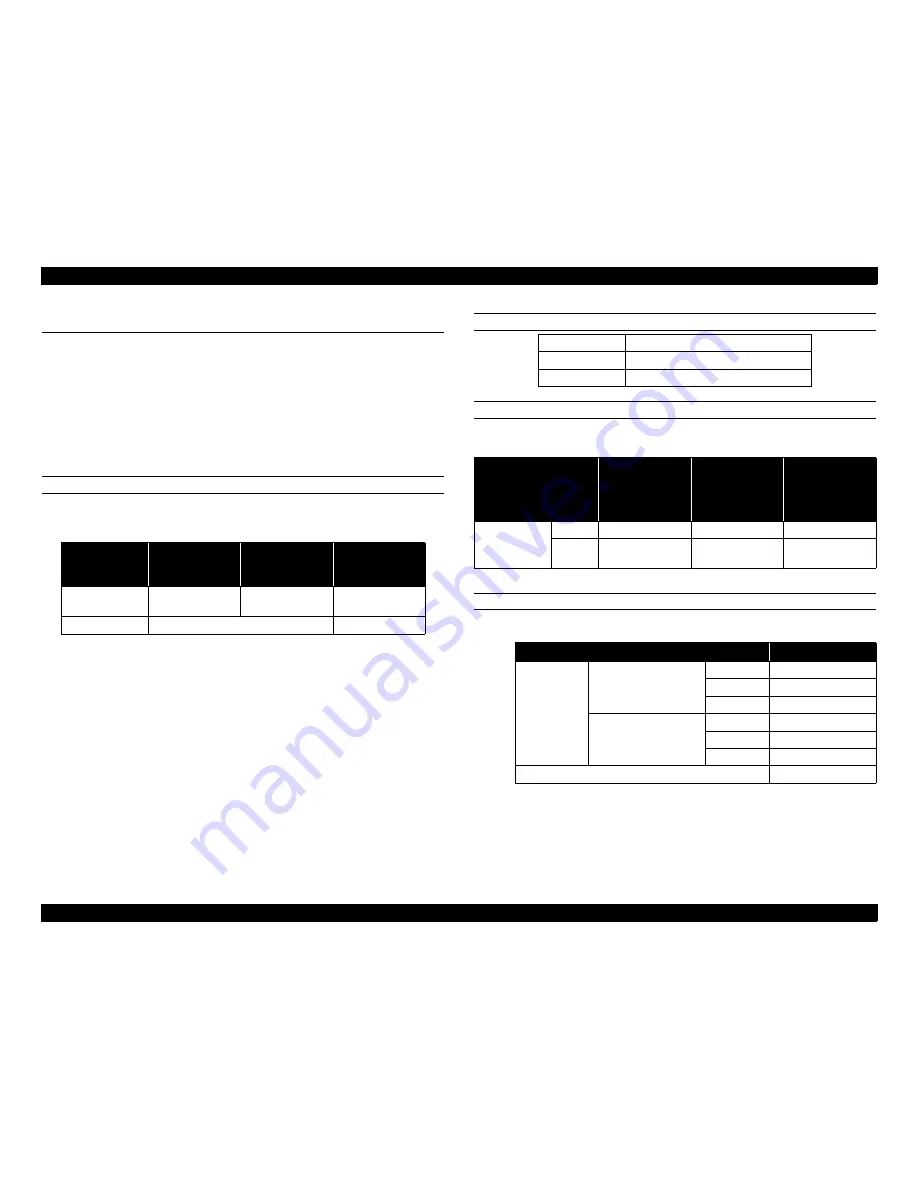
Installation Environment

Prior to installation, confirm that the installation environment meets the 
specifications below and that the carry-in space and installation site are easily 
accessible.

Flooring may be damaged when the printer is moved. Make sure to protect the 
surface of the floor as necessary.

ENVIRONMENTAL SPECIFICATIONS

We recommend operating the product within the temperature and humidity 
range below.

Avoid installing the product in:

Places subject to direct sunlight such as near a window

Places subject to frequent vibrations

Places subject to a sudden change in temperature and/or humidity

Places subject to cold or hot air such as an air conditioning vent

Closed environments with poor breathability and ventilation

POWER SUPPLY

CARRY-IN SPACE

The carry-in route must have at least the following width/height:

INSTALLATION SITE SPACE

Printer only

Item

Operation 

guarantee

Image quality 

guarantee

Feeding paper 

reliability 

guarantee

Temperature

41–104

F

(5–40

C)

50–95

F

(10–35

C)

64–82

F

(18–28

C)

Humidity

15–85% (non-condensation)

35–70%

Rated voltage

AC100/240 V

Rated current

9.0 to 4.5 A

Rated frequency

50/60 Hz±0.5 Hz

Item

Dimensions when 

packing the 

printer

Basic dimensions 

of the printer

Minimum 

dimensions of the 

printer 

(when SCN/ADF 

unit are removed )

External 
dimensions

Width

33.5 in (850 mm)

26.5 in (674 mm)

26.5 in (674 mm)

Height

59.1 in

(1500 mm)

48.4 in

(1230 mm)

43.3 in

(1100 mm)

Item

External 
dimensions

When stored

Width

26.5 in (674 mm)

Depth

29.8 in (757 mm)

Height

48.4 in (1230 mm)

When printing 
(maximum size)

Width

56.1 in (1426 mm)

Depth

29.8 in (757 mm)

Height

48.4 in (1230 mm)

Weight

410.1 lb (186 kg)

PRELIMINARY

Содержание WF-C20590 Series

Страница 1: ...WF C20590 Installation Guide PRELIMINARY ...

Страница 2: ...cluded Items Optional 18 Unpacking the Finisher Unit 18 High Capacity Input Tray Included Items Optional 23 Unpacking the High Capacity Input Tray 23 Setting Up the Printer 25 Adding Labels 25 Checking the Circuit Breaker 25 Updating the Firmware 26 Initial Settings 27 Installing the Optional Units 31 Installing the Bridge Unit 31 Installing the Finisher Unit 44 Installing the High Capacity Input ...

Страница 3: ... environments with poor breathability and ventilation POWER SUPPLY CARRY IN SPACE The carry in route must have at least the following width height INSTALLATION SITE SPACE Printer only Item Operation guarantee Image quality guarantee Feeding paper reliability guarantee Temperature 41 104 F 5 40 C 50 95 F 10 35 C 64 82 F 18 28 C Humidity 15 85 non condensation 35 70 Rated voltage AC100 240 V Rated c...

Страница 4: ...Width 85 4 in 2 170 mm Depth 29 8 in 757 mm Height 48 4 in 1230 mm When printing maximum size Width 91 5 in 2 325 mm Depth 29 8 in 757 mm Height 48 4 in 1230 mm Weight 661 4 lb 300 kg 680 mm 500 mm 500 mm 500 mm 730 mm 1000 mm 550 mm 21 6 in 19 7 in 26 8 in 19 7 in 39 4 in 28 7 in 19 7 in Front Top Wall surface 680 mm 1 490 mm 1 000 mm 500 mm 730 mm 1 000 mm 550 mm 19 7 in 21 6 in 39 4 in 26 8 in ...

Страница 5: ...r Unit are heavy be careful not to let them fall over during movement When moving the printer Bridge Unit and Finisher Unit place your hands in the areas indicated below otherwise damage to the exterior frames or moving parts may occur Do NOT place hands here Place hands here when moving the unit Front side Back side Do NOT place hands here Place hands here but use caution Place hands here when mo...

Страница 6: ...Sub brand label WorkForce Enterprise North America only 1 8 User s kit Installation Guide Warranty 1 9 Slope for pallet 2 Be sure to check the following notes before unpacking All workers must read the unpacking procedure together before starting work Wear easy to move clothing gloves and safety shoes Work with care to avoid injuries Work with sufficient working space Never work with less than 4 p...

Страница 7: ...ull up on the end of each plastic band to remove them 2 Lift and remove the top cover Remove the foam cushioning materials and wheel stoppers x4 Plastic bands Foam cushioning materials Top cover Wheel stoppers Foam cushioning materials Slopes for pallets PRELIMINARY ...

Страница 8: ...WF C20590 Installation Guide Unpacking 6 3 Remove the box locks 4 Remove the side plates of the packing box and the corner angles x10 Box locks Corner angle Side plate PRELIMINARY ...

Страница 9: ... the lower box and open the box 7 Remove the blue tape attaching the plastic sheet under the printer x4 Plastic bag Lower box The center of gravity of the printer is toward the rear For the next steps one worker should stand at each corner of the printer and proceed carefully paying attention to the balance of the printer x4 Plastic sheet Blue tape PRELIMINARY ...

Страница 10: ...ourth worker removes the foam cushioning material and the plastic sheet under the printer from the caster 10 Gently lower the printer back down to the pallet 11 Place the wheel stoppers on each front caster Foam cushioning material Plastic sheet Caster To keep the printer from moving when unpacking do the following Insert the wheel stoppers from the side to the advancing direction of the caster Ma...

Страница 11: ...olding each rear corner of the printer the two workers should tilt the printer to the front while the fourth worker removes the foam cushioning material and the plastic sheet under the printer from the caster 14 Gently lower the printer back down to the pallet 15 Remove the wheel stoppers from the front casters Foam cushioning materials Plastic sheet x2 x2 Wheel stoppers PRELIMINARY ...

Страница 12: ... slots on the lower box Make sure the slopes are aligned with the rear casters 17 Slowly roll the printer down the slopes off the pallet and onto a level work surface or floor Be careful that the casters do not come off the slopes Slope for pallet Back side Make sure the tabs are inserted under the slots Back side PRELIMINARY ...

Страница 13: ...terior and interior areas of the printer 19 If only the printer is being installed continue to Page 25 If optional units are being installed continue to Page 12 Paper Cassette interior EJ Unit interior Exterior E Door and J Door interior ADF and Scanner Control Panel PRELIMINARY ...

Страница 14: ...ing guide 1 2 Bridge unit joint 2 3 Additional magnet 1 4 Additional magnet fixed axis 1 5 Control cable 1 6 Power cable 1 7 Protective sponge 415 mm 1 8 Protective sponge 375 mm 1 9 Protective sponge 305 mm 1 10 Protective sponge 170 mm 42 5 mm 42 5 mm 1 11 Grounding plate 2 12 Screw M3 8 2 13 Screw M4 8 12 14 Screw P tight M3 10 1 15 Buffer blocks 1 PRELIMINARY ...

Страница 15: ...hem Be sure to check the following notes before unpacking All workers must read the unpacking procedure together before starting work Wear easy to move clothing gloves and safety shoes Work with care to avoid injuries Work with sufficient working space Never work with less than 3 people Use proper lifting techniques and stop working immediately if you feel that the load is too bulky or heavy x2 Pl...

Страница 16: ...WF C20590 Installation Guide Unpacking 14 2 Lift and remove the top cover Remove the connection parts box and set it aside 3 Remove the box locks Connectionparts box Top cover x10 Box locks PRELIMINARY ...

Страница 17: ...ng the four corners of the lower box and open the box Side plate Side plate Corner angle Foam cushioning materials Foam cushioning materials Thepowersupply cableisstoredin thefoampacking material The protective material shown in the figure below is attached to prevent injury and avoid deformation of the Entrance Guide Plate Make sure to remove it before connecting to the main unit x4 Lower box Pla...

Страница 18: ...it toward the front while one worker pulls out the lower back packing material Rear side Lower front packing material Front side C H E C K P O I N T To keep the Bridge Unit from moving when unpacking you can use the wheel stoppers included with the printer Insert them from the side to the advancing direction of the caster Rear side Lower back packing material Front side PRELIMINARY ...

Страница 19: ...nd tape attached to the exterior and inside the front cover When lifting the Bridge Unit place your hands at the position indicated Otherwise the unit may be damaged Back side Front side Position where hands should be placed Positionwhere hands should be placed Pallet Do not remove the protective materials until adjustment is complete see Page 39 Back side Top side Inside front cover Protective ma...

Страница 20: ...le cover 1 6 Bridge unit joint plate 1 7 S tite screw M 4 8 1 8 Machine screw M 4 10 2 1 2 3 4 5 6 7 8 Be sure to check the following notes before unpacking All workers must read the unpacking procedure together before starting work Wear easy to move clothing gloves and safety shoes Work with care to avoid injuries Work with sufficient working space Never work with less than 2 people Use proper li...

Страница 21: ...ation Guide Unpacking 19 UNPACKING PROCEDURE 1 Open the box and remove the front upper pad and rear upper pad 2 Remove the joints 6 Lift and remove the outer case Front upper pad Rear upper pad x6 Outer case PRELIMINARY ...

Страница 22: ... box and open the box 5 Slide the packaging plastic bag covering the Finisher Unit down to the bottom 6 Have one worker tilt the Finisher Unit back while one worker removes the cushioning materials at the front bottom and then pushes the packaging plastic bag underneath the center of the Finisher Unit x4 Accessories box Cushioning cardboard materials Lower box Finisher Unit Cushioning materials Pa...

Страница 23: ...d then pulls out the packaging plastic bag to remove it 8 Have two workers place their hands in the specified locations on the Finisher Unit Lift the unit from the pallet and gently place it on the floor Finisher Unit Cushioning materials Packaging plastic bag Back side Finisher Unit Position where hands should be placed Position where hands should be placed PRELIMINARY ...

Страница 24: ...rior protective materials and tape from the unit 10 Open the front cover of the unit and remove all internal protective materials and tape Front side Back side Exterior protective material Front side Front cover Removetheinternal protective material PRELIMINARY ...

Страница 25: ...ock support plate 1 5 Front lock support plate 1 6 Switch lever 1 7 Flathead screw M 4 10 7 1 2 3 4 5 6 7 Be sure to check the following notes before unpacking All workers must read the unpacking procedure together before starting work Wear easy to move clothing gloves and safety shoes Work with care to avoid injuries Work with sufficient working space Never work with less than 2 people Use proper...

Страница 26: ...items 2 Have two workers place their hands on the bottom of the High Capacity Input Tray and lift it out of the box 3 Remove all exterior protective tape and the cable connector 4 Pull open the cassette and remove the inner protective materials and tape High Capacity Input Tray Front side Back side Protective material Cassette PRELIMINARY ...

Страница 27: ... in the area shown Checking the Circuit Breaker 1 Connect the power cable to the back of the printer and plug it in to a wall adapter 2 Unlatch the Hook to open the Small Cover on the back of the printer Move the Main Power Switch up to the ON position Do NOT turn on the printer yet Model name label Small Cover Hook Main Power Switch PRELIMINARY ...

Страница 28: ...inter flashes Do NOT remove the USB device or turn off the power while the power light is flashing 9 The screen below appears when the firmware update is complete Turn off the printer then remove the USB device LEFT______________________________ UP_____________________________RIGHT 1 Maintenance MENU 2 Individual Ac on Check MENU 3 Before Repair Opera on MENU 4 Adjustment Main Op on Unit MENU 5 Ad...

Страница 29: ...g Up the Printer 27 Initial Settings Turn on the printer then set up the printer s basic settings on the LCD screen DATE TIME SETTING 1 Select Settings 2 Select General Settings 3 Select Date Time Settings 4 Select Date Time PRELIMINARY ...

Страница 30: ...llation Guide Setting Up the Printer 28 5 Select the date format 6 Use the numeric keypad to enter the date then select OK 7 Select the time format 8 Use the numeric keypad to enter the time then select OK PRELIMINARY ...

Страница 31: ...tridge Cover 12 Open the Front Cover and the Maintenance Box Cover then install the Maintenance Box 13 Close the Maintenance Box Cover and the Front Cover 14 After setting the time and date ink charging starts automatically and takes about 20 minutes A message appears on the LCD screen when ink charging is complete OPERATION PRINT QUALITY CHECK 15 Select Maintenance 16 Select Print Head Nozzle Che...

Страница 32: ...olid Select NG if the pattern contains lines then run a print head cleaning COPY TEST 18 Make sure paper is loaded in the paper cassette Place an original document in the Automatic Document Feeder ADF 19 Select Copy from the home screen 20 Select 2 Sided 21 Select 2 Sided 2 Sided then select Copy Check the copy to confirm that there are no problems with ADF feeding scanning or printing and print q...

Страница 33: ...500 mm between the rear of the printer and the wall where the unit will be installed Be sure to check the following notes before the installation All workers must read the installation procedure together before starting work Wear easy to move clothing gloves and safety shoes Work with care to avoid injuries Work with sufficient working space Use proper lifting techniques and stop working immediate...

Страница 34: ... UNIT 6 Insert the ribs of the Bridge Unit Joint Stacker Stopper into the holes of the EJ unit Attach the Bridge Unit Joint Stacker Stopper to the hole of the EJ Cover Lower removed in Step 5 7 Use the Stopper Fixing Plate and one screw S19 to attach the Bridge Unit Joint Stacker Stopper to the EJ Unit EJ Unit Small EJ Cover Right EJ Stacker EJ Stacker Shaft Inside of Small EJ Cover Right No Screw...

Страница 35: ...Cover Right removed in Step 3 to the EJ unit 11 Fit the EJ Unit into the printer 12 Remove the cover on the bottom left side of the printer by releasing the hook with a tool such as a flathead screwdriver 13 Attach the Joint to the printer with two screws S16 Pin Pin Stacker portion No Screw types S11 C B SCREW 3X8 F ZN 3C Stacker portion Hook Bridge Unit Joint Stacker Hook Cover Bottom left side ...

Страница 36: ...h the joint hangers 2 with five screws S16 on each side 16 Attach the Buffer Blocks along the marking lines Left side Multi Cassette Optional Attachment Cover R No Screw types S1 C B S TITE R SCREW 3X8 F ZN 3C Multi Cassette Optional Attachment Cover L Joint Hanger No Screw types S16 C B SCREW 4X8 F ZN 3C Left side Buffer Blocks Marking line Marking line PRELIMINARY ...

Страница 37: ...e Front Cover of the Bridge Unit no more than 45 degrees Remove the Front Cover by lifting it and pulling out of the hinges 18 Confirm that the lock lever is in the release position Front Cover Bridge Unit Hinge shaft Bridge Unit OK Released Lock Lever NG Locked PRELIMINARY ...

Страница 38: ... 36 19 Make sure the stacker portion of the Bridge Unit Joint Stacker is open 20 Move the Bridge Unit to the left side of the printer then align the Joint Hook Guide Pin with the Cutout Stacker portion Bridge Unit Align Cutout Joint Hook Guide Pin PRELIMINARY ...

Страница 39: ... the installation site the printer may sink and cause a gap larger than 0 12 in 3 mm In this case adjust the height by adjusting the casters see Step 27 Joint Hook Guide Pin NG NG OK The tip of the Joint Hook Guide Pin must touch the upper edge of the Cutout of the Bridge Unit C H E C K P O I N T When performing this step you should feel slight resistance because the Bridge Unit plate makes contac...

Страница 40: ...ove the Lock Lever until after you have adjusted the height of the Bridge Unit In the next step adjust the position of the Bridge Unit to secure the Joint Hooks and lock the Bridge Unit Lock Lever No Screw type S1 C B S TITE R SCREW 3X8 F ZN 3C Lock Lever Locked position C H E C K P O I N T When the Lock Lever is moved to the lock position the lever stays at the center position even after you rele...

Страница 41: ...wise to tighten 28 Adjust the height with the Adustment Nut One full turn of the Adjustment Nut raises or lowers the Bridge Unit by about 1 75 mm see the table below for more measurements Clockwise The caster lowers the Bridge Unit rises Counterclockwise The caster rises the Bridge Unit lowers 29 Tighten the Fixing Nut after the adjustment is complete 30 Adjust the remaining casters C H E C K P O ...

Страница 42: ...y hand Keep the Fixing Nut loosened until the next step PARALLEL ADJUSTMENT REQUIRED FOR CASE 1 AND CASE 2 32 Perform the parallel adjustment with the casters on the left Finisher Unit side Casters to adjust Make sure the casters can be rotated by hand after making adjustments C H E C K P O I N T To correct the tilt of the Bridge Unit adjust the height of the left side casters on the Bridge Unit C...

Страница 43: ...he Bridge Unit Subtract 1 mm from the measured gap width and raise the height of the casters on the left Finisher Unit side by that value 35 Turn the Fixing Nut of the casters on the left clockwise to loosen it 36 Insert the wrench from the front side then turn the Adjustment Nut for the front caster 1 4 turn to raise the caster by 0 44 mm 37 Insert the wrench from the left side then turn the Adju...

Страница 44: ...the EJ Cover stick to the plate When the cover opens and closes smoothly turn the Fixing Nuts counterclockwise to tighten them ADJUSTING THE RIGHT PRINTER SIDE CASTERS TO TOUCH THE FLOOR 41 Turn the Adjustment Nut for the caster on the right printer side clockwise to lower the caster until it touches the floor Turn the Fixing Nut counterclockwise to secure the caster You must adjust the casters on...

Страница 45: ...move the protective materials from the paper ejection slot on the Bridge Unit 44 Attach the Cushion Sponges to the left side of the Bridge Unit and the right side of the Finisher Unit aligning them with the guide lines as shown The sponges are for preventing foreign materials from entering into the unit Small Cover Small Cover Power Supply Cable Control Cable Back Protective materials Bridge Unit ...

Страница 46: ...nge 415 mm Make sure the Cushion Sponges are aligned Be sure to check the following notes before the installation All workers must read the installation procedure together before starting work Wear easy to move clothing gloves and safety shoes Work with care to avoid injuries Work with sufficient working space Never attempt to install the product alone Use proper lifting techniques and stop workin...

Страница 47: ...f the Finisher Joint Drawer Plate as shown below then connect the Finisher Unit connector to the Bridge Unit connector Pay close attention to the orientation of the connector hook C H E C K P O I N T Turn off the main power of the printer beforehand Confirm that the power cable of the printer and the Bridge Unit is not connected before starting work Left Side of the Bridge Unit Finisher Joint Draw...

Страница 48: ...side of the Finisher Unit Then attach the Grounding Plate with one screw S16 C H E C K P O I N T There is a mounting hole and dowel on both the center and front side of the Finisher Unit When attaching the Grounding Plate in the following step install it only to the center of the Finisher Unit Left Side of The Bridge Unit Cable Cover Dowel Hook Relay Cable Grounding Plate B Positioning Hole Ground...

Страница 49: ...he hole on the Finisher Joint Fix Slider Lock to connect the Finisher Unit to the Bridge Unit If the height of the Finisher Unit does not allow connection to the Bridge Unit or the casters of the Finisher Unit do not touch the ground after installation you may have to adjust the casters on the Finisher Unit see Page 50 Finisher front cover Finisher Joint Fix Slider Lock No Screw types S16 C B SCRE...

Страница 50: ... Finisher Paper Ejection Tray and the Sub Tray C H E C K P O I N T If the Finisher Joint Fix Slider Lock can not be attached press the Finisher Unit against the Bridge Unit from the left side and tightly close the Bridge Unit until the Finisher Joint Fix Slider Lock can be attached Finisher Joint Fix Slider Lock No Screw types S16 C B SCREW 4X8 F ZN 3C Sub Tray Finisher Paper Ejection Tray PRELIMI...

Страница 51: ... Letter Size 6 Press BACK to return to the previous menus 7 Press the Power Button to turn the printer off then turn it back on again to activate the setting Staple Cartridge Staple Unit LEFT______________________________ UP_____________________________RIGHT 1 Maintenance MENU 2 Individual Ac on Check MENU 3 Before Repair Opera on MENU 4 Adjustment Main Op on Unit MENU 5 Adjustment SCN ADF MENU 6 ...

Страница 52: ...casters if necessary 1 Open the Front Cover of the Finisher Unit 2 Remove the screw in the Lower Front Cover then open the cover 3 Remove two screws in the Front Caster Cover 4 Slide the Front Caster Cover down release the hooks and remove the Front Caster Cover Front Cover Remove the screw Lower Front Cover Lower Front Cover Front Caster Cover Screw Hooks Screw PRELIMINARY ...

Страница 53: ... Rear Cover and two screws in the Lower Rear Cover then remove the Rear Cover 6 To adjust the height you can use either the wrench attached to the unit or a Phillips No 2 screwdriver Remove the screw to use the wrench Lower Rear Cover Upper Rear Cover Screw Screw Screw Screw Wrench PRELIMINARY ...

Страница 54: ...t Fix Screws 8 To adjust the casters on the rear side loosen each Height Fix Screw Using either the wrench or a Phillips No 2 screwdriver rotate the Caster Bolt clockwise to raise the caster or counterclockwise to lower the caster After adjusting the height tighten the Height Fix Screws 9 When the caster adjustment is complete replace the Front Caster Cover and the Rear Cover Front side Caster Bol...

Страница 55: ...move clothing gloves and safety shoes Work with care to avoid injuries Work with sufficient working space Never attempt to install the product alone Use proper lifting techniques and stop working immediately if you feel that the load is too bulky or heavy Figure Number Name Figure Number Name 1 Switch lever 4 Drawer rail 2 Front lock support plate 5 Drawer rail guide 3 Back lock support plate 6 Co...

Страница 56: ...tach it with two screws 6 Attach the Back Lock Support Plate to the part covered with Cover 3 then attach it with one screw 7 Attach the Switch Lever to the part covered with Cover 4 and attach it with one screw 8 Put the Drawer Rail on the Drawer Rail Guide then temporarily attach them to the printer Front Lock Support Plate Marking line Hook Dowel Back Lock Support Plate Marking line Hook Switch...

Страница 57: ...he right side of the printer Attach the Drawer Rail Guide to the High Capacity Input Tray with the two screws 11 Confirm that the Drawer Rail Guide is horizontal If it is not horizontal correct it by adjusting the screws you attached in Step 9 Step 10 You should now be able to slide the High Capacity Input Tray against the printer Drawer Rail High Capacity Input Tray Drawer Rail Guide High Capacit...

Страница 58: ...UT TRAY FOR LETTER SIZE After installing the High Capacity Input Tray you must adjust the unit to support letter size paper instead of A4 size paper Keep the removed parts if you want to switch back to A4 size 1 Open the unit 2 Remove one screw then remove the Paper Rear Edge Regulation Board Small cover Hook Lower back right Printer High Capacity Input Tray Cable Connector Remove the screw Paper ...

Страница 59: ...ttom of the screen to make and enter selections 5 Select and enter the Installation Menu 6 Select and enter Bridge Unit Input Serial No 7 Press Input Value and enter the serial number from the rear of the Bridge Unit using the keypad Press OK when complete 8 Press BACK to return to the previous menu 9 Select and enter Hi Capacity Unit Paper Size Setting 10 Press DOWN to select Letter then press OK...

Страница 60: ...ation General Notice Other product names used herein are for identification purposes only and may be trademarks of their respective owners Epson disclaims any and all rights in those marks This information is subject to change without notice 2017 Epson America Inc 7 17 CPD 53693 Printed in U S A PRELIMINARY ...

Отзывы: