background image

25

English

Cleaning

Cleaning the Product Case

Be sure to turn off the product, and wipe the dirt off the product case with a dry cloth or a damp 
cloth. For persistent dirt, use a cloth slightly moistened with mild neutral detergent.

!

CAUTION:

Never clean the product with alcohol, benzine, thinner, or other such solvents. Doing so may 
damage or break the parts made of plastic and rubber.

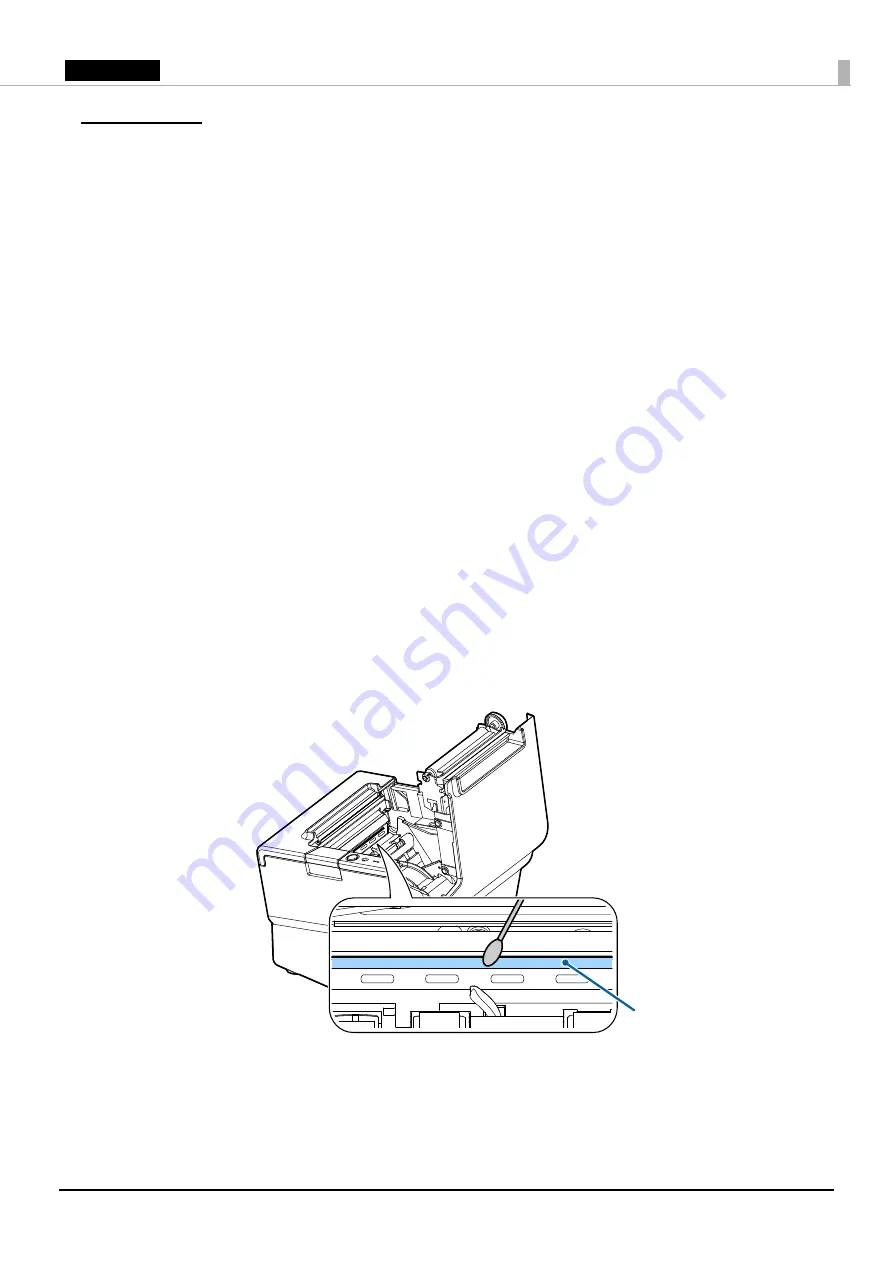
Cleaning the Thermal Head

To maintain print quality, Epson recommends cleaning the thermal head periodically (generally 
every 3 months) by following the steps below.

!

K

CAUTION:

The thermal head and the frame on its side can be very hot after printing. Be careful not to touch 

them and to let them cool before you clean it. 

Do not damage the thermal head by touching it with your fingers or any hard object.

1. Turn off the product. (

U


“Turning Power On/Off” on page 20

)

2. Open the roll paper cover. (

U


“Opening the roll paper cover” on page 21

)

3. Clean the thermal elements of the thermal head with a cotton swab moistened with an alcohol 

solvent (ethanol or IPA).

Thermal head

Содержание TM-T70II-DT2

Страница 1: ...ety Information page 2 Part Names and Functions page 5 Setup page 8 Basic Operations page 20 Installing Replacing the Roll Paper page 23 Cleaning page 25 Troubleshooting page 26 Specifications page 28 Appendix page 29 M00112601EN ...

Страница 2: ... minor injury to yourself damage to your equipment or loss of data QNote Notes have important information and useful tips on the operation of your product Safety Precautions WARNING If this product produces smoke a strange odor or unusual noise immediately unplug the AC cable and contact qualified service personnel Continued use may lead to fire or electric shock Do not use this product with any v...

Страница 3: ...ace heavy objects on top of this product Equipment may fall or collapse causing breakage and possible injury Be sure to use this product with the connector cover attached If it is not attached foreign objects may enter this product causing fire or equipment damage When you move this product be sure to hold the main body If you hold only the connector cover it may come off and the main body may bre...

Страница 4: ...sconnecting the AC cable DC cable The same phenomenon may also occur due to power shutdown caused by power failure temporary power failure Caution Labels The caution label on the product indicates the following precautions KCAUTION Do not touch the thermal head and the frame on its side because they can be very hot after printing Caution about Warranty This product assumes that the customer uses t...

Страница 5: ...ointed object such as a pen until the Power LED goes off to reset the printer Power button Press this button to turn on or shut down the product Keep pressing the button to turn off the product forcibly U Forced Termination on page 22 QNote If the power button is disabled by settings on the operating system the product will not shut down even if you press the power button Cover open button Press t...

Страница 6: ...e Status LED Blue Product status Flashing with approx 1 sec intervals On Booting Updating software Off On Power is on Normal status Off Flashing with approx 1 sec intervals Standby Off Off Power is off Flashing with approx 600 msec intervals On CPU overheating 95 C or higher USB overcurrent detected Backup battery error On Accessing storage LED LED status Meaning Power LED Blue On Power is on Off ...

Страница 7: ...t QNote If the connector cover is attached detach it to access the ports or connectors U Removing the connector cover on page 13 USB 3 0 ports 5 USB 2 0 Type C port VGA port USB 3 0 port DC in connector Drawer kick connector Serial port HDMI Port Line out port Ethernet port USB 2 0 port ...

Страница 8: ... horizontally on a firm stable surface QNote The security hook on the back of the product allows you to attach a commercially available antitheft wire A tape for fixing the product DF 10 is available as an option U Securing the Product on page 19 Security hook ...

Страница 9: ...AC adapter and the main unit 1 Firmly insert the DC connector of the AC adapter all the way into the DC in connector on the product in the illustration 2 Firmly insert the connector of the AC cable all the way into the AC inlet on the AC adapter in the illustration 3 Firmly insert the plug all the way into the grounded wall outlet in the illustration 4 Set the AC adapter so that its label side is ...

Страница 10: ...d then connect each cable to the port connector on the back of the product U Interface on page 7 QNote When connecting the cables whose connectors do not lock themselves USB cables and line out cable etc you can pass the cables through the wire saddle to prevent them from coming off Wire saddle ...

Страница 11: ...nector cover when attaching it or it may become damaged Follow the steps below to attach the connector cover to protect cables QNote If you use the product with the optional customer display Model DM D110 remove the U shaped part from the connector cover 1 Align the hooks on the connector cover with the dents on the main body ...

Страница 12: ...12 English 2 Push the connector cover to click onto the main body 3 Make sure the cables are not pinched QNote You can also attach bottom cover to hide connectors ...

Страница 13: ...nector cover Push the connector cover down while pushing the lower part of the both sides of it inward to detach the hooks from the main body QNote If the connector cover bottom is attached first remove the connector cover bottom ...

Страница 14: ...er QNote It is recommended to clean any dirt around the power button before you attach the cover 1 Open the power button cover 2 Peel off the backing paper 3 Attach the power button cover as shown in the illustration Align the left edge of the power button cover with the right edge of the printer reset button Align the inside edge of the power button cover with the upper edge of the power button P...

Страница 15: ...on the roll paper holder is aligned with the hole on the printer QNote You can use the enclosed screw to fix the roll paper guide 4 Install the roll paper correctly 5 Close the roll paper cover CAUTION If you once use the printer with 58 mm paper roll you cannot change it back to 80 mm You need to set with the memory switch customized values for the paper width in Software Setting mode For informa...

Страница 16: ...ws are included with the customer display 1 Attach the base on the TM T88VI DT2 with the three screws in the illustration 2 Pass the USB cable of the customer display through the base in the illustration 3 Align the dowel hole in the customer display and the dowel on the base to attach the customer display on the base in the illustration 4 Connect the USB cable to the USB port U Interface on page ...

Страница 17: ...omer display Pole Base Screws 1 Attach the base on the TM T88VI DT2 with the three screws in the illustration 2 With the end of the straight pole with a hole pointing downward pass the USB cable of the customer display through the pole and base in the illustration 3 Attach the pole with the customer display 4 Align the dowel hole in the pole and the dowel on the base to attach the pole on the base...

Страница 18: ...rm to change the direction or angle CAUTION Do not rotate the display with excessive force Doing so may break it The mobile range of the display is as follows Display tilt Maximum angle of 48 5 levels Display rotation Maximum angle of 300 Arm rotation Maximum angle of 270 only for models without a pole 48 300 270 ...

Страница 19: ...o pieces of the affixing tape combined peel off the backing paper of a pair on one side and paste it to one of the specified positions on the bottom of the product 3 In the same way paste other three pairs of tape in the specified positions 4 Peel off the backing paper of each pair on the other side of the affixing tape turn over the product back on its bottom and place and secure it firmly to the...

Страница 20: ...ON If you turn the product off wait more than 10 seconds before you turn it on again When the product is turned off or when it is in the standby mode do not hold down the power button longer than 4 seconds Press the power button to turn on off the product ...

Страница 21: ...21 English Opening the Covers Opening the roll paper cover Press the cover open button to open the roll paper cover Opening the cutter cover Slide the cutter cover toward front to open it ...

Страница 22: ...d Termination CAUTION When forced termination is executed all unsaved data is lost and recovery of the operating system may be required If you cannot turn the product off using applications or the operating system you can execute forced termination as a last resort by pressing the power button for approximately 4 seconds ...

Страница 23: ...s below to install replace the roll paper 1 Open the roll paper cover U Opening the roll paper cover on page 21 2 Remove the used roll paper core if there is one 3 Insert the roll paper in the correct direction 4 Pull out some paper and close the roll paper cover ...

Страница 24: ...24 English 5 Tear off the paper ...

Страница 25: ... print quality Epson recommends cleaning the thermal head periodically generally every 3 months by following the steps below KCAUTION The thermal head and the frame on its side can be very hot after printing Be careful not to touch them and to let them cool before you clean it Do not damage the thermal head by touching it with your fingers or any hard object 1 Turn off the product U Turning Power ...

Страница 26: ...LED is flashing Check whether paper is jammed If it is jammed remove it U Paper is jammed on page 26 Printing stops if the thermal head overheats and resumes automatically when it cools For other cases turn the product off and after 10 seconds turn it back on Paper is jammed KCAUTION Do not touch the thermal head and the frame on its side because they can be very hot after printing When paper is j...

Страница 27: ...n 1 Turn off the product U Turning Power On Off on page 20 2 Open the cutter cover U Opening the cutter cover on page 21 3 Turn the knob until you see a triangle in the opening This returns the cutter blade to the normal position There is a label near the cutter to assist you 4 Close the cutter cover 5 Open the roll paper cover U Opening the roll paper cover on page 21 a a knob b triangle b ...

Страница 28: ...ply DC 5 V 3 A Serial D sub 9 pin male VGA D sub 15 pin female HDMI Standard HDMI connector type A 19 pin female Drawer kick RJ12 6 pin Power supply DC 24 V 1 A Line out φ 3 5 mm Mini jack RTC CMOS Backup battery Lithium battery for RTC CMOS backup Sound function Built in monaural speaker Print method Thermal line printing Maximum print speed 350 mm s Roll paper Paper width 3 79 5 mm 0 5 mm 3 13 0...

Страница 29: ...d for identification purpose only Caution No part of this publication may be reproduced stored in a retrieval system or transmitted in any form or by any means electronic mechanical photocopying recording or otherwise without the prior written permission of Seiko Epson Corporation No patent liability is assumed with respect to the use of the information contained herein While every precaution has ...

Страница 30: ...he open source software programs are WITHOUT ANY WARRANTY without even the implied warranty of MERCHANTABILITY AND FITNESS FOR A PARTICULAR PURPOSE See the license agreements of each open source software program for more details 4 OpenSSL toolkit This printer product includes software developed by the OpenSSL project for use in the OpenSSL Toolkit http www openssl org This product includes cryptog...

Страница 31: ...endar contacts music and news that are included with and are a part of Windows If this agreement contains terms regarding a feature or service not available on your device then those terms do not apply b Additional terms Depending on your device s capabilities how it is configured and how you use it additional Microsoft and third party terms may apply to your use of certain features services and a...

Страница 32: ...nd or transmit customer information and perform related management functions and or ii provide information directly and indirectly to customers about available products and services You may use other programs with the software as long as the other programs i directly support the manufacturer s specific use for the device or ii provide system utilities resource management or anti virus or similar p...

Страница 33: ...ss Action Waiver if You Live in or if a Business Your Principal Place of Business is in the United States We hope we never have a dispute but if we do you and we agree to try for 60 days to resolve it informally If we can t you and we agree to binding individual arbitration before the American Arbitration Association AAA under the Federal Arbitration Act FAA and not to sue in court in front of a j...

Страница 34: ...egotiation and arbitration 10 Governing Law The laws of the state or country where you live or if a business where your principal place of business is located govern all claims and disputes concerning the software its price or this agreement including breach of contract claims and claims under state consumer protection laws unfair competition laws implied warranty laws for unjust enrichment and in...

Страница 35: ...r device from malware The software will turn on malware protection if other protection is not installed or has expired To do so other antimalware software will be disabled or may have to be removed d Limited rights versions If the software version you acquired is marked or otherwise intended for a specific or limited use then you may only use it as specified You may use other programs with the sof...

Страница 36: ...S FOR BREACH OF A WARRANTY GUARANTEE OR CONDITION YOUR LOCAL LAWS IMPOSE TO THE EXTENT NOT PROHIBITED BY YOUR LOCAL LAWS IF YOU HAVE ANY BASIS FOR RECOVERING DAMAGES YOU CAN RECOVER FROM THE MANUFACTURER OR MICROSOFT ONLY DIRECT DAMAGES UP TO THE AMOUNT YOU PAID FOR THE SOFTWARE OR UP TO 50 USD IF YOU ACQUIRED THE SOFTWARE FOR NO CHARGE YOU WILL NOT AND WAIVE ANY RIGHT TO SEEK TO RECOVER ANY OTHER...

Отзывы: