background image

Epson Stylus C58/C59/ME 2/C79/D78/C90/C91/C92/D92/T20/T20E/T23/T26/S20/T10/T11/ME 30/T21/T24/T27/S21  

Revision E

PRODUCT DESCRIPTION     

General Specifications

18

Confidential

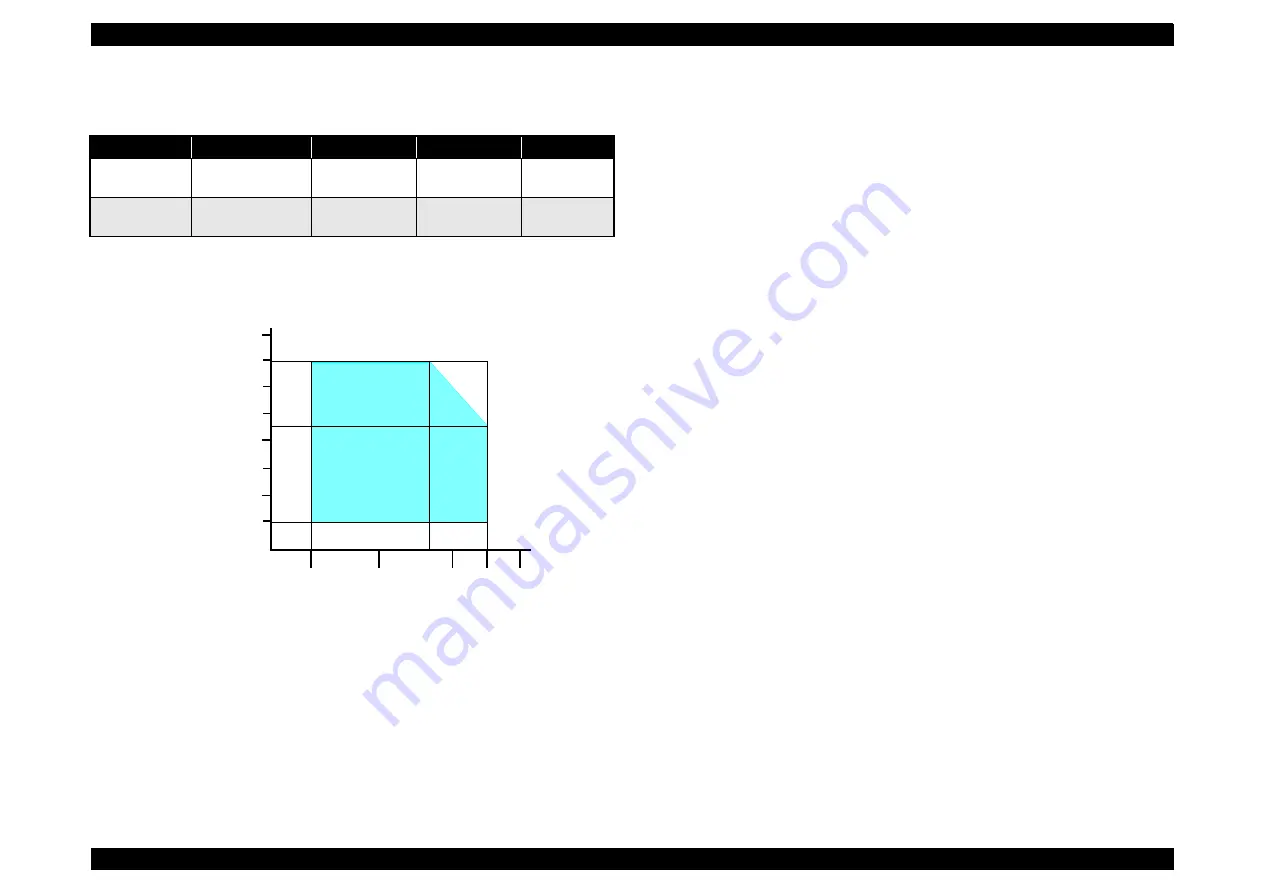
1.4.5  Environmental Performance

Note *1 : After opening package

*2 : No condensation
*3 : One month at 40°C (104°F)
*4 : Under the following conditions:

1.4.6  Durability

†

Total print life: 10,000 pages (A4, Letter) or three years (whichever comes first)

†

Printhead life: Seven billion shots (per nozzle) or five years (whichever comes first)

Table 1-20.  Environmental Performance

Condition

Temperature

Humidity*

2

Impact

Vibration

Operating

10 to 35°C

(50 to 95°F)*

3

*

4

20


to


80%*

4

1G,

1 x 10

-3

 seconds

0.15G

Not operating*

1

-20


to 40°C

(-4°F to 140°F)

5


to


85%

2G,

2 x 10

-3

 seconds

0.50G

27/80

30/86 35/95 40/104

20/68

Temperature (°C/°F)

20

30

40

50

90

80

70

60

Humidity (%)

10/50

Содержание Stylus S20

Страница 1: ...sC58 C59 EpsonME2 EpsonStylusC79 D78 EpsonStylusC90 C91 C92 D92 EpsonStylusT20 T20E T23 T26 S20 EpsonStylusT10 T11 EpsonME30 EpsonStylusT21 T24 T27 S21 Color Inkjet Printer SEIJ06 003 SERVICE MANUAL Confidential ...

Страница 2: ...tents of this manual However should any errors be detected SEIKO EPSON would greatly appreciate being informed of them The above not withstanding SEIKO EPSON CORPORATION can assume no responsibility for any errors in this manual or the consequences thereof EPSON is a registered trademark of SEIKO EPSON CORPORATION General Notice Other product names used herein are for identification purpose only a...

Страница 3: ...WORKING ON POWER SUPPLY AND OTHER ELECTRONIC COMPONENTS 4 WHEN DISASSEMBLING OR ASSEMBLING A PRODUCT MAKE SURE TO WEAR GLOVES TO AVOID INJURY FROM METAL PARTS WITH SHARP EDGES WARNING 1 REPAIRS ON EPSON PRODUCT SHOULD BE PERFORMED ONLY BY AN EPSON CERTIFIED REPAIR TECHNICIAN 2 MAKE CERTAIN THAT THE SOURCE VOLTAGE IS THE SAME AS THE RATED VOLTAGE LISTED ON THE SERIAL NUMBER RATING PLATE IF THE EPSO...

Страница 4: ... for reference Exploded Diagram Symbols Used in this Manual Various symbols are used throughout this manual either to provide additional information on a specific topic or to warn of possible danger present during a procedure or an action Be aware of all symbols when they are used and always read NOTE CAUTION and WARNING messages Indicates an operating or maintenance procedure practice or conditio...

Страница 5: ...ncreasing viscosity when the printer is in stand by state or when the printer is off p25 is updated Chapter 4 4 5 6 Ink System removal p51 Caution during inserting the Ink Tube into the connector is added 4 5 8 EJ Frame Assy EJ Roller p54 Reassembly procedure of the Grounding Spring Frame is added Chapter 5 5 2 1 Head angular adjustment p75 Print samples made by the adjustment program for Stylus C...

Страница 6: ...talling Head FFC is added Chapter 7 Exploded Diagram Parts List is changed to reference to SPI Circuit Diagrams is deleted E May 7 2009 All chapters The model name Epson Stylus T21 T24 T27 S21 are added Chapter 1 1 1 Features p10 is updated Print speed printable width p11 is updated 1 2 1 Paper Support p12 is updated 1 2 2 Printable Area Size and Margins p13 is updated 1 2 3 Ink Cartridge p14 is u...

Страница 7: ...s 19 1 5 3 Errors and Panel Status 20 1 5 4 Printer Initialization 20 Chapter 2 OPERATING PRINCIPLES 2 1 Overview 22 2 2 Printer Mechanism 22 2 2 1 Printhead Specifications 23 2 2 2 Carriage Mechanism 23 2 2 3 Paper Feeding Mechanism 24 2 2 4 Ink System Mechanism 25 2 3 Power On Sequence 26 Chapter 3 TROUBLESHOOTING 3 1 Overview 28 3 1 1 Specified Tools 28 3 1 2 Preliminary Checks 28 3 2 Troublesh...

Страница 8: ...13 PF Motor 63 4 6 Procedure Specific to Epson Stylus C58 C59 ME 2 64 4 6 1 Printhead 64 4 6 2 Waste Ink Pads 67 4 7 The Shortest Way to Remove the Main Frame 68 Chapter 5 ADJUSTMENT 5 1 Adjustment Items and Overview 70 5 1 1 Servicing Adjustment Item List 70 5 1 2 Replacement Part Adjustment Items 73 5 2 Adjustment by Using Adjustment Program 75 5 2 1 Head angular adjustment 75 5 2 2 Top Margin A...

Страница 9: ...Confidential C H A P T E R 1 PRODUCTDESCRIPTION ...

Страница 10: ...s Macintosh supported Borderless printing The difference between the Epson Stylus C58 C59 ME 2 Epson Stylus C79 D78 C90 C91 C92 D92 T20 T20E T23 T26 S20 T10 T11 ME 30 T21 T24 T27 S21 The main difference is the ink type as shown in the table below Dimension With the output tray and paper support closed Width 435 mm 17 1 inches Depth 219 mm 8 6 inches Height 165 mm 6 5 inches Maximum dimension Width...

Страница 11: ...de ASCII 20H to 7FH Font Bit map LQ font EPSON Courier Input buffer size 32 Kbytes Paper feed method Friction feed with ASF Auto Sheet Feeder Paper path Sheet feeder top entry Paper feed rates TBD High quality mode 10 16 mm 0 4 feed TBD mm sec TBD inch sec High speed mode continuous feed TBD mm sec TBD inch sec Table 1 3 Character Mode Character Pitch Printable Columns CR Speed 10 CPI Pica 80 419 ...

Страница 12: ... C6 EPSON special paper Premium Ink Jet Plain Paper A4 0 11 80 g m2 21 lb Premium Bright White Paper A4 7 0 11 90 g m2 24 lb Letter 5 Bright White Ink Jet Paper A4 0 13 92 5 g m2 25 lb Premium Photo Paper Glossy EAI Premium Glossy Photo Paper Other Letter 3 0 27 255 g m2 68 lb A4 1 8 x 10 3 5 x 7 1 4 x 6 1 16 9 wide 1 L 3R 1 4 Premium Photo Paper Semi Gloss EAI Premium Semigloss Photo Paper Other ...

Страница 13: ...er 215 9 mm 8 5 279 4 mm 11 Legal 215 9 mm 8 5 355 6 mm 14 Half Letter 139 7 mm 5 5 215 9 mm 8 5 8 x 10 203 2 mm 254 mm 5 x 7 127 mm 178 mm 4 x 7 11 101 6 mm 180 6 mm 4 x 6 101 6 mm 152 4 mm L 3R 89 mm 3 5 127 mm 5 User defined 50 8 329 mm 2 12 6 127 1117 6 mm 5 44 Envelope No 10 104 8 mm 4 125 241 3 mm 9 5 DL 110 mm 220 mm C6 114 mm 162 mm Table 1 7 Guaranteed Print Area A B L B R C D C58 C59 ME ...

Страница 14: ...le 1 11 Epson Stylus C90 C91 C92 D92 Color Latin Asia Europe CISMEA Black T0731 T0901 T0731 T0911 T0711 T0921 Cyan T0732 T0732 T0912 T0712 T0922 Magenta T0733 T0733 T0913 T0713 T0923 Yellow T0734 T0734 T0914 T0714 T0924 Table 1 12 Epson Stylus T20 T20E T23 T26 S20 T21 T24 T27 S21 Color Latin 1 Latin 2 CISMEA Euro Asia Black T0731N T0901N T1161 T1171 T0921N T0711 T0891 T0731N T0911N Cyan T0732N T09...

Страница 15: ...60 dpi Operating procedure 1 User carries out printing from an application 2 The printer driver checks both the printing mode and the amount of remaining ink and displays the specific window if the conditions described below are all met Selected printing mode supports black ink save mode Remaining amount of black ink is less than 5 or the status of the black ink is ink low Remaining amount of all ...

Страница 16: ...niversal Serial Bus Device Class Definition for Printing Devices Version 1 1 Descriptors Based on Design Specification for USB Device Requests and USB Descriptors for EPSON USB Printer Product ID 0005h Transfer rate 12 Mbps Full Speed Device Cable length Under 2 meters 6 6 feet Device ID NOTE Model Name represents each model name TBD Table 1 16 Device ID When IEEE 1284 4 is Enabled When IEEE 1284 ...

Страница 17: ...61000 3 2 EN61000 3 3 EN55024 Table 1 17 Primary power input 100 120 V model 220 240 V model Rated power supply voltage ACV 100 to 120 220 to 240 Input voltage range ACV 90 to 132 198 to 264 Rated current A C58 C59 ME 2 C79 D78 C90 C91 C92 D92 T20 T20E T23 T26 S20 T10 T11 ME 30 0 4 max 0 7 0 2 max 0 4 T21 T24 T27 S21 0 4 max 0 8 Rated frequency Hz 50 to 60 Input frequency range Hz 49 5 to 60 5 Pow...

Страница 18: ...ditions 1 4 6 Durability Total print life 10 000 pages A4 Letter or three years whichever comes first Printhead life Seven billion shots per nozzle or five years whichever comes first Table 1 20 Environmental Performance Condition Temperature Humidity 2 Impact Vibration Operating 10 to 35 C 50 to 95 F 3 4 20 to 80 4 1G 1 x 10 3 seconds 0 15G Not operating 1 20 to 40 C 4 F to 140 F 5 to 85 2G 2 x 1...

Страница 19: ... paper When Paper jam occurred Ejects paper When Double feed occurred Clears the error and resumes the printing When Ink end or No ink cartridge occurred Moves the carriage to ink check position When the carriage is in the ink check position Moves the carriage slightly to check the adjacent ink cartridge When the carriage is in Ink low or Ink out position Moves the carriage to the replacement posi...

Страница 20: ...ears input data buffer c Clears print buffer d Sets default values 2 Operator initialization This printer is initialized when turning the printer power on again within 10 seconds from last power off or printer recognized the INIT signal negative pulse of parallel interface When printer is initialized the following actions are performed a Cap the printer head b Eject a paper c Clears input data buf...

Страница 21: ...Confidential C H A P T E R 2 OPERATINGPRINCIPLES ...

Страница 22: ...7 S21 consists of printhead carriage mechanism paper loading feeding mechanism and ink system As in the case of conventional models Epson Stylus C58 C59 ME 2 and Epson Stylus C79 D78 C90 C91 C92 D92 T20 T20E T23 T26 S20 T10 T11 ME 30 T21 T24 T27 S21 has two motors one is a stepping motor for paper loading feeding mechanism and the other is a DC motor for carriage mechanism Papers are fed from the ...

Страница 23: ...d Figure 2 2 Nozzle Rear View 2 2 2 Carriage Mechanism Main components of the carriage mechanism are carriage unit including printhead CR encoder sensor CR motor timing belt and CR scale 2 2 2 1 CR Motor Specifications K 90 K 89 K 3 K 2 K 1 C 29 C 1 M 29 M 1 Y 29 Y 3 Y 2 Y 1 2 822mm 40 360 inch 0 2117mm 1 120 inch Black Color Cyan 29nozzles Magenta 29nozzles Yellow 29nozzles Carriage Moving Direct...

Страница 24: ...counter clockwise and the clutch is released by the CR lock lever 4 After the clutch is released the PF motor rotates clockwise Drive is transmitted to the LD roller and the paper loading operation begins 5 During paper loading operation papers are fed from the ASF unit to inside the printer by the rotating movement of the two cams of the LD roller Cam large releases hopper Cam small releases pape...

Страница 25: ... Unit Mechanism When the PF motor turns power is always transmitted to the ink system Note The PF Motor rotational direction seen from the left side of the printer 2 2 4 2 Capping Mechanism The Capping mechanism covers the printhead with the cap to prevent the nozzle from increasing viscosity when the printer is in stand by state or when the printer is off Table 2 3 PF Motor Rotational Direction I...

Страница 26: ...m the CR lock 2 3 Checks if paper does not exist with the PE sensor and the PF Motor rotates clockwise for two seconds to release the CR lock 2 4 The carriage moves to the 80 digit side slowly and confirms that the CR lock is released 2 5 The carriage quickly moves to the 80 digit side by the Left Frame 2 6 After the carriage continuously moves to the 80 digit side slowly and confirms it touches t...

Страница 27: ...Confidential C H A P T E R 3 TROUBLESHOOTING ...

Страница 28: ... papers that conform to the specifications There should be no errors in handling of the printer Check the inside of the printer and remove foreign matters if any such as paper clips staples bits of paper paper dust or toner Clean the inside of the printer and the rubber rollers W A R N I N G Be careful to avoid electric shocks when checking the electrical circuit boards C664 MAIN PSE and B circuit...

Страница 29: ... too long upon ejection 1 Remove the blank paper or check the paper size 2 Press the Maintenance button to eject the paper and release the error Paper jam On Even though paper feeding operation is carried out for predetermined times leading edge or back end of the paper could not be detected 1 Press the Maintenance button on the panel 2 If paper jam occurred again after pressing the button open th...

Страница 30: ... Motor Sensor Table 3 2 Motor Resistance and Check Points Motor name Type Location Check point Resistance CR motor Motor with DC brush CN5 Pin 1 2 28 8 Ω 10 PF motor 4 phase 200 pole HB stepping motor CN6 Pin 1 3 Pin 2 4 4 3 Ω 8 12 20ºC Table 3 3 Sensor Check Sensor name Detecting system Location Signal level Sensor status PE sensor Transmission photo interrupter CN7 pin 1 2 2 6 V or more Paper lo...

Страница 31: ...Confidential C H A P T E R 1 4 DISASSEMBLY ASSEMBLY ...

Страница 32: ...dling WARNING and CAUTION in the following columns when disassembling or assembling Epson Stylus C58 C59 ME 2 and Epson Stylus C79 D78 C90 C91 C92 D92 T20 T20E T23 T26 S20 T10 T11 ME 30 T21 T24 T27 S21 W A R N I N G Disconnect the power cable before disassembling or assembling the printer If you need to work on the printer with power applied strictly follow the instructions in this manual Always w...

Страница 33: ... C90 C91 C92 D92 T20 T20E T23 T26 S20 T10 T11 ME 30 T21 T24 T27 S21 are shown below Table 4 1 Tools Name Supplier Parts No Phillips screwdriver 1 EPSON 1080530 Phillips screwdriver 1 EPSON 1080532 Flathead screwdriver EPSON 1080527 Tweezer EPSON 1080561 Table 4 2 Screws No Image Name Type 1 C B S 3 x 6 C B S TITE SCREW 2 C B S 3 x 8 C B S TITE SCREW 5 C B P 2 5 x 8 C B P TITE SCREW 6 C B P 3 x 6 C...

Страница 34: ... Check Point Status Main Unit Self test Is the operation normal Checked Not necessary ON line Test Is the printing successful Checked Not necessary Printhead Is ink discharged normally from all the nozzles Checked Not necessary Carriage Mechanism Does it move smoothly Checked Not necessary Is there any abnormal noise during its operation Checked Not necessary Is the CR Motor at the correct tempera...

Страница 35: ...s between the models See the respective pages for details C H E C K P O I N T Since Epson Stylus C79 D78 C90 C91 C92 D92 model was used to make this manual the appearance of some parts may differ from those on other model The procedures are the same for both models unless otherwise noted except for the one described in the table below Item Description Products 1 Reference Page A B C Printhead You ...

Страница 36: ...59 ME 2 B Epson Stylus C79 D78 C90 C91 C92 D92 C Epson Stylus T20 T20E T23 T26 S20 T10 T11 ME 30 T21 T24 T27 S21 Shield Plates Shield Plate L is small 3 3 see 4 5 8 EJ Frame Assy EJ Roller p54 Shield Plate L is large 3 see 4 5 9 Main Frame p56 Waste Ink Pad 7 parts 3 see 4 6 2 Waste Ink Pads p67 9 parts 3 3 see 4 5 11 Waste Ink Pads p61 Item Description Products 1 Reference Page A B C ...

Страница 37: ...Check Point and Reassembly Note Shown in the dotted line is not the shortest procedure but is necessary to proceed to the next step 4 3 1 Upper Housing p38 4 5 1 Hopper p42 4 4 1 Main Board p40 4 5 10 LD Roller ASF Unit p59 4 5 2 Printhead p43 4 5 3 CR Scale p46 4 5 4 CR Motor p47 4 5 9 Main Frame p56 Ink System Cap Assy p51 4 5 7 Power Supply Board p53 4 5 8 EJ Frame Assy EJ Roller p54 START 4 5 ...

Страница 38: ...ewdriver Figure 4 3 Removing Upper Housing 1 3 Push the marked area to release the tabs x2 on the front side of the printer Arrows 4 Push the dotted area from inside as shown in the figure to release the tab x1 in the middle Figure 4 4 Removing Upper Housing 2 5 Remove the Upper Housing taking care not to scratch the Hopper with the tabs Figure 4 5 Removing Upper Housing 3 C A U T I O N When relea...

Страница 39: ...e tape and remove the grounding spring 1 2 2 Bend the four protrusions of each of the two holes outwardly with a flat head precision driver or the like and remove the Shield Plate Front NOTE After removing be sure to straighten the protrusions of the holes to restore their original state Reassembling Shield Plate Front 1 Insert the two holes of the plate over the dowels on the base frame as far as...

Страница 40: ...ctors on the Main Board Assy CN1 Head FFC CN3 Head FFC Backside CN5 PE Detector Connector Cable CN6 PF Motor Connector Cable CN7 CR Motor Connector Cable CN8 Power Supply Board Connector Cable 3 Remove the screws x4 and remove the GND Plate M B and the Main Board Assy Figure 4 9 Removing Main Board 1 Figure 4 10 Connector Layout of Main Board 4 Remove the Grounding Plate Clip from the Main Board A...

Страница 41: ...data copy only after replacement 2 Destination Setting only after replacement 3 USB ID Input only after replacement 4 Waste Ink Pad Counter Ink Pads must be replaced 5 Head ID Input only after replacement 6 TOP Margin Adjustment only after replacement 7 First Dot Adjustment only after replacement 8 Head Angular Adjustment only after replacement 9 Bi D Adjustment only after replacement 10 PF Band A...

Страница 42: ...ion Spring 1 94 Compression Spring 1 94 Hopper Bearing Guide Pin B Guide Pin A Before installing the Hopper be sure to adjust the position of the LD Roller following the steps below 1 Unlock the Carriage Lock See 4 5 2 Printhead p43 2 Move the CR Unit to the center of the printer 3 Adjust the position of LD Roller turning the EJ Roller clockwise LD Roller position the flat part facing inward Paper...

Страница 43: ...e CR Unit to the center of the printer Figure 4 14 Unlocking Carriage Lock and Moving CR Unit to the Center 2 Open the Cartridge Cover and remove all the Ink Cartridges from the CR Unit 3 Release the FFCs from the tabs Figure 4 15 Releasing FFCs 4 Disconnect the Head FFCs x2 that are connected to the CSIC Board and the CR Encoder Board Figure 4 16 Disconnecting Head FFCs C H E C K P O I N T The re...

Страница 44: ...e the tab and pull out the blade of the Sub FFC Guide from the slit and remove the Sub FFC Guide pulling out the guide pin x1 from the notch Figure 4 18 Removing Sub FFC Guide 7 Remove the screw x3 and lift up the Printhead with a longnose pliers Figure 4 19 Removing Printhead 1 Tab 1 Tab 2 Holder Board Assy Tab 1 Holder Board Assy Tab 2 Tab 1 CR Unit Tab 2 CR Unit C A U T I O N Do not touch or da...

Страница 45: ...installed in the wrong position There s no need to remove the Cartridge Cover when replacing the Print Head of the Epson Stylus C79 D78 But if the replacement is required for some reasons refer to 4 6 1 Printhead p64 for the replacement procedures The Ink Position Label is not included in the Cartridge Cover When replacing the Cartridge Cover order the label separately and attach the Ink Position ...

Страница 46: ...e the scale from the Main Frame Figure 4 24 Removing CR Scale 3 C A U T I O N Pay attention to the following instructions Do not touch the CR Scale with bare hands Do not damage the CR Scale Do not stretch Extension Spring 3 289 too much CR Scale Tab CR Scale Epson Stylus C79 D78 s Case Slit of CR Encoder Sensor Tab CR Scale Epson Stylus C58 C59 ME2 s Case When installing the CR Scale pay attentio...

Страница 47: ...e and release the Timing Belt from the pinion gear of the CR Motor 4 Remove the screws x2 and remove the CR Motor from the Main Frame Figure 4 26 Releasing Timing Belt and Removing CR Motor C A U T I O N After releasing the Timing Belt temporarily secure the belt to the Cartridge Cover with a tape or the like so as not to allow the grease to come in contact with the Timing Belt Contaminating the b...

Страница 48: ...ng Belt temporarily secure the belt to the Cartridge Cover with a tape or the like so as not to allow the grease to come in contact with the Timing Belt Contaminating the belt with grease can result in malfunction of the printer CR Scale Holder CR Unit CR Unit Stopper Epson Stylus C58 C59 ME2 s Case C B S 3X6 Torque 8 1Kgf cm CR Scale Holder Groove of CR Unit Timing Belt Insert the wavy surface pa...

Страница 49: ...s shown in the figure Figure 4 32 Installing Head FFC 4 Head FFC 1 2mm FFC1 FFC2 CN1 CN3 Hook hole Strong Tape 60mm x 18mm Epson Stylus C58 C59 ME 2 s Case 1 Put the Head FFC through the Hole of the Main Frame see Figure 4 29 p 48 2 Secure the Head FFC with Rib A and B see Figure 4 29 p 48 3 Fold back the Head FFC and secure it with Rib A again see Figure 4 31 p 49 4 Put the Head FFC through the F...

Страница 50: ...k see Figure 4 29 p 48 3 Put the FFC1 and FFC2 through the Ferrite Core 4 Connect the Head FFC to CN1 CN3 of the Main Board see 4 4 1 Main Board p 40 5 Secure the FFC and the Ferrite Core with strong tape 60mm according to the standard given below Align the top of the Ferrite Core in parallel with the marking shown below The tape must be attached vertically to the Head FFC The lower end of the tap...

Страница 51: ...p40 2 Remove the Printhead p43 3 Remove the Ink System Cap Assy p51 4 Remove the CR Scale p46 5 Remove the CR Motor p47 6 Remove the CR Unit Timing Belt p48 7 Remove the Main Frame p56 8 Insert a flathead screwdriver between the tab 1 and the rib and release the tab 1 while pushing it in the direction of the arrow 9 Release the tab 2 in the direction of the arrow Figure 4 38 Removing Ink System 2 ...

Страница 52: ...ack Lever behind Ink Tube Ink Tube Connector of Waste Ink Pad Hole of Frame Base Ink Tube Ink Tube Paper Back Lever When installing the Cap Assy follow the steps described below 1 Arrange the tube between the ribs as shown in the figure below 2 Place the Cap Assy and match the tabs x2 and lock them Figure 4 34 3 Attach the Ink Tube Figure 4 38 Figure 4 42 Installing Ink System When installing the ...

Страница 53: ...in the direction of the arrow Figure 4 45 Removing Power Supply Board 2 4 Pull out the connector cable through the hole of the Frame Base Figure 4 46 Removing Power Supply Board 3 CN8 Acetate Tape C B P 3X6 Torque 6 1Kgf cm Power Supply Board Cable of Power Supply Board Cable of PF Motor C A U T I O N Do not turn the Power Supply Board upside down as shown in the figure below This figure is only u...

Страница 54: ...g EJ Roller 1 3 Pull the bearing slightly Arrow and remove the EJ Roller Arrow Figure 4 51 Removing EJ Roller 2 C H E C K P O I N T When installing Spur Gear 59 6 and the EJ Roller be sure to install new ones These parts cannot be reused Before starting the removal procedure the preparing procedure is needed In the case of Epson Stylus C79 D78 C90 C91 C92 D92 Remove the Grounding Spring See Figure...

Страница 55: ...he bend of the Grounding Spring Frame to the Shield Plate Front 3 Pulling the Grounding Spring Frame leftward hook its the other end to the Shield Plate L Figure 4 52 Installing Grounding Spring Frame A D J U S T M E N T R E Q U I R E D After replacing the EJ Roller perform the following adjustment Refer to Chapter 5 ADJUSTMENT 1 Head Angular Adjustment 2 Bi D Adjustment 3 PF Band Adjustment only ...

Страница 56: ...Spring 3 Remove the Driven Pulley Holder from the notch of the Main Frame Figure 4 54 Removing Grounding Spring and Driven Pulley Holder 4 Remove the Extension Springs x3 from the hooks of the Main Frame and the guide pins of the Upper Paper Guide Figure 4 55 Removing Extension Springs 5 Remove the screws x4 that secure the Main Frame to the Frame Base Figure 4 56 Removing Main Frame 1 C A U T I O...

Страница 57: ...connector cable of the PE Detector from the tabs x4 Figure 4 58 Disconnecting Cable 8 Remove the screw x1 and remove LD Shaft Holder Assy Figure 4 59 Removing LD Shaft Holder Assy 9 Release the tab x1 and remove the PE Detector Assy Figure 4 60 Removing PE Detector Assy 10 Release the tabs x6 and remove the Upper Paper Guide Figure 4 61 Removing Upper Paper Guide LD Holder Shaft Assy Upper Paper G...

Страница 58: ...Spring When securing the Main Frame to the Frame Base with screws be sure to perform the tightening in the order of the numbers indicated in Figure 4 56 p 56 When installing the Shield Plate L be cautious not to damage the Spur Gears of the PF Roller and the EJ Roller Install the Grounding Spring attaching the ends to the parts as shown in the figure below Figure 4 64 Installing Grounding Spring A...

Страница 59: ...2 Insert a tweezer or a screwdriver into the slot as shown in the figure to hold the Paper Back Lever outwards 3 Move the Carriage Lock Lever outwards Figure 4 65 Preparation 1 LD Roller Removal 4 Release the tabs x2 of the LD Roller shaft from the bearing and loosen the shaft Figure 4 66 Removing LD Roller 1 5 Pull out the LD Roller shaft from the frame of the ASF Unit and remove the LD Roller Fi...

Страница 60: ...e 6 1Kgf cm Assemble the LD Roller as shown below Figure 4 69 Assembling LD Roller 1 1 Match the guide pin of the LD Roller Shaft with the positioning hole of the Clutch 2 Attach the tips of the Extension Spring 0 143 to the tab of the LD Roller shaft and the tab of the Clutch 3 Attach the cam side of the Spur Gear 36 8 to the hole of the Clutch Figure 4 70 Assembling LD Roller 2 A D J U S T M E N...

Страница 61: ...installing the Waste Ink Pads be sure to insert ribs and tabs of the Frame Base into the slots and notches of the pads When installing in the section refer to Figure 4 72 be sure to match the positioning tabs and press until it clicks to secure it in the right position When installing the Waste Ink Pads on the section be sure to lay the six parts one on top of another in the order shown in the fig...

Страница 62: ...and remove the PF Roller Assy Arrow Figure 4 77 Removing PF Roller 3 C A U T I O N Do not touch or damage the coated area of the PF Roller Assy when performing the following work When installing the Spur Gear 13 5 be sure to install a new one The Spur Gear 13 5 cannot be reused C A U T I O N When removing prying the Spur Gear 13 5 with a flathead screw driver or the like do not use the fragile upp...

Страница 63: ...sy Print Head CR Scale CR Motor CR Unit Timing Belt EJ Roller PF Roller Removal procedure 1 Detach the ferrite core from the Main Frame Figure 4 78 Removing PF Motor 1 2 Remove the screws x3 and remove the PF Motor Figure 4 79 Removing PF Motor 2 Ferrite Core Main Frame PF Motor C B S 3X8 Torque 6 1Kgf cm When installing the PF Motor arrange the cable into the slit and the hook then place the ferr...

Страница 64: ... Open the Cartridge Cover and remove all the Ink Cartridges from the Carriage Unit 3 Follow the steps below to remove the Cartridge Cover Hinge 1 Cut off the part of the Cartridge Cover Hinge with a nipper as indicated in the figure 2 Remove the upper part of the Cartridge Cover Hinge 3 Release the tab and remove the lower part of the Cartridge Cover Hinge Figure 4 82 Removing Cartridge Cover Hing...

Страница 65: ...FC from the tabs Figure 4 84 Releasing FFCs from Tabs 7 Disconnect the FFCs x2 that are connected to the CSIC Board and the CR Encoder Board Figure 4 85 Disconnecting Head FFCs 8 Release the tabs x2 that secure the Holder Board Assy and remove the Holder Board Assy upward Figure 4 86 Removing Holder Board Assy Tabs FFCs FFCs Tab 1 Tab 2 Holder Board Assy Tab 1 Holder Board Assy Tab 2 Tab 1 CR Unit...

Страница 66: ... the Holder Board Assy make sure to check if the assy is properly installed in the right position The assy is likely to be installed in the wrong position The Ink Position Label is not included in the Cartridge Cover When replacing the Cartridge Cover order the label separately and attach the Ink Position Label to the place shown below Figure 4 89 Installing Ink Position Label A D J U S T M E N T ...

Страница 67: ...r When installing the Waste Ink Pads be sure to insert ribs and tabs of the Frame Base into the slots and notches of the pads When installing in the section refer to Figure 4 91 be sure to match the positioning tabs and press until it clicks to secure it in the right position When installing the Waste Ink Pads on the section be sure to lay the four parts one on top of another in the order shown in...

Страница 68: ... Guide Upper Main Frame with other parts Parts removed together C A U T I O N After removing the Main Frame treat and place the Main Frame with great care while following the next instructions Be careful not to deform the Main Frame Do not touch or damage the nozzles or the ink supply needles of the Printhead when placing the Main Frame Be careful not to stick the grease around the area especially...

Страница 69: ...Confidential C H A P T E R 5 ADJUSTMENT ...

Страница 70: ...to write the Board common information on a destination basis Use the adjustment program to write the Board information on a destination basis to the Main Board Adjustment Program USB ID Input To enable recognition of each printer on the PC side when several same model printers are connected to the PC via the USB hub Enter the serial number to the adjustment program Operate the function for the adj...

Страница 71: ... pattern based on the criteria and register the appropriate adjustment value to the printer Adjustment Program A4 Plain paper CR heat protection control Assuming production variation of the CR Motor and the PS Board operate this to use the motor capacity to the maximum when the CR Motor generates heat Select the replaced parts in the adjustment program then operate this adjustment to automatically...

Страница 72: ...ts are normal Select and execute the functions by the adjustment program Adjustment Program A4 Letter Plain paper Photo Quality Ink Jet Paper A4 Letter Photo Quality Ink Jet Paper EEPROM data readout Read the EEPROM data for analysis Select this function in the exclusive servicing program and save all data of the EEPROM into a file Adjustment Program Read printer information Waste Ink counter Read...

Страница 73: ...Head Angular adjustment Bi D adjustment PF band adjustment CR heat protection control Hopper Removal Required Required Replacement Required Required Main Frame Removal Required Required Required Required Required Replacement Required Required Required Required Required Required Main Board Removal Replacement Required Replacement EEPROM Copy NG Required Required Ink Pads must be replaced Required R...

Страница 74: ...d Required Replacement Required Required Required Required Required Power Supply Board Removal Replacement Required EJ Frame Assy Removal Required Required Required Required Replacement Required Required Required Required Table 5 4 Adjustment Items Priority 1 2 3 4 5 6 7 8 9 10 11 12 EEPROM data copy Destination setting USB ID input Waste ink pad counter Ink charge Head ID input TOP margin adjustm...

Страница 75: ... 3 and enter the value of that pattern Corrective action If the NG on both ends are the ones with least vertical displacement reassemble replace the Head and carry out the adjustment again FOR EPSON STYLUS C90 C91 C92 D92 T20 T20E T23 T26 S20 T10 T11 ME 30 T21 T24 T27 S21 Patterns are printed as shown below Figure 5 2 Head angular adjustment Pattern Printing Judgment method Find the pattern with n...

Страница 76: ...elect adjustment value 2 1 1 2 and adjust the deviation Each adjustment value shifts the line by 0 85 mm 5 2 3 Bi D Adjustment 8 types of the pattern below each dot size ECO VSD1 VSD2 VSD3 x color Black Color are printed Figure 5 4 Bi D adjustment Pattern Printing Judgment method Find the pattern with no gaps or overleaps of the left and right pattern and enter the value of that pattern Corrective...

Страница 77: ...atter that it is 5mm away from the left edge Corrective action If the an appropriate pattern is not printed reassemble the parts that was removed replaced and carry out the adjustment again 5 2 5 PF Band Adjustment Patterns are printed as shown below Figure 5 6 PF Band Adjustment Pattern Judgment method Select the pattern with no gap or overleap Corrective action If the an appropriate pattern is n...

Страница 78: ...Confidential C H A P T E R Y 6 MAINTENANCE ...

Страница 79: ...ntrol panel operation confirm that the printer is in stand by state the Power LED is lighting and hold down the Error reset button on the control panel for more than 3 seconds Then the printer starts the cleaning sequence the Power LED blinks during this sequence In case that you select and perform the manual cleaning by the printer driver utility the most appropriate cleaning mode is selected The...

Страница 80: ... to the Waste drain ink pad and the amount of the waste ink is stored as the waste ink counter into the EEPROM on the Main board Due to this when the waste ink max counter has reached the limit 9000 of the absorbing capability of the Waste drain ink pad the Maintenance call error is indicated on Status monitor 3 as following figure But waste ink max counter is changed by usage therefore waste ink ...

Страница 81: ... this manual Use of different types of oil or grease may damage the component or give bad influence on the printer function Never apply larger amount of grease than specified in this manual Type Name EPSON code Supplier Grease G 71 1304682 EPSON Grease G 58 1432035 EPSON Grease G 74 1409257 EPSON Lubrication Point Blade A Blade B of LD Roller Lubrication Type G 71 Lubrication Amount φ1mm x along e...

Страница 82: ...nt φ1 mm x along inner edges L Remarks Use an injector to apply G 71 G 71 must not be adhered to other parts Rub off excess G 71 with a cotton bud if necessary Lubrication Point Bearing A Lower Housing Bearing C Bearing B Lubrication Point Lubrication Point Lubrication Point Shaft and Groove of PF Roller Lubrication Type G 71 Lubrication Point φ1 mm x around shaft x 2 Remarks Use an injector to ap...

Страница 83: ...G 74 G 74 must not be adhered to other parts Rotate EJ Roller when lubricate it with G 74 Lubrication Points x 19 355 mm 2 1 Main Frame Lubrication Point Upper rib x 1 Area 1 in Figure 6 11 Lubrication Point G 71 Lubrication Amount φ 1 mm x 355 mm along upper rib See Figure 6 11 Remarks Use an injector to apply G 71 G 71 must not be adhered to other parts Rub off excess G 71 with a cotton bud if n...

Страница 84: ...Confidential C H A P T E R 7 APPENDIX ...

Страница 85: ...20E T23 T26 S20 T10 T11 ME 30 T21 T24 T27 S21 Revision E APPENDIX Exploded Diagram Parts List 85 Confidential 7 1 Exploded Diagram Parts List This manual does not provide exploded diagrams or parts list For the information see SPI Service Parts Information ...

Отзывы: