


EPSON Stylus Photo 750
Revision A
Disassembly and Assembly
Disassembly
60
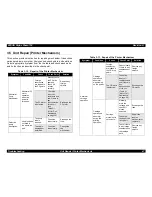
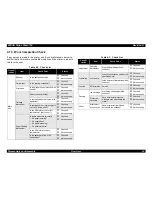
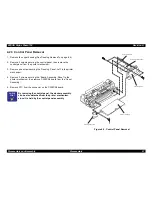
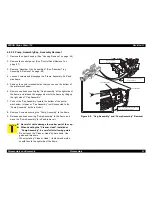
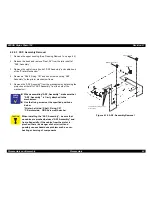
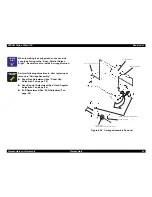
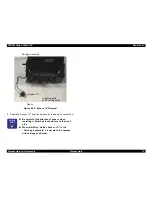
Figure 4-8. Print Head Installation
C H E C K
P O I N T
„
Be sure that the grounding plate is installed to the
carriage correctly. (There are 2 fixing pins on the
carriage.
„
After installing the print head to the carriage, be
sure that the fixing pin at the carriage side is
correctly located into the cut out of the printhead
unit.
P o s i t i o n n i n g P i n
P o s i t i o n n i n g P i n
T h i s s h o u l d c o n t a c t
t h e C R b u s h
C R A s s e m b l y
P r i n t h e a d U n i t
C A U T I O N
„
Install the new cartridge before sending the printer
back to the user, since the ink cartridge once taken
out can not be used again.
„
When you return the printer to the user, pack the
printer in the state that the ink cartridges are
installed in the printer and carriage is in the home
position.
A D J U S T M E N T
R E Q U I R E D
Perform the following adjustment after replacing the
print head.
1. Ink Initial Charge (See “Initial Ink Charge” on
page -88)
2. Head ID Writing (See “Head Voltage ID
Adjustment” on page -83)
3. Head Angular Adjustment (See “Head Angular
Adjustment” on page -84)
Содержание Stylus Photo 750
Страница 1: ...EPSON Stylus Photo750 Color Inkjet Printer SEIJ98005 6 59 0 18 6 59 0 18 6 59 0 18 6 59 0 18 ...
Страница 8: ... 3 7 5 4 PRODUCTDESCRIPTION ...
Страница 32: ... 3 7 5 5 OPERATINGPRINCIPLES ...
Страница 43: ... 3 7 5 6 TROUBLESHOOTING ...
Страница 55: ... 3 7 5 7 DISASSEMBLYANDASSEMBLY ...
Страница 81: ... 3 7 5 8 ADJUSTMENT ...
Страница 95: ... 3 7 5 9 MAINTENANCE ...
Страница 101: ... 3 7 5 APPENDIX ...
Страница 111: ......
Страница 112: ......
Страница 113: ......
Страница 114: ......


