


EPSON Stylus Photo 750
Revision A
Disassembly and Assembly
Disassembly
59
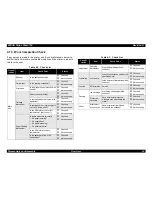
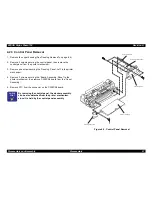
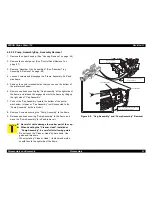
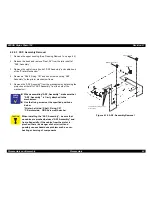
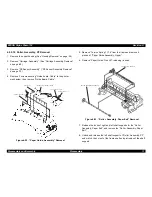
4.2.5 Printer Mechanism Removal
4.2.5.1 Print Head Removal
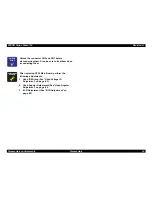
1. Remove the upper housing.(See “Housing Removal” on page -54)
2. Rotate “Gear, 67.2” toward the front side of the printer and release
the carriage lock mechanism. Then, move the carriage assembly to
the left side.
3. Remove black and color ink cartridges.
4. Remove “Cover, Cartridge, B” and “Cover, Cartridge, C” from the
carriage assembly.
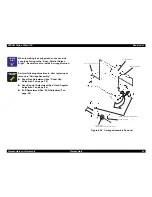
5. Remove the “Torsion Spring, 49” and one screw. Then, remove the
“Fastner, Head”.
6. Remove the “Head FFC” installed to the carriage assembly, and
remove the “Print Head Unit” form the carriage.
7. Remove the “Head FFC” from the connector on the driver board of
print head unit.
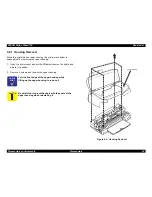
Figure 4-7. Print Head Removal
P r i n t h e a d U n i t
F l a t C a b l e
T o r s i o n S p r i n g , 4 9
F a s t n e r , H e a d
Содержание Stylus Photo 750
Страница 1: ...EPSON Stylus Photo750 Color Inkjet Printer SEIJ98005 6 59 0 18 6 59 0 18 6 59 0 18 6 59 0 18 ...
Страница 8: ... 3 7 5 4 PRODUCTDESCRIPTION ...
Страница 32: ... 3 7 5 5 OPERATINGPRINCIPLES ...
Страница 43: ... 3 7 5 6 TROUBLESHOOTING ...
Страница 55: ... 3 7 5 7 DISASSEMBLYANDASSEMBLY ...
Страница 81: ... 3 7 5 8 ADJUSTMENT ...
Страница 95: ... 3 7 5 9 MAINTENANCE ...
Страница 101: ... 3 7 5 APPENDIX ...
Страница 111: ......
Страница 112: ......
Страница 113: ......
Страница 114: ......


