EPSON Stylus Photo 720 / EPSON Stylus Photo EX3
Revision A
Disassembly and Assembly
Disassembly
79
8.
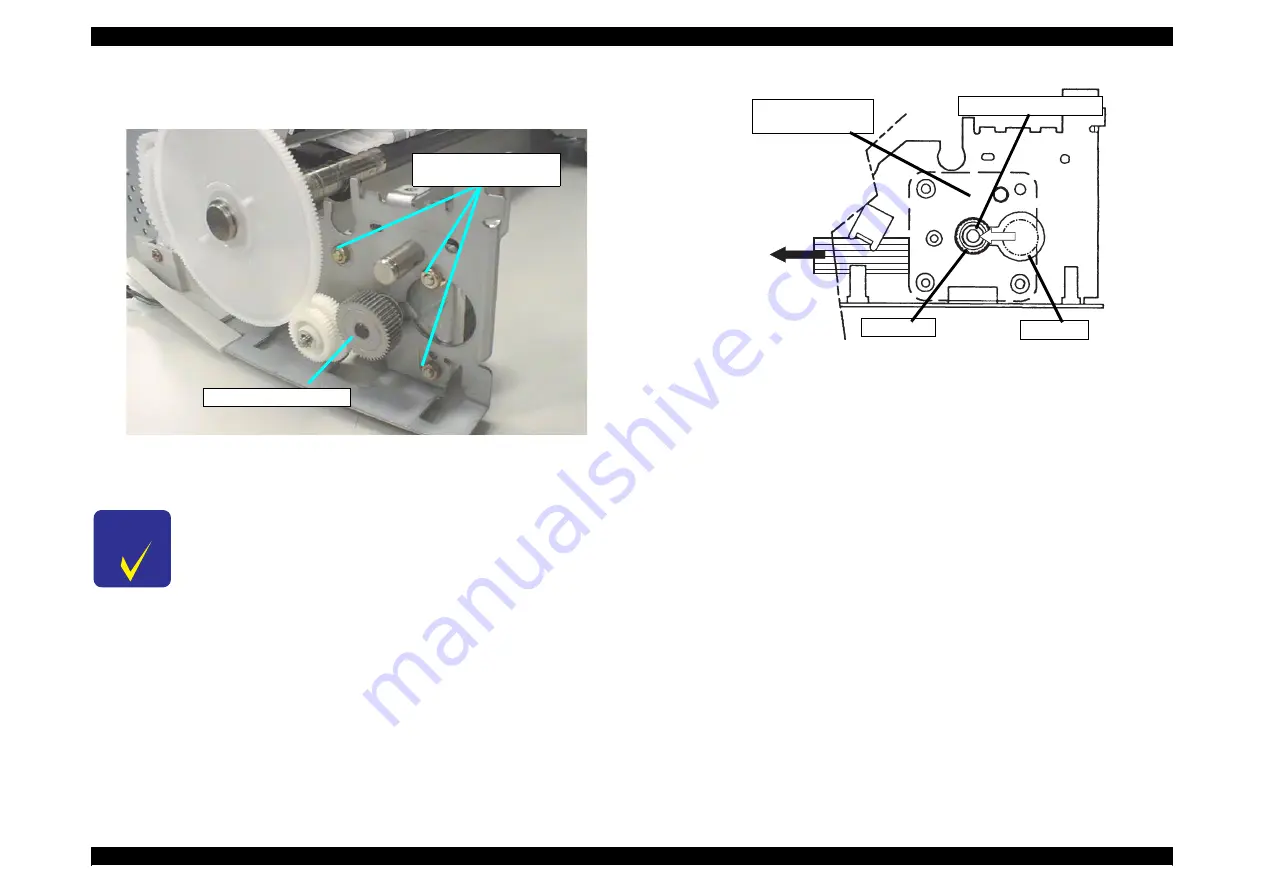
Remove 3 Hexagon Nuts and shift the PF Motor Assembly to the front side of the
printer to remove it. (Refer to Figure 4-18.)
Figure 4-18. 3 Hexagon Nuts Securing the PF Motor
Figure 4-19. PF Motor Assembly Installation
C H E C K
P O I N T
n
When removing the PF Motor Assembly, first slightly pull out
the PF Motor Assembly from the frame and slide the Motor
Shaft to a larger cutoff of the frame and remove it.
n
Be careful for the routing direction of the cable from the PF
Motor Assembly. (Refer to Figure 4-19.)
PF Motor Pinion Gear
3 Hexagon Nuts Securing
the PF Motor
C a b l e D i r e c t i o n
Small Hole
Large Hole
PF Motor Pinion Shaft
PF Motor
(Behind the Frame)
Содержание Stylus Photo 720
Страница 5: ...Revision Status Revision Issued Date Description Rev A April 6 2000 First Release ...
Страница 8: ...C H A P T E R 1 PRODUCTDESCRIPTION ...
Страница 29: ...C H A P T E R 2 OPERATINGPRINCIPLES ...
Страница 51: ...C H A P T E R 3 TROUBLESHOOTING ...
Страница 64: ...C H A P T E R 4 DISASSEMBLYANDASSEMBLY ...
Страница 94: ...C H A P T E R 5 ADJUSTMENT ...
Страница 114: ...C H A P T E R 6 MAINTENANCE ...
Страница 121: ...C H A P T E R 7 APPENDIX ...
Страница 150: ......
Страница 151: ......
Страница 152: ......
Страница 153: ......
Страница 154: ......


