background image

Stylus C41/42/43/44 series

Revision B

Disassembly and Assembly

Disassembly

32

2.2.9  LD unit removal

1.

Remove the upper housing. (Refer to Section 2.2.1)

2.

Remove the ASF unit. (Refer to Section 2.2.2)

3.

Disconnect the cables which are connected to the LD unit.

4.

Disconnect connector CN4 form the MAIN board.

Figure 2-34.  Disconnecting the Cables

5.

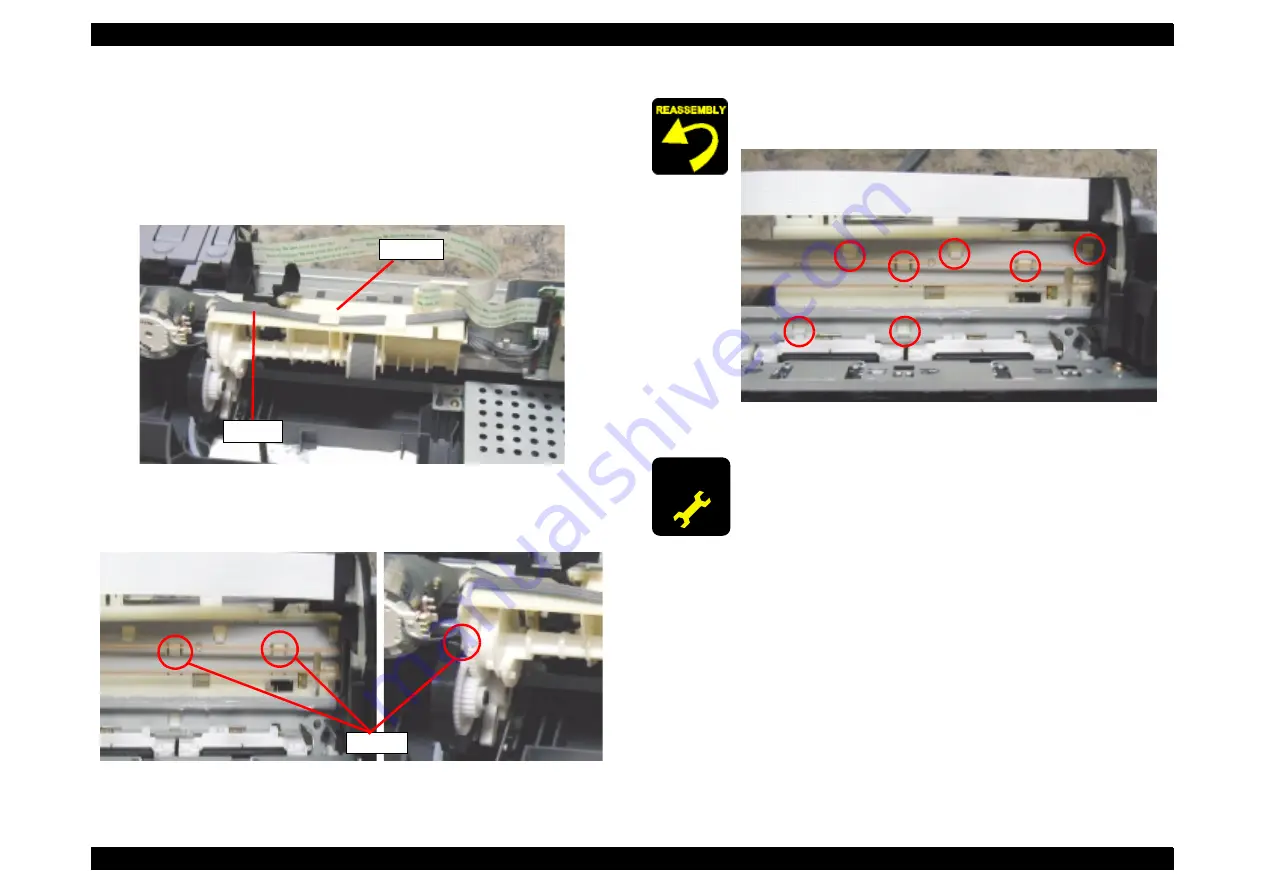
Push the two hooks on the LD unit, then lift it up and remove hook of pump unit

Figure 2-35.  Removing the LD unit

LD unit

Cables

Hooks

T

When reassembling the LD unit, make sure that seven hooks are 
set to the Main frame.

Figure 2-36.  Setting seven hooks

A D J U S T M E N T

R E Q U I R E D

The Top Margin adjustment is required when the LD unit is replaced.

Содержание Stylus C42 Series

Страница 1: ...StylusC41 42 43 44series Color Inkjet Printer SEIJ01011 SERVICE MANUAL ...

Страница 2: ... greatly appreciate being informed of them V The contents of this manual are subject to change without notice V The above not withstanding SEIKO EPSON CORPORATION can assume no responsibility for any errors in this manual or the consequences thereof EPSON is a registered trademark of SEIKO EPSON CORPORATION General Notice Other product names used herein are for identification purpose only and may ...

Страница 3: ...E MUST BE CONNECTED USE EXTREME CAUTION IN WORKING ON POWER SUPPLY AND OTHER ELECTRONIC COMPONENTS 4 WHEN DISASSEMBLING OR ASSEMBLING A PRODUCT MAKE SURE TO WEAR GLOVES TO AVOID INJURIER FROM METAL PARTS WITH SHARP EDGES WARNING 1 REPAIRS ON EPSON PRODUCT SHOULD BE PERFORMED ONLY BY AN EPSON CERTIFIED REPAIR TECHNICIAN 2 MAKE CERTAIN THAT THE SOURCE VOLTAGES IS THE SAME AS THE RATED VOLTAGE LISTED...

Страница 4: ...ference Electrical circuit boards schematics Exploded diagram Parts List Symbols Used in this Manual Various symbols are used throughout this manual either to provide additional information on a specific topic or to warn of possible danger present during a procedure or an action Be aware of all symbols when they are used and always read NOTE CAUTION or WARNING messages Indicates an operating or ma...

Страница 5: ...ndicates that a particular task must be carried out according to a certain standard after disassembly and before re assembly otherwise the quality of the components in question may be adversely affected ...

Страница 6: ...Revision Status Revision Issued Date Description A March 29 2002 First Release B January 20 2003 The model name Stylus C43 C44 series is added ...

Страница 7: ...eject roller removal 23 2 2 6 Paper Guide Upper Left removal 25 2 2 7 MAIN board removal 27 2 2 8 Printhead unit removal 29 2 2 9 LD unit removal 32 Chapter 3 Adjustment 3 1 Overview 34 3 1 1 Required Adjustment 34 3 1 2 Adjustment Program Initial Setting menu 35 3 1 3 Adjustment Program feature 36 3 1 4 EEPROM initial setting 38 3 1 5 Head ID 39 3 1 6 Bi D 40 3 1 7 USB ID 42 3 1 8 First Dot Posit...

Страница 8: ...C H A P T E R PRODUCTDESCRIPTION ...

Страница 9: ...Paper Handling Friction feed with ASF Top in front out Holds 100 cut sheets 65 g m Holds 10 envelopes Holds 10 transparency films Paper Specification Cut sheet A4 Letter Legal Half Letter Exclusive A5 A6 Thickness 0 08 mm 0 003 0 11 mm 0 004 Weight 64 g m 2 17 lb 55Kg 90 g m 2 24 lb 78Kg Quality Exclusive paper Bond paper PPC Envelope No 10 DL C6 Envelope220 132 Weight 10 DL C6 45 g m 2 12 lb 75 g...

Страница 10: ...to 870 1270 and lately models Table 1 5 Ink cartridge type USB The Stylus C4xUX C2xUX are adopting USB 2 0 interface NOTE The EPSON standard USB cable or less than 3m length USB cable are commended for connection POWER SUPPLY As the Stylus C4x are adopting the universal power supply the power supply board is only one type Table 1 6 Power supply type Model name Market Stylus C41 Mainly Asia Pacific...

Страница 11: ...icator condition in Ink exchange sequence 1 see Errors on page 12 SW Function Error Reset SW Loads or Ejects the Paper Pushing within 3seconds Starts the Cleaning of head Pushing for 3seconds When carriage is on the Ink Cartridge change position return carriage from Ink Cartridge change position Starts the Ink Cartridge change Pushing for 6seconds SW Function Error Reset SW Starts status printings...

Страница 12: ...e V Paper out When printer fails to load a sheet it goes paper out error V Paper jam When printer fails to eject a sheet it goes paper jam error V No ink cartridge When printer detects that ink cartridge comes off it goes this error mode V Maintenance request When the total quantity of ink wasted through the cleanings and flushing is reaches to the limit printer indicates this error and stops The ...

Страница 13: ...C H A P T E R DISASSEMBLYANDASSEMBLY ...

Страница 14: ...r protective goggles to protect your eyes from ink If ink gets in your eye flush the eye with fresh water and see a doctor immediately T Always wear gloves for disassembly and reassembly to avoid injury from sharp metal edges T To protect sensitive microprocessors and circuitry use static discharge equipment such as anti static wrist straps when accessing internal components T Never touch the ink ...

Страница 15: ...ue par une pile du même type ou d un type équivalent recommandé par le fabricant Eliminer les piles déchargées selon les lois et les règles de sécurité en vigueur C A U T I O N T Never remove the ink cartridge from the carriage unless this manual specifies to do so T When transporting the printer to the customer after servicing be sure to pack the printer for transportation without removing the in...

Страница 16: ...Stylus C41 42 43 44 series Revision B Disassembly and Assembly Overview 16 2 1 3 Screws Table 2 2 No Name and Specification Outward Form 1 CBS 3x6 2 CBP 3x8 3 CBS P2 3x6 4 CBS 3x8 5 C P F S Tite 3x12 ...

Страница 17: ...rrect temperature Not too heated V Checked V Not necessary Paper Feeding Mechanism Is paper advanced smoothly No paper jamming No paper skew No multiple feeding No abnormal noise V Checked V Not necessary Is the PF Motor at correct temperature V Checked V Not necessary Is the paper path free of any obstructions V Checked V Not necessary Adjustment Specified Adjustment Are all the adjustment done c...

Страница 18: ...he edge guide is in the upper housing s notch position Figure 2 2 Position of Edge guide C A U T I O N Do not remove the Main Frame from the Lower Housing to avoid the deformation of the Main Frame Therefore you cannot remove the following parts T Lower Housing T Main Frame T PF Motor T Pump Unit T Cap Unit T PF Roller Assy Upper housing removal Page 18 ASF unit removal PS unit removal MAIN board ...

Страница 19: ...river Figure 2 3 Removing the front hook 3 Remove the 2 hooks on the sides by pushing the tops of the hooks up Figure 2 4 Removing the side hook 4 Remove the 3 hooks at the back using a screwdriver or similar tool Figure 2 5 Removing the back hook C A U T I O N The printer should not turn when the front 2 hooks are removed Upper housing ...

Страница 20: ...n installing the ASF unit install the spring in the guide then install it while supporting it by hand Figure 2 7 reassembling the ASF unit T When reassembling the ASF unit tighten screws form lower numbers in Figure2 6 T Tightening Torque for screw C B S 3x6 9 1 kgf cm C B S P2 3x6 9 1 kgf cm C B P 3x8 6 1 kgf cm CBP 3 8 CBP 3 6 CBS P2 3 6 3 3 3 3 1 1 1 1 2 2 2 2 A D J U S T M E N T R E Q U I R E ...

Страница 21: ...8 Removing the Waste ink pad T When assembling the Waste ink pad be sure to set the tip of the ink tube in the correct position of the Waste ink pad Otherwise it will cause ink leakage Figure 2 9 Tip of ink tube setting position tube stopper Waste ink pad A D J U S T M E N T R E Q U I R E D When the Waste ink pad is replaced with a new one following service item is required T Waste ink counter res...

Страница 22: ...rews Figure 2 10 Removing the PS unit 5 Pull the PS unit out while lifting up on it C B P 3 8 C B S 3 6 PS unit CN2 T When installing the PS unit make sure the claws are attached to the hooks on the lower housing Figure 2 11 Reassembling the PS unit T Do not insert the pin of the PS cable to the leftmost side of the connector because the 1st pint of its cable is cut Figure 2 12 Connecting the PS c...

Страница 23: ...2 Grip the dowel pin of the PE roller s gear turn it clockwise and release the carriage lock Figure 2 13 Releasing the carriage lock 3 Move the carriage to the center 4 Take out the two screws Figure 2 14 Take out the screw 5 Return the carriage to the home position then remove the Front Frame Figure 2 15 Removing the Front Frame Protrusion CBS 3 6 Front Frame ...

Страница 24: ...n remove the Paper eject roller Figure 2 17 Removing the Paper eject roller Paper Eject roller Gear C A U T I O N T If the Paper eject roller gear and Paper eject roller shaft are removed or make sure that neither of the Paper eject roller shaft hooks is damaged If either of the hooks is damaged it should be replaced with a new one Figure 2 18 Hook of Paper eject roller T Tightening Torque for scr...

Страница 25: ...t and the PF roller by rotating the protrusion of the Paper Eject roller gear in CW direction Figure 2 19 Place the OHP sheet 3 Press the dowel of the paper guide unit with tweezers etc then pull it forward and remove it Figure 2 20 Removing the Paper Guide Upper Left C A U T I O N Perform this operation by the following procedures so that the coating material of the PF roller does not damage Prot...

Страница 26: ...roller Figure 2 22 Placing the OHP sheet OHP paper 3 Assemble the Paper Guide Upper Left to the Main Frame Figure 2 23 Assembling the Paper Guide 1 4 Fix the dowel of the Paper Guide Upper Left to the hole of the Main Frame by sliding the Paper Guide Upper Left to the right side And release the spring from the hook of the Paper Guide Upper Left Figure 2 24 Assembling the Paper Guide 2 dowel Releas...

Страница 27: ...ng Refer to Section 2 2 1 2 Remove the ASF unit Refer to Section 2 2 2 3 Remove the PS unit Refer to Section 2 2 4 4 Remove the three screws then remove the shield cover 5 Eject the OHP sheet from the printer by rotating the protrusion of the Paper Eject roller gear in CW direction Figure 2 25 Ejecting the OHP sheet Protrusion ...

Страница 28: ...ecting the connectors 6 Take out the 1 screw Refer to Figure 2 27 7 Lift the MAIN board up and remove it CBS 3 6 USB Type Parallel Type CBS 3 6 C P F S Tight 3 12 Tightening Torque for screw T USB Type C B S 3x6 screw 9 1 kgf cm C B S 3x8 screw 9 1 kgf cm T Parallel Type C B S 3x6 screw 9 1 kgf cm C P F S Tight 3x12 screw 9 1 kgf cm C B S 3x8 screw 9 1 kgf cm CN9 CN4 CN7 CN12 CBS 3 8 ...

Страница 29: ...Main board and write the read out data to the new Main board through the Adjustment program EEPROM back up data on page 51 1 I C Ink consumption counter 2 Waste ink drain pad counter 3 EEPROM Initial setting 4 Head ID input 5 Top margin adjustment 6 Bi D adjustment In case the above mentioned data are not able to be read out from the defective Main board perform the following service items T Repla...

Страница 30: ...he two hook fixing between the Printhead unit and carriage cover on the both sides of the carriage unit then pull the unit forward and remove the cover Figure 2 31 Release the two hooks 8 Lift the Printhead unit up and remove it T When reassembling the CR motor it contact the lib of Main frame after turning clockwise Figure 2 29 Reassembling the CR motor T Tightening Torque for screw C B S 3x6 scr...

Страница 31: ... one make sure that the Carriage timing belt is set in the assembling groove correctly as following figure A D J U S T M E N T R E Q U I R E D When the Printhead is replaced with a new one following adjustments must be performed in the order below Refer to Table 3 1 1 Initial ink charge 2 Head ID input 3 Bi D adjustment When the Printhead is removed and reinstalled only the following adjustment is...

Страница 32: ... LD unit 4 Disconnect connector CN4 form the MAIN board Figure 2 34 Disconnecting the Cables 5 Push the two hooks on the LD unit then lift it up and remove hook of pump unit Figure 2 35 Removing the LD unit LD unit Cables Hooks T When reassembling the LD unit make sure that seven hooks are set to the Main frame Figure 2 36 Setting seven hooks A D J U S T M E N T R E Q U I R E D The Top Margin adju...

Страница 33: ...C H A P T E R ADJUSTMENT ...

Страница 34: ... each adjustment by Adjustment Program In this printer it is necessary to set the adjusting information for each printer mechanism in order to maintain consistent printing function and quality eliminating differences of each printer mechanism s characteristics Therefore in case that the combination of the printer mechanism and main board changes or the print head is replaced during the repair serv...

Страница 35: ... LPT2 LPT3 EPUSB1 EPUSB2 EPUSB3 1 When you run this program the following menu appears Select the model name in the screen below Figure 3 1 Model Name Selection NOTE This printer stores model name in the PROM Therefore even you select the model name in the screen above model name will not stored in the EEPROM Selecting model name in the screen above determines respective special command for each m...

Страница 36: ...gram can get the several error statuses even if the printer is error condition and can control the printer under the error condition Following explain you the common function of the Adjustment program V Quit If you want to exit this program click the Quit button Following menu is displayed on the screen And clicking the Quit Button in the following menu exit the adjustment program completely Click...

Страница 37: ...e printer status even if the printer is error condition except the main logic circuit failure and control the printer by using the D4 mode functions Figure 3 5 Get status function C A U T I O N This program dose not display the Paper out error status in the Bi d adjustment even if the paper is out in the ASF When the paper is out in the ASF this program continues to send the paper feed command unt...

Страница 38: ...function enables writing of the initial setting values to the new MAIN board s EEPROM 1 Choose the EEPROM initial setting in the Adjustment menu Figure 3 6 EEPROM initial setting 1 2 Click the OK button then the initial setting values are written to the MAIN board If choose Check the destination setting will be appera Figure 3 7 EEPROM initial setting 2 ...

Страница 39: ...ge ID on the following position T Printhead On the top right face of the printhead A 6 digit ID code is printed with the QR code on the label T Printer mechanism On the label of the packing box of the printer mechanism 2 Run the Adjustment program and enter the Adjustment Main menu 3 Choose the Head ID and click it The menu shown in the next page appears Figure 3 8 Head ID input menu 4 Choose the ...

Страница 40: ...ting timing in right and left directions during the Bi directional printing Therefore you are required to perform this adjustment after performing the following operations T Replacing the Print mechanism T Replacing the main board T Replacing the CR motor T Replacing the Printhead 1 Choose the Bi D in the Adjustment menu as following figure Figure 3 11 Choose the Bi d adjustment 2 Choose the Print...

Страница 41: ... can always confirm and adjust the pattern correctly by referring to gap amount only 3 Click the Previous and go back to the BI Directional Adjustment menu And choose the Adjust menu and click the OK button 4 Check the printed pattern and find the misaligned dot type Choose the misaligned dot size in the following menu and click the OK button Figure 3 13 Choose the misaligned dot size 5 By choosin...

Страница 42: ... from the specific address of the printer s EEPROM and the provides the USB port number to the unique code The USB port driver controls the several USB ports under the Windows 98 environment A unique code called USB ID is input to the specific address of the EEPROM in our manufactory and the following total 18 digit code is used as a USB ID for the EPSON ink jet printer T Factory line number 3 dig...

Страница 43: ...and click OK button NOTE Even though you input irresponsible another 10digits code and click the OK button the program allow to input the code and write down it the specific address of the EEPROM But there is a possibility that the code is not unique and the code conflicts another USB ID in the USB port driver C A U T I O N T In case the USB ID is not input in the adjustment program after the main...

Страница 44: ...ft margin from the paper left edge of print pattern to vertical pole of print start position Refer to Figure 3 36 3 Change setting by pressing r s button beside or under the predetermined figure 4 If following indication appears set printer power OFF ON in order to record predetermined limit to printer at first 5 Press OK button after confirming 6 Repeat above 2 to 5 and adjust so that left margin...

Страница 45: ...nism T Replacing the main board 1 Choose the Top margin in the Adjustment menu Figure 3 20 Choose the Top margin menu 2 Choose the Print the Top margin in the Top margin adjustment and click the OK button Figure 3 21 Top margin adjustment pattern 3 Check that the printed horizontal line is in 2 6mm 7 2mm from the top of the paper If it is out of the specific range perform the Top Margin adjustment...

Страница 46: ...its perform initial ink charge and return the printer after making sure that ink is ejected correctly from the printhead T After replacing the printer mechanism T After replacing or removing the printhead 1 Choose the Initial ink charge in the Maintenance menu Figure 3 23 Choose the Initial Ink Charge menu 2 Click the OK button in the menu The initial ink charge is performed NOTE As described in t...

Страница 47: ...the Waste drain ink pad counter Otherwise the ink or S46 liquid may leak from the pad during the transportation T Prepare the following tool Dummy ink cartridge Injector S46 liquid T Do not carry out this program repeatedly This operation is available only one time Excessive operation causes overflow of the ink and S46 liquid T When you refurbish the repair product by using this program do it on y...

Страница 48: ...k the present counter values in the Maintenance menu and click the OK button Figure 3 25 Choose the Check the present counter value 2 After read the Caution description on the above menu click the OK button in the menu The present counter value is displayed on the bottom column as following figure Figure 3 26 Present counter value 3 If the present counter value is over 5845 points we recommend you...

Страница 49: ...27 Choose the Clear the present counter value 2 After you read the description on the menu click the OK button Figure 3 28 Clear the present counter value C A U T I O N Be sure to replace the installed waste ink pad with a new one after or before you clear the current protection counter value C H E C K P O I N T The initial value of the Protection counter is differ by destination as bellow T ESP 0...

Страница 50: ... menu The main menu of this function is as following figure The following two functions are built in this program Figure 3 29 EEPROM check function T Check the EEPROM data You can check the specific data stored in the specific address of the EEPROM Input the specific address with hexadecimal code Use this function in your analysis usefully Figure 3 30 Check the EEPROM data T Change EEPROM data You...

Страница 51: ...e menu Figure 3 32 EEPROM backup data 2 The EEPROM data on the current MAIN board are backed up by clicking the OK button The following message is displayed when the data backup operation is completed Replace the printer s MAIN board then turn the power ON again and click the OK button Figure 3 33 Replace the defective main board with new one 3 The backed up data will be written to the EEPROM on t...

Страница 52: ...rinting C H E C K P O I N T T The check point for the first black and each color solid pattern beta pattern 360 x 360dpi normal dot in the A4 Check pattern is as follows Any white line is not observed Uneven banding is not observed extremely T The check point for the second Nozzle check pattern 120dpi is as follows Ink is fired from all nozzles Uneven banding is not observed extremely T The check ...

Страница 53: ...Stylus C41 42 43 44 series Revision B Adjustment Overview 53 Figure 3 35 A4 Check pattern ...

Страница 54: ...C H A P T E R MAINTENANCE ...

Страница 55: ...te ink pad while counting the amount of the waste ink Once the amount of the waste ink reaches the predetermined limit the printer indicates Maintenance Error and the waste ink pad should be replaced T Overflow Counter Limit Overflow Counter Protection Counter A 8350 T Timing for Replacing the Waste Ink Pad When the total amount of the waste ink reaches the predetermined limit the LED indicates Ma...

Страница 56: ...plier Grease G 46 1039172 EPSON Grease G 58 1082176 EPSON Table 4 2 Lubrication Type Point No Lubrication Type Point Remarks 1 Lubrication Point Specified area on the Main frame Refer to Figure 4 1 Lubrication point 1 Lubrication Type G 58 Lubrication Amount 100mg x 4 points Use a brush to apply it After lubrication move the CR unit left or right and smooth out the grease on the Front frame 2 Lubr...

Страница 57: ...lus C41 42 43 44 series Revision B Maintenance Overview 57 Figure 4 1 Lubrication point 1 Figure 4 2 Lubrication point 2 Figure 4 3 Lubrication point 3 G 58 G 58 Main frame right side view 200mm G 58 G 46 ...

Страница 58: ...C H A P T E R APPENDIX ...

Страница 59: ...l Circuits 59 5 1 Electrical Circuits See the following pages for the electric circuit diagrams below V C482MAIN C Stylus C41 42 UX series control circuit board V C482MAIN D Stylus C41 42P SX series control circuit board V C482PSH Power supply circuit board ...

Страница 60: ......

Страница 61: ......

Страница 62: ......

Отзывы: