B
In the
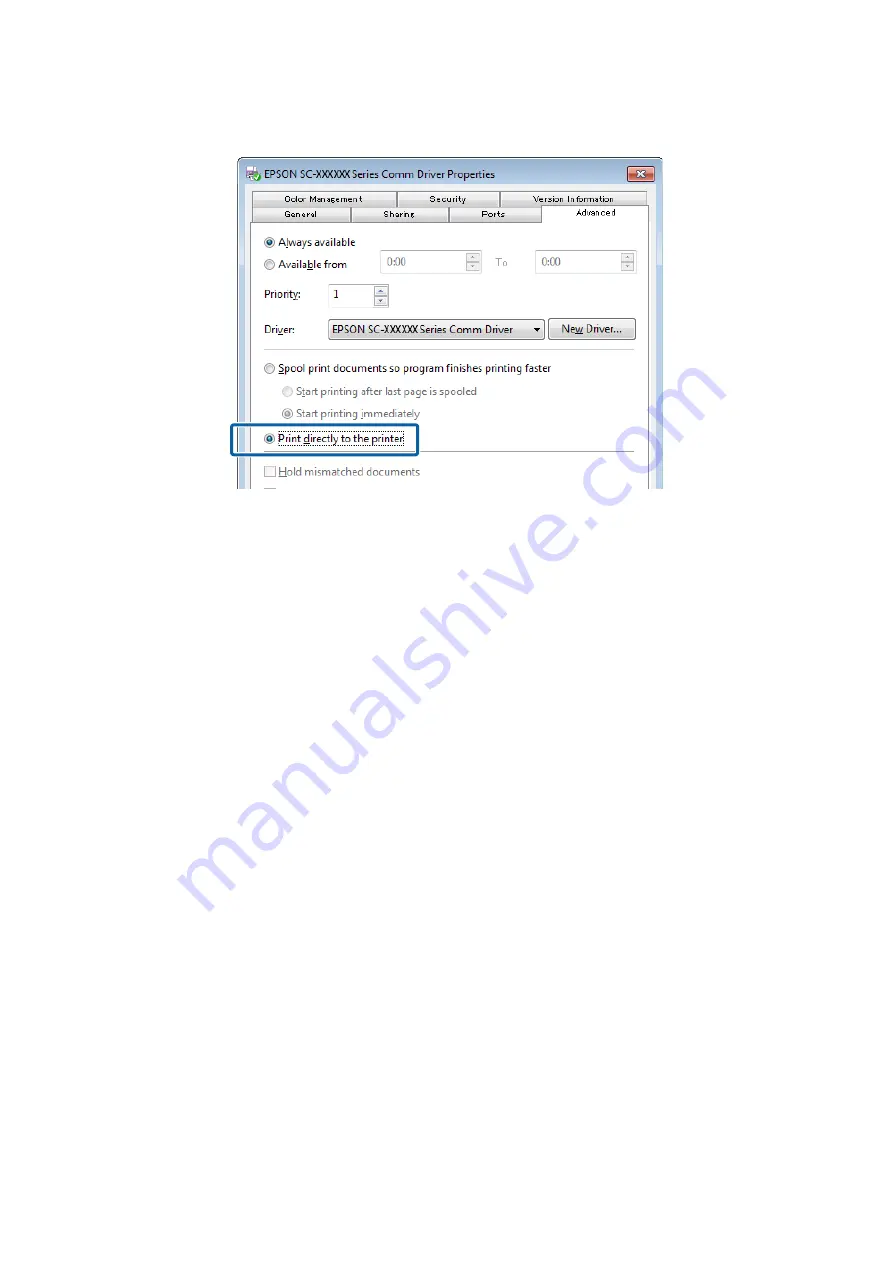
Advanced
tab, select the spooling method
Print directly to the printer
.
Epson Manual for RIP Printing (ONYX RIP)
Troubleshooting
34
Страница 1: ...Manual for RIP Printing ONYX RIP CMP0097 00 EN ...
Страница 2: ...cking it 26 Hot Folder Printing 28 Canceling Printing 29 Troubleshooting EMX Files Cannot Be Downloaded on the Dashboard 31 FailedtoRegistertheMediaSettingValues Failed to Import Print Information 31 The Estimated Print Time Does Not Match Windows Only 33 The Seams between Pages Stand Out 35 For ONYX RIP 36 MatchingthePrintResultstotheDisplayedColor of Print Data 37 Checking the Print Results with...
Страница 3: ...ks of their respective owners Epson disclaims any and all rights in those marks 2016 Seiko Epson Corporation All rights reserved Screen Appearance The screens in this manual may slightly differ from the actual screens Also be aware that the screens may differ due to a difference in the OS or the usage environment The software RIP screens that appear in this manual use the following screens unless ...
Страница 4: ...or media settings temperature of the heater platen gap etc that are registered to the printer Printinformation SuchsettinginformationasresolutionandthenumberofprintpassesandICCprofilesthatare read and used by the RIP Download and import EMX files with the Epson software Epson Control Dashboard InthismanualweexplainthebasicproceduresforRIPprintingthatusesEMXfiles Alsoseethesupplementalmanual Printi...
Страница 5: ...e preparations for printing are done when printing on media for the first time or printing on new media They do not need to be done every day for all print jobs The procedure may differ depending on the RIP you are using Preparations for Printing 1 On the Dashboard download the EMX files for the media on which you are printing U Downloading EMX Files on page 7 2 Register the values of the media se...
Страница 6: ... do not need to do step 1 1 Load media in the printer and select the media setting number Correctly load the media and select the media setting number that has been registered to the printer See Operator s Guide booklet online manual for details about the procedure 2 Read the print data to the RIP and then print it U Print Operations on page 26 Epson Manual for RIP Printing ONYX RIP Introduction 6...
Страница 7: ... If you are using multiple printer models download the EMX files that are specific to each model If you have finished registering your printer on the Dashboard start from step 3 A Start the Dashboard Select the tab for registering printers and then click Search AnyunregisteredprintersthatareconnectedtothenetworkorthatareconnectedbyUSBtoyourcomputerare displayed Epson Manual for RIP Printing ONYX R...
Страница 8: ...n click Apply Dataisbeingacquiredfromtheprinterwhiletheiconthatdisplaystheprinter sstatusiconis Donotoperate the computer C On the Home screen click your printer D Click Media Settings Epson Manual for RIP Printing ONYX RIP Preparations for Printing 8 ...
Страница 9: ...d then click Download The EMX files are saved in the following locations You cannot change the location in which they are saved Windows PUBLIC Documents Epson Control Dashboard XXX Mac OS X Library Caches Epson Epson Control Dashboard XXX The final XXX are the 3 characters after SC for the model of your printer e g S80 when the model is SC S80600 Series Epson Manual for RIP Printing ONYX RIP Prepa...
Страница 10: ...6 through 7 to download them one at a time H Click Close The EMX files are imported and the list of source media settings is displayed You cannot click Close while downloading EMX files Wait until the button becomes enabled Next register the media setting values to the printer U Registering the Media Setting Values to the Printer on page 11 cImportant Be sure toregister the mediasetting values tot...
Страница 11: ...egistration of the media setting values may be unsuccessful if you operate the printer s control panel or print while registering We recommend telling those around you before you start registration when there are several users sharing the printer If you are continuing to register after downloading the EMX files start from step 3 A Start the Dashboard On the Home screen click your printer B Click M...
Страница 12: ... printer is connected by any other means proceed to step 5 D Click to update to the latest printer status E In Target click the media setting that writes the settings Be aware that the values for the settings are overwritten if you select media settings to which settings have already been saved Epson Manual for RIP Printing ONYX RIP Preparations for Printing 12 ...
Страница 13: ...er click to edit the settings G Check that the icon that displays the printer s status is Ready and then click Apply The media setting values are written to the printer If you are using multiple printers of the same model or if you are using multiple models register the media settings to all of the printers using the same steps Epson Manual for RIP Printing ONYX RIP Preparations for Printing 13 ...
Страница 14: ...ntheprinterandautomaticallyimportstheprintinformation from the EMX files Initial Settings for the RIP After installing ONYX RIP copy the Epson special profile for wide color gamut printing to the appropriate folder If you have finished installing ONYX RIP start from step 2 A Install ONYX RIP and the printer driver PrnInst for ONYX RIP If the following screen appears during installations copy and i...
Страница 15: ...add the printers using the following procedure Adding Printers A Right click the RIP Queue icon and select Run as administrator Be sure to start using administrator mode B Click in the order of File Manage Printers C Select the printer you want to add and then right click and select Duplicate Epson Manual for RIP Printing ONYX RIP Preparations for Printing 15 ...
Страница 16: ...r Port and then click Configure With USB connection Select Print to Windows Printer Driver and select your printer With network connection Select TCP IP and input the IP address displayed on the Home screen of the Dashboard to Host name or IP address Epson Manual for RIP Printing ONYX RIP Preparations for Printing 16 ...
Страница 17: ...inputting the IP address by clicking Test Once you have finished doing the settings click OK to return to the Device tab G On the Device tab click Features H Select Global Printer Options and click Configure Epson Manual for RIP Printing ONYX RIP Preparations for Printing 17 ...
Страница 18: ...ick OK to automatically import the print information to the RIP If you are starting the RIP for the first time If on the printer you selected a media settings number for media that does not have print information imported to the RIP After you select The media will automaticallybe imported the print information is automatically imported without displaying a confirmation screen Epson Manual for RIP ...
Страница 19: ...con B Click Configure Printer in the toolbar C On the Device tab click Features D Select Global Printer Options and click Configure E Select one from Import Media according to the status of the EMX file EMX files copied from another computer In 2 select Select EMX files and select the file that you want in the folder that stores EMX files EMX files downloaded with your computer In 1 check whether ...
Страница 20: ...ck OK This displaysalist ofthe printinformationfrom theEMX files youselectedin step 5 Select thenecessary items You can import all of the displayed print information if you select Select All Epson Manual for RIP Printing ONYX RIP Preparations for Printing 20 ...
Страница 21: ... using the same print mode simply by reading the print data and selecting the quick set U Creating Quick Sets on page 21 A hot folder with the same name is also automatically made when you create a quick set If you do the following preparations you can easily print just by dragging and dropping the print data to the shortcut icon for the hot folder U Preparations for Hot Folder Printing on page 25...
Страница 22: ...values the media setting of the media on which you are going to print now that are selected on the printer s control panel See below for the parameters for 3 How to Read Print Mode In the following settings theprint data inputresolutionof 360dpi undergoesoutput processingat 720 x 1440 dpi and is printed in 32 passes The following table describes the meanings of the setting names A through C A Indi...
Страница 23: ...or Select Print Mode F Click Change Profiles in Color Management G See the following table when setting 1 through 3 in the Profiles tab Click OK Ordinarily donotchangeanysettingsotherthan 1 through 3 Doingsomakesitdifficulttomatchthecolors as intended 1 SelecttheprofileforCMYK SelectEpsonWideCMYK_Ver2 iccifyouwanttodobrightlycoloredprintingwithawide color gamut for signs etc Select FOGRA SWOP or G...
Страница 24: ...ow to check print results in advance U Matching the Print Results to the Displayed Color of Print Data on page 37 H Do the other settings as needed Click OK If you want to do advanced settings click Advanced on the bottom left of the screen Epson Manual for RIP Printing ONYX RIP Preparations for Printing 24 ...
Страница 25: ... ONYX RIP input inside the printer name folder Note If you want to do hot folder printing through the network from another computer consult with the network administrator and then create a shortcut using the following procedure 1 Share the hot folder that you want to use 2 Create a shortcut on the Map Network Drive B Move the shortcut icon that you created to the desktop Epson Manual for RIP Print...
Страница 26: ...need to check the print data U Hot Folder Printing on page 28 Printing the Print Data While Checking it A Correctly load the media into the printer See Operator s Guide booklet online manual for the procedure for loading media B Double click the RIP Queue icon C On the toolbar click Open D Select the print data and quick set 1 Select a quick set for the same media as the media setting selected on ...
Страница 27: ...o print If thestatusis anythingotherthanReady check the details on the Home screen anddo thenecessary measures F Check the print data in Print Preview on the right side of the screen Click Print Now Epson Manual for RIP Printing ONYX RIP Print Operations 27 ...
Страница 28: ...f you are doing hot folder printing If you do RIP processing etc at the same time printing may be interrupted A Correctly load the media into the printer See Operator s Guide booklet online manual for the procedure for loading media B Double click the RIP Queue icon C Set so that printing starts automatically 1 Click in Placement in the printer status on the right side of the Rip Queue screen 2 Se...
Страница 29: ... the job being printed with the RIP and hold all the successive jobs See the manual for the RIP that you are using for more details on the settings When sending data from the RIP to the printer is complete Printing cannot be cancelled from the RIP Proceed to step 3 to cancel printing on the printer When the data size for the job is large Windows only In Windows especially when connected via USB jo...
Страница 30: ... The Estimated Print Time Does Not Match Windows Only on page 33 C On the printer s control panel screen select Job Cancel and press the Z button The job that is being printed is canceled It may take some time before you are able to print again after a job has been canceled Epson Manual for RIP Printing ONYX RIP Print Operations 30 ...
Страница 31: ...d to the printer Print information is not automatically imported to the RIP just by downloading the EMX files on the Dashboard If you are importing print information to the RIP first register the values of the media settings to the printer U Registering the Media Setting Values to the Printer on page 11 Did you write the values of the media settings to the printer while the RIP was running If you ...
Страница 32: ...the browser on another computer from which you want to access the Dashboard B Input the following in the address bar http name or IP address of the computer on which you installed the Dashboard 30561 Is your printer added to the RIP correctly Check the settings for your RIP using the following procedure For ONYX RIP A Start RIP Queue Click Configure Printer in the toolbar B On the Device tab click...
Страница 33: ...print data is sent directly from the RIP to the printer cImportant If you change this setting the printheads may stop and move while printing and printing may be interrupted If printing is interrupted the colors before and after the interruption may change A Right click the icon for your printer in Devices and Printers in the Start menu Select Printer Properties Epson Manual for RIP Printing ONYX ...
Страница 34: ...B In the Advanced tab select the spooling method Print directly to the printer Epson Manual for RIP Printing ONYX RIP Troubleshooting 34 ...
Страница 35: ...s shown the seams where the pages are joined will not stand out Tiled Printing or Panel Printing See the following for the procedure for doing tiled printing with the RIP from dividing the image to printing it so that they alternatingly flip vertically ONYX RIP U For ONYX RIP on page 36 Epson Manual for RIP Printing ONYX RIP Troubleshooting 35 ...
Страница 36: ... Job Editor B Do the settings for tiled printing in the Tiling Setup tab See the manual for the RIP for details on these settings C Once you finish doing the settings for tiled printing click This takes you back to the RIP Queue screen Epson Manual for RIP Printing ONYX RIP Troubleshooting 36 ...
Страница 37: ...m below Note Werecommenddoingmonitormatching colormanagementforthescreen fortheprintcolortobeascloseaspossibletothe colors displayed on the computer screen See the manuals for your computer and monitor for details Checking the print results with a wide color gamut profile in advance on the screen You can print in a wider color gamut than typical print colors by using the wide color gamut profile E...
Страница 38: ...thePrintResultswithaWideColorGamutProfileinAdvance on the Screen In this section we explain how to change the preview displaycolors for the print data without changing the settings for Working Spaces to check the print results The examples used in following explanation are when using Adobe Illustrator CC 2015 in Windows 7 Note When selecting the input profile you want in step 4 you can also check ...
Страница 39: ..._Ver2 icc in Profile and then click OK This update is applied to the display colors in the preview We recommend closing Adobe Illustrator without saving the print data after you are done checking If you save the changes the color input settings for the print data change Matching Your Print Results to the Display Colors in the Image Processing Software Use the follow procedure to check the display ...
Страница 40: ...ows 7 A Start Adobe Illustrator Click in the order of Edit Color Settings B Check the setting for both RGB and CMYK in 1 and 2 and then click OK How to Change the Input Color Settings of the RIP For ONYX RIP Use the following procedure to change the Profiles that you set when creating the quick set Epson Manual for RIP Printing ONYX RIP Troubleshooting 40 ...
Страница 41: ...rator mode Click Configure Printer in the toolbar B Select the quick set to use when printing from the Quick Sets tab Click Edit C Click Change Profiles in Color Management Epson Manual for RIP Printing ONYX RIP Troubleshooting 41 ...
Страница 42: ...theselectionmenu copyitfromthefollowingfoldertotheinputcolorfolder in the profiles folder for ONYX RIP Windows System Folder Windows System32 spool drivers color Mac OS X Library ColorSync Profile E Click OK on the Edit Quick Set screen to save the quick set Matching the Colors to Color Swatch Books and Samples Matching specific color such as spot colors PANTONE DIC Color etc and corporate colors ...