background image

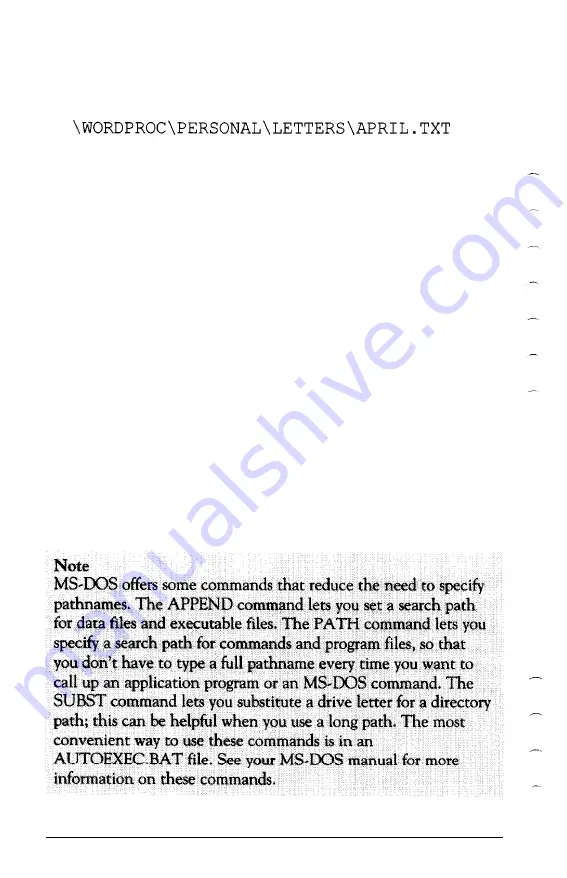
For instance, in the example shown on the previous page, if you
had a file named APRIL.TXT stored in the subdirectory named
LETTERS, the full pathname of that file would be:

The pathname tells MS-DOS where to look for a directory or file.

In this case, the pathname tells MS-DOS to start at the root
directory and go through two subdirectories (WORDPROC and
PERSONAL) to find the LETTERS subdirectory. Once in the
LETTERS subdirectory, MS-DOS finds the file called APRIL.TXT.

The backslash that starts this pathname tells MS-DOS to begin at

the root directory. If you omit the backslash at the beginning of the

pathname, MS-DOS begins, not at the root directory but at the
current directory. Thus, for example, if the current directory is
PERSONAL and you want MS-DOS to find the file APRIL.TXT,
which is stored in the subdirectory LETTERS, you can specify the
pathname like this:

LETTERS\APRIL.TXT

Because this pathname does not begin with a backslash, MS-DOS
starts in the current directory (PERSONAL), moves to the
subdirectory LETTERS, then finds the file APRIL.TXT. If you did
begin with the backslash, MS-DOS would not find the file, because
it is a subdirectory of PERSONAL, not of the root directory.

5-10

Using MS-DOS 

With Your Equity LT-286

Содержание LT-286

Страница 1: ...EPSON ...

Страница 2: ...EPSON EQUITY LT 286 User s Guide Y17499100100 ...

Страница 3: ...While every precaution has been taken in the preparation of this publication Epson America assumes no responsibility for errors or omissions Nor is any liability assumed for damages resulting from the use of the information contained herein Further this publication and features described herein are subject to change without notice TRADEMARKS AT and XT are trademarks and IBM is a registered tradema...

Страница 4: ...ional suggestions You may find the following booklet prepared by the Federal Communications Commission helpful Television Interference Handbook This booklet is available from the U S Government Printing Office Washington DC 20402 Stock No 004 000 00450 7 Note If the interference stops it was probably caused by the computer or its peripheral devices To further isolate the problem Disconnect the per...

Страница 5: ...Switches 1 12 6 Inserting the Startup Operating 1 Diskette 1 14 7 Starting the System 1 15 Turning On the Computer 1 16 Adjusting Screen Contrast and Brightness 1 17 Initial Screen Display 1 18 8 Copying System Diskettes 1 19 Running the Setup Program 2 1 Starting the Setup Program 2 2 Memory 2 3 Display 2 4 Coprocessor 2 6 Mass Storage 2 7 Backlight Period 2 9 Gray Scale 2 10 Leaving the Setup Pr...

Страница 6: ...kettes for the Equity LT 286 4 11 Caring for Diskettes 4 13 Inserting and Removing Diskettes 4 14 Making Backup Copies 4 15 Write Protecting Diskettes 4 15 Using the Hard Disk Drive 4 16 Caring for the Hard Disk 4 16 Protecting the Data on Your Hard Disk 4 17 Improving Hard Disk Performance 4 17 Turning Off the Hard Disk 4 17 Turning Off the Hard Disk Before Starting the Computer 4 19 Turning Off ...

Страница 7: ...6 Using the COPY Command 5 18 Using the BACKUP Command 5 20 Deleting Data 5 21 Using the Epson HELP Utility 5 22 Using the Epson MENU Utility 5 24 MENU Utility Options 5 24 Using the XTREE Utility 5 25 Running XTREE 5 26 Cautions 5 27 Using an AUTOEXEC BAT File 5 28 Creating an AUTOEXEC BAT File 5 29 Starting an Application Program 5 30 Using the LIGHTON Utility 5 30 Appendixes A Connecting an Ext...

Страница 8: ...2 Selecting a Test D 4 Resuming From an Error D 5 System Board Check D 6 Memory Check D 6 Keyboard Check D 7 Monochrome Display Adapter and CRT Check D 8 Monochrome Adapter Check D 9 Attribute Check D 9 Character Set Check D 9 Video Check D 10 Sync Check D 10 Run All Above Checks D 10 Color Graphics Adapter and CRT D 11 Color Graphics Adapter Check D 11 Attribute Check D 12 Character Set Check D 1...

Страница 9: ...ot Matrix Printer Check D 24 Hard Disk Drive and Controller Check D 25 Seek Check D 25 Write Read Check D 26 Read Verify Check D 26 Run All Above Tests D 27 Alternate Parallel Port Check D 27 Parallel Port on Video Adapter Check D 28 Exiting System Diagnostics D 28 Error Codes and Messages D 29 E Specifications E 1 Main Unit E 1 Interfaces E 1 Keyboard E 1 Mass Storage E 2 Display E 2 Power Supply...

Страница 10: ...uity LT 286 can run at an execution speed of either 12 MHz or 8 MHz Ordinarily you ll want to use the 12 MHz speed to get faster performance from your computer A few application programs may require the 8 MHz speed a switch above the keyboard allows you to change speeds without resetting the computer The Equity LT 286 also has a built in socket for an 80287 math coprocessor which can be installed ...

Страница 11: ...d 8 bit and 16 bit option cards Your Equity LT 286 comes with MS DOS version 3 3 by Microsoft and the GW BASIC programming language You ll find reference manuals for both MS DOS and GW BASIC packed in the box with the computer You can use virtually any application program designed for the IBM Personal Computer PC XT or PC AT on your Equity LT 286 In addition to MS DOS and GW BASIC Epson has includ...

Страница 12: ...ing your hard disk Unless your dealer has already set up the disk for you you must follow the steps described in this chapter before using your hard disk Chapter 4 describes general operating procedures and explains how to use and care for your disks and disk drives Chapter 5 provides basic instructions for using MS DOS with your computer You can find more detailed information about MS DOS in the ...

Страница 13: ...mer Care Centers throughout the United States Epson America provides training replacement parts product information and toll free support to our dealers and Customer Care Centers Therefore we ask that you contact the business where you purchased your Epson product to request assistance If the people there do not have the answer to your question they can obtain it through our toll free dealer Custo...

Страница 14: ...pter 2 for information about the setup program You must run this program to give your computer the information it needs to get started Then follow the instructions in Chapter 3 to prepare your hard disk Do not turn on the computer printer or any peripherals until the instructions tell you to Otherwise you may damage some part of your equipment 1 Unpacking As you unpack the components be sure to in...

Страница 15: ...mail it to Epson With your registration card on file Epson can send you update information Be sure to keep your packing materials They provide the best protection possible for your computer if you need to ship it later 2 Connecting the AC Adapter Follow these steps to connect the AC adapter 1 Make sure the computer s power switch located on the back panel of the computer is turned off 2 Insert the...

Страница 16: ...he cable with your thumb on the flat part of the connector Then pull it away from the computer Do not try to unplug the adapter by pulling on the cord 3Charging the Battery The Equity LT 286 contains a rechargeable nickel cadmium NiCad battery pack that powers the computer when you are not using the AC adapter Before you use the computer the first time you must charge the battery When you plugged ...

Страница 17: ... range of printer products consult your dealer for more information Connecting to the Parallel Interface The computer s Centronics compatible parallel interface uses a 25 pin D shaped female connector Most Epson printers have parallel interfaces To connect a printer to the computer you need an IBM compatible printer cable If you re not sure which one you need consult your Epson dealer Once you hav...

Страница 18: ... a 25 pin D shaped male connector See your printer manual if you re not sure which end this is Connect this end to the parallel connector on the back panel of the computer as shown below If the plug has retaining screws tighten them by hand or with a screwdriver Setting Up Your System 1 5 ...

Страница 19: ...ibed on page 1 8 in Setting the DIP Switches This tells your computer that a printer is connected to the parallel interface Note If you plan to use an external 5 1 4 inch diskette drive with your Equity LT 286 you must connect the external drive to the parallel interface Therefore you cannot have both a parallel printer and the diskette drive connected at the same time If you re using an external ...

Страница 20: ... cable that converts the 9 pin output to the standard 25 pin output To connect a serial device follow the steps above for connecting a parallel device You need to make sure the serial port is set up so it functions properly If you are using the port for a serial printer you must also redirect printer output from the parallel port to the serial port Use the MS DOS MODE command or the Epson MENU pro...

Страница 21: ...ack panel has six switches that control the diskette drive the parallel and serial interface configuration the character set and the presence or absence of an external video controller card Read this section to make sure the current DIP switch settings match your system setup Note Note The DIP switches on the back panel should be changed only The DIP switches on the back panel should be changed on...

Страница 22: ...mbered 1 through 4 To access these switches lift the panel above the keyboard by pressing inward on both sides of the cover as you lift it up The system functions controlled by the keyboard DIP switches shown below are listed in Table l l Setting Up Your System 1 9 ...

Страница 23: ...rse mode white characters are displayed on a black background Switches 2 and 3 gray scale mode These two switches select one of four available gray scale modes The gray scale mode governs the way color information is displayed on your LCD screen In mode 0 everything is displayed in black and white For most of your work with the Equity LT 286 you probably want to use mode 0 In modes 1 and 2 informa...

Страница 24: ...s the lightest Mode 3 is user defined If you select mode 3 you may assign colors to gray tones in whatever way best suits your needs To specify a mode 3 gray scale use the setup program as described in Chapter 2 Switch 4 LCD or monitor selection This switch tells the computer whether to display text and graphics on the LCD screen or on a color monitor that you have connected to the computer If you...

Страница 25: ... These switches are numbered 1 through 6 To access these switches open the back panel of the computer as shown below The system functions controlled by these switches are listed in Table 1 3 and described below Table 1 3 Buck panel DIP switch functions Default settings __ 1 12 Setting Up Your System ...

Страница 26: ...ication programs require that an original program diskette be in drive A when the program is started If you are running such a program and the original diskette is 5 1 4 inch be sure to set switch 2 off Under all other circumstances it is best to leave it on Switch 3 primary or secondary serial port This switch tells the computer whether the serial connector on the back of the computer is configur...

Страница 27: ...tor attached to a video controller card in an expansion chassis and you have set switch 5 off If your external monitor displays color set this switch on If your external monitor is monochrome set this switch off Note If switch 5 is on the computer ignores the setting of switch 6 6 Inserting the Startup Operating 1 Diskette Follow these steps to insert the Startup Operating 1 diskette 1 Hold the di...

Страница 28: ...shooting or after performing the system diagnostics described in Appendix D consult your Epson dealer Never turn off or reset your computer while a disk drive LED light emitting diode is illuminated Doing so can destroy data stored on the disk or make the whole disk unusable The disk drive LEDs are located above the keyboard on the right side The LED marked HDD indicates that the hard disk drive i...

Страница 29: ...urn on your computer follow these steps 1 Turn on any peripheral devices such as a printer an external diskette drive or a color monitor 2 Make sure your computer s hard disk switch located on the back panel is turned on It is best to leave this switch on at all times 3 If you have not done so already insert the Startup Operating 1 diskette 4 Turn on the computer by pressing the power switch on th...

Страница 30: ...d Brightness If you cannot see text on the screen clearly use the switches on the right side of the screen to adjust the screen s contrast and brightness The switches are shown below The contrast switch determines how bright the characters appear against the background To increase the contrast move the switch up To decrease it move the switch down To make the backlighting brighter move the brightn...

Страница 31: ...ove and press Enter You don t need to enter the seconds For PM times use a number between 12 and 23 to designate the hour Note You need to enter the current date and time only the first time you start your computer Afterward your computer s built in battery powered clock keeps track of the date and time automatically If you ever want to change the date or time for any reason use the MS DOS DATE an...

Страница 32: ... originals in a safe place To copy your system diskettes you need three blank 720KB double sided double density 3 1 2 inch diskettes Follow these steps 1 Write protect your original system diskettes This protects the diskettes from accidentally being erased or copied over The write protect device is a small switch on the lower right corner on the back of the diskette To write protect a diskette sl...

Страница 33: ...the release button and insert the blank diskette the target diskette in the drive Then press any key If the diskette in drive A has not been formatted the DISKCOPY program formats it Then the program begins copying the data from the computer s memory to the formatted diskette When it has copied all the files from memory the screen displays this message Insert SOURCE diskette in drive A Press any k...

Страница 34: ...is prompt Copy another diskette Y N Press Y so you can make a copy of the Operating 2 diskette Follow the instructions above and the prompts on the screen to copy the Operating 2 diskette When the Copy another diskette Y N prompt reappears press Y again and follow the instructions above to copy the Reference diskette 10 When you finish copying all three system diskettes answer N to the Copy anothe...

Страница 35: ...ve installed an 80287 math coprocessor Whether or not you have installed an external 5 1 4 inch diskette drive What type of hard disk drive you have The backlight period for your LCD screen The mapping of colors to gray tones for gray scale mode 3 The settings you specify with the setup program are recorded in a special area of memory called CMOS RAM This memory is backed up by a battery so it can...

Страница 36: ...am loads automatically and displays the Reference diskette s operation menu OPERATION MENU 1 Setup 2 System diagnostics 0 Exit to DOS for more utilities Enter selection number 3 Press 1 to select Setup and then press Enter The setup main menu appears on the screen SETUP Utility version 4 00 Copyright c SEIKO EPSON CORP 1988 Coprocessor Mass storage Backlight period Gray scale Lsaloct function Ente...

Страница 37: ... no expansion memory If this information is correct you do not need to make any changes to the Memory portion of the setup program To change the memory information recorded by the setup program or to confirm that the current settings are correct highlight Memory and press Enter The following display appears Exit Memory Display Coprocessor Mass storage Backlight period Gray scale If the current set...

Страница 38: ...6KB appears When you have finished making changes to the memory settings highlight SAVE SETTINGS and press Enter Display The setup program assumes that you are using either the built in LCD screen in its normal 80 column mode or a color monitor attached to the CRT connector in 80 column mode If this information is correct you do not need to make any changes to the Display portion of the setup prog...

Страница 39: ...lay graphics This is the standard setting Color graph 40 col In this mode the Equity LT 286 displays text at a width of forty characters per line and can display graphics Use this setting if you want the computer to start up with wider characters Your application programs may still change the display from the 40 column mode to the 80 column mode but the computer will start in the 40 column mode ea...

Страница 40: ...eappears Coprocessor The setup program assumes that you have not installed an 80287 math coprocessor If this is the case you do not need to make any changes to the Coprocessor portion of the setup program If you have installed an 80287 coprocessor highlight Coprocessor and press Enter The following display appears Exit Memory Display 4 Coprocessor Mass storage Backlight period Gray scale SAVE SETT...

Страница 41: ...torage Backlight period Gray scale I B A 1 1 II Drive B external None Drive C Type 2 20MB SAVE SETTINGS If you are using an external 5 1 4 inch diskette drive highlight Drive B external Then press Enter to select the type of external diskette drive you have installed As you continue to press Enter the display cycles through the available options 360 KB 1 2 MB and None Select the appropriate option...

Страница 42: ...ge from the setup main menu you may see the following display Exit Memory Display Coprocessor Mass storage Backlight period Gray scale Drive B internal None BAD SETTING Drive C Type 2 20MB SAVE SETTINGS Do not be concerned about the message BAD SETTING This is merely to remind you to adjust the settings for both of your diskette drives When you have entered the correct setup information for both d...

Страница 43: ...nge the period of time the computer waits before darkening the screen to any value between 30 seconds and five minutes in half minute increments You can also disable the automatic screen darkening feature by selecting an unlimited backlight period To change the backlight period highlight Backlight period on the setup program s main menu then press Enter The following display appears Exit Memory Di...

Страница 44: ...ss Enter The main menu reappears Gray Scale The Gray scale option on the setup menu allows you to define the correspondence between colors and gray tones in gray scale mode 3 see Chapter 1 If you are not planning to use gray scale mode 3 you do not need to set the Gray scale portion of the setup program To define gray scale mode 3 highlight Gray scale on the setup main menu and press Enter The fol...

Страница 45: ... 1 Gray Scale 2 Gray Scale 3 m Gray Scale 4 m Gray Scale 5 m Gray Scale 6 m Gray Scale 7 m return to previous menu 1 select option Enter change gray scale 0 Use and 1 to highlight the gray tone that you would like to use for black then press Enter The submenu shown in the preceding figure then reappears showing your latest gray tone selection for the color black Next press the key The name of anot...

Страница 46: ... Magenta 5 Magenta 6 Brown 6 Brown 7 White 7 White 8 Gray 8 Blinking black 9 Light blue 9 Blinking blue A Light green A Blinking green B Light cyan B Blinking cyan C Light red C Blinking red D Light magenta D Blinking magenta E Yellow E Blinking brown F Bright white F Blinking white For example to see how a red character might look on a blue background you would find the intersection of row 4 and ...

Страница 47: ... Type 2 20MB 3 0 minutes return to main menu L aelect option Enter return to main menu F 1 change Check the list to make sure all the information is correct l If any setting is incorrect highlight Change settings and press Enter The main setup menu appears again and you can correct the setting l If you did not make any changes or if you want to cancel the changes you made highlight Exit without sa...

Страница 48: ...ve the Reference diskette and insert your working copy of the Startup Operating 1 diskette in drive A Then highlight EXIT AND SAVE and press Enter At this point the program resets the computer using the new configuration and MS DOS is reloaded After you press Enter twice to respond to the date and time prompts the A prompt reappears on the screen If the computer displays a setup error message whil...

Страница 49: ...nt to approximately 15 1 44MB diskettes Using a hard disk reduces the number of diskettes you need and eliminates much of the diskette swapping you do when you use diskettes The computer is also able to read and write data on the hard disk much more quickly than it can on a diskette You generally do most of your work on the hard disk and use the diskette drive for tasks such as installing new soft...

Страница 50: ...ly operating system you are going to use on your hard disk If you re going to use another operating system in addition to MS DOS you may need to create an additional partition For information about how to do this consult the chapter an FDISK in your MS DOS manual If you want to set up your hard disk to run another operating system only consult the manual fur that operating system With MS DOS versi...

Страница 51: ... used an operating system The steps are simple and you should not have any problems however if you do have questions see Chapter 5 for basic information about using MS DOS or see your MS DOS manual for more detailed information about the operating system Creating a Primary Partition The steps below describe how to create a primary partition of the maximum size 20MB on a 20MB hard disk or 32MB on a...

Страница 52: ... the following Create Primary DOS Partition Current Fixed Disk Drive 1 Do you wish to use the maximum size for a DOS partition and make the DOS partition active Y N Y Press ESC to return to FDISK Options 9 Press Y then press Enter The screen displays the following message System will now restart Insert DOS diskette in drive A Press any key when ready 10 Without removing the Startup Operating 1 dis...

Страница 53: ... also describes how to create multiple drives in the extended partition Note Splitting a hard disk into two logical drives does not require you to run the setup program to change the configuration information The setup program is concerned only with the number of physical disk drives in your system Follow these steps to create an extended partition on the hard disk and designate it as drive D 1 In...

Страница 54: ...reates a logical drive for the extended partition and designates it drive D Press ESC The screen displays the following message and prompts System will now restart Insert DOS diskette in drive A Press any key when ready Without removing your Startup Operating 1 diskette from drive A press any key to restart the system Press Enter twice to accept the date and time shown The system now recognizes th...

Страница 55: ...ives in the extended partition See Formatting the Extended Partition the next section in this chapter After you have formatted drive C you can boot the operating system automatically from the hard disk every time you turn on or reset your computer You won t have to insert an MS DOS system diskette in drive A to load the operating system To format drive C follow these steps 1 Insert your working co...

Страница 56: ... with Format Y N 5 Press Y then press Enter MS DOS begins formatting the primary partition The screen continuously displays the changing head and cylinder numbers of the drive Because the formatting process takes a few minutes your screen may go dark Just press any key to make the information on the screen visible again When the procedure is complete the screen displays the following message Forma...

Страница 57: ...e f i l e s When all the files have been copied the A prompt reappears The SELECT procedure is complete Now you can format the extended partition if you have one using the procedure below Formatting the Extended Partition If you have an extended partition drive D you need to format it also Follow this procedure 1 Insert your working copy of the Startup Operating 1 diskette into the diskette drive ...

Страница 58: ...tted your partition s you need to copy the files on your Operating 2 and Reference diskettes to drive C Follow the steps below 1 Remove the Startup Operating 1 diskette from drive A and insert the Operating 2 diskette in the drive 2 You should still see the A prompt If not type A and press Enter 3 At the A prompt type the following and press Enter COPY C DOS MS DOS copies all the files from the di...

Страница 59: ...e that your system starts up properly each time you boot it from the hard disk The instruction that installs the keyboard information however has the side effect of interfering with the mechanism that restores the backlighting to your screen after the backlight period has elapsed To correct this problem you need to make a simple modification to the AUTOEXEC BAT file created by SELECT To do so foll...

Страница 60: ...n it back on After the computer completes its power on self test the screen displays the date prompt Press Enter twice to accept the date and time shown The C prompt appears indicating that the system has successfully loaded MS DOS from your hard disk From now on each time you turn on or reset your computer it automatically loads MS DOS from the hard disk Just make sure drive A is empty 3 12 Prepa...

Страница 61: ...reserve the battery s charge You can connect or disconnect the AC adapter while you are using the computer without interrupting any operation For example if you are not using the adapter and the Power Speed light starts flashing see below you can connect the AC adapter without first turning off the computer You should do this immediately if the Power Speed light starts to flash to avoid losing dat...

Страница 62: ...r and to an electrical outlet You can charge the battery whether the computer is on or off For the maximum charge leave the AC adapter connected for 12 hours The battery pack cannot be overcharged so don t worry if you leave it connected for more than 12 hours Remember the following when you are charging the battery l Use only the AC adapter that comes with the Equity LT 286 Using a different one ...

Страница 63: ... keyboard on the right side are six LED light emitting diode indicators that provide information about the computer s operation The Power Speed LED is on whenever the computer is on The color of this LED indicates the computer s current execution speed If the microprocessor is running at 12 MHz the light is green if it is running at 8 MHz the light is orange The Power Speed LED serves another impo...

Страница 64: ...turn off the HDD switch when the HDD LED is illuminated or remove a diskette when the FDD LED is illuminated If you do you may lose dam The Num Lock Caps Lock and Scroll Lock LEDs indicate whether the corresponding key functions are enabled See Special Keys on the Equity LT 286 Keyboard below Opening and Closing the Screen When you are not using the computer or you want to move it turn it off and ...

Страница 65: ... back panel Set the computer in a horizontal position before opening it If you close the screen while the computer is running the screen s backlighting is automatically turned off to conserve battery charge When you reopen the screen the backlighting comes back on automatically unless the backlight period has elapsed If the screen is dark when you reopen it press any key You may close and reopen t...

Страница 66: ... the bottom of the computer as shown below Be sure the screen is closed whenever you carry the computer by its handle WARNING To avoid accidental damage to your Equity LT 286 always store the computer in a horizontal position Do not leave it standing upright on its back panel 4 6 Using the Equity LT 286 ...

Страница 67: ...speed to run application programs that have specific timing requirements Do not change the execution speed while you are running a program Always complete your current operation and exit the program first However it is not necessary to turn the computer off before changing execution speed To change the speed move the CPU SPEED switch located above the keyboard Using the Equity LT 286 4 7 ...

Страница 68: ... for specific software functions consult the manual that came with the program you re running The Num Lock Scroll Lock and Caps Lock keys work as toggles press them once to turn on a function and again to turn it off When a function is on the corresponding LED on the upper right comer of the keyboard is illuminated When a function is off the LED is off Table 4 1 describes special keys on the Equit...

Страница 69: ...ther keys to perform special functions such as editing operations in MS DOS and GW BASIC Alt Works with other keys to enter alternate character codes t Backspace Moves the cursor back one space deleting the character to the left I Enter Ins Del Home End PgUp PgDn T lt Num Lock Esc F1 F12 Print Screen Ends a line of keyboard input or executes a command Turns the insert function on and off Deletes t...

Страница 70: ...e The twelve keys marked F1 through F12 at the top of your keyboard are used in different ways in different application programs Your Equity LT 286 comes with two function key templates Use a pencil to label the template with the functions of each key You can use both sides of the function key templates and erase your labels later if you need to To insert a template lift the flap above the functio...

Страница 71: ...you can retrieve record over and erase data just as you play record and erase music on cassette tapes When you insert a diskette in a drive a metal shutter above the access area moves aside exposing the diskette surface When your computer reads data from or writes data to the diskette it causes the diskette to spin within its plastic casing Then a small read write head positioned above and below t...

Страница 72: ...his drive These diskettes can hold the equivalent of about 500 pages of text and are compatible with the high capacity diskette drives used on some models of the IBM AT Because of their size difference you cannot use a 3 1 2 inch diskette in a 5 1 4 inch drive or vice versa If you have both types of drives however you can copy individual files or groups of files from one drive to the other with th...

Страница 73: ...c fields Remember diskettes store data magnetically strong magnetic fields can scramble that data Don t set your diskettes on such common magnetic sources as electrical appliances telephones television sets and loudspeakers Keep diskettes in a moderate environment They work best at room temperature and in normal humidity Never leave diskettes sitting in the sun or in extreme cold or heat The tempe...

Страница 74: ... diskettes in their protective envelopes when you are not using them Inserting and Removing Diskettes To insert a diskette into the drive hold it with the label facing up and the arrow on the left side pointing into the computer Slide the diskette into the drive until you feel it click into place To remove a diskette press the release button on the diskette drive When the diskette pops out of the ...

Страница 75: ...ackup copies of your system diskettes For general instructions on copying diskettes or hard disk files see Chapter 5 or your MS DOS manual Write Protecting Diskettes You can write protect a diskette to prevent its data from being altered When a diskette is write protected you can copy data from it but you cannot store new data modify existing data erase files or format the diskette The write prote...

Страница 76: ...e hard disk Store your other files on diskettes Note You must prepare a new hard disk before using it for the first time Make sure you have completed all the procedures in Chapter 3 to prepare it Caring for the Hard Disk To avoid damaging your hard disk take these precautions Keep your computer away from magnetic fields such as electrical appliances telephones and loudspeakers Keep your computer i...

Страница 77: ...hese backup utilities see Chapter 5 or your MS DOS manual Improving Hard Disk Performance Your Reference diskette includes two utilities called HDCACHE and FASTOPEN that can improve your hard disk s performance For information about using these programs see your MS DOS manual Turning Off the Hard Disk Your computer s hard disk has its own power switch To avoid drive access problems it is best to l...

Страница 78: ...ither before you turn on the computer or after l If you do not plan to use the hard disk at all turn it off before you turn on the computer l If you need to load MS DOS or an application program or to access files on the hard disk leave the hard disk switch on when you turn on the computer then turn it off later as described below 4 18 Using the Equity LT 286 ...

Страница 79: ...ble again save your data exit the program you are running then turn the computer off Wait at least five seconds then turn the hard disk switch on Remove any diskette from drive A and turn the computer back on Turning Off the Hard Disk After Starting the Computer If you want to use the hard disk at any time during your working session start the computer with the hard disk switch turned on After you...

Страница 80: ...are still lugged onto drive C when you turn off the hard disk the next time you enter a command the screen will display an error message If this happens turn the hard disk back on then log onto drive A disk back on then log onto drive A Continue running your application program using drive A When you want to save your data on the hard disk turn it on Wait about ten seconds to allow the disk to rea...

Страница 81: ... hold down Ctrl and Alt while you press the Del key The screen goes blank for a moment and then MS DOS is reloaded Be sure to remove any diskette from drive A when you do this so that MS DOS can be reloaded from the hard disk If this does not correct the problem try the second method Press the RESET button above the left side of the keyboard This method works even when the keyboard does not respon...

Страница 82: ...lan to use your computer If you use it only for running application programs the few MS DOS commands you need are introduced in this chapter If you use advanced features or create your own programs see your MS DOS manual for a complete description of MS DOS This chapter describes the following MS DOS functions Starting MS DOS Exiting MS DOS Changing the current drive The MS DOS command format Ente...

Страница 83: ...isplays the MS DOS command prompt C Exiting MS DOS Before you turn off the computer make sure the MS DOS command prompt either C or A appears on the screen Then remove your diskettes turn off any peripherals and then turn off the computer Changing the Current Drive MS DOS identifies your hard disk as drive C Your 3 1 2 inch diskette drive is identified as drive A If you have an external 5 1 4 inch...

Страница 84: ...s the A prompt showing that you are operating from drive A Drive A continues to be the current drive until you log onto a different drive or turn off or reset your computer To access a program or file on another drive without first logging onto that drive specify the drive identifier the name of the drive followed by a colon along with the filename For example if you are logged onto drive C and yo...

Страница 85: ... file is not stored in the current drive and directory you may need to use a pathname when you enter an external command See your MS DOS manual for more information on the command format and for detailed descriptions of each command Entering MS DOS Commands You can enter an MS DOS command whenever you see the MS DOS command prompt Type the command name and any necessary parameters and delimiters a...

Страница 86: ...ters except for blank spaces and the following symbols I It is a good idea to choose a name that describes the contents of the file The extension is optional and can be up to three characters long You can use the extension to describe the type of data contained in the file for example TXT for a text file When you use an extension separate it from the filename with a period like this DATA TXT Many ...

Страница 87: ...ectory for the disk This directory is called the root directory Because the hard disk has room for hundreds of files MS DOS allows you to create additional directories called subdirectories Subdirectories allow you to organize your hard disk so that files of similar type or purpose are kept together Without subdirectories it would be difficult to keep track of all the files on your hard disk You c...

Страница 88: ...ept the root directory which can have a total of no more than 512 files and subdirectories l Subdirectories are named in the same way that files are The name can include as many as eight characters letters or numbers and you can add an optional extension consisting of up to three characters l The root directory does not have a name it is identified by a backslash The Current Directory MS DOS alway...

Страница 89: ...as others You can use XTREE to generate a visual diagram of your subdirectory structure to move quickly between directories to add and remove directories and so on XTREE is described later in this chapter Listing the Contents of a Directory To list the files in the current directory type DIR and press Enter MS DOS lists the names of the files in the current directory on the current drive If you ar...

Страница 90: ...WBASIC EXE 86192 12 04 86 7 55p SETPRINT EXE 5168 8 08 86 9 05a EPSON TXT 366 10 04 85 12 00p 16 File s 289792 bytes free To list the files in a different directory on the current drive type the pathname of that directory For example to list the contents of the LEDGER subdirectory while logged onto drive C type DIR LEDGER and press Enter Pathnames are described below Using Pathnames Whenever you w...

Страница 91: ...s MS DOS to begin at the root directory If you omit the backslash at the beginning of the pathname MS DOS begins not at the root directory but at the current directory Thus for example if the current directory is PERSONAL and you want MS DOS to find the file APRIL TXT which is stored in the subdirectory LETTERS you can specify the pathname like this LETTERS APRIL TXT Because this pathname does not...

Страница 92: ...directory LEDGER DIR 9 14 88 10 17a WORDPROC DIR 9 14 88 10 32a COMMAND COM 25307 3 17 87 12 00a CONFIG SYS 209 9 14 88 10 48a AUTOEXEC BAT 309 9 14 88 12 11p 3 File s 18625536 bytes free The subdirectories are identified by the letters DIR Thus when you type DIR after creating the subdirectory LEDGER you should find the entry LEDGER DIR as well as the names of all the root directory files Changin...

Страница 93: ...e root directory from any subdirectory type the following and press Enter CD Copying From One Directory to Another The COPY command lets you copy files from one directory to another To use this command you must specify the name of the file you want to copy as well as the directory to which you want to copy the file For example if you are in the LETTERS directory see the diagram on page 5 6 and wan...

Страница 94: ...ormatting Diskettes Before you can store data on a new diskette you must format it Formatting prepares the diskette so that MS DOS can store data on it You need to do this only once before you use the diskette for the first time You can also reformat previously used diskettes Be aware however that reformatting erases all data on the diskette Always be sure you no longer need any files on a diskett...

Страница 95: ...T COM is stored in a subdirectory named DOS type CD DOS and press Enter When you see the C prompt type the following and press Enter FORMAT A You see this prompt Insert new diskette for drive A and strike ENTER when ready Insert the diskette you want to format into drive A and press Enter When the diskette is formatted you see this message Format complete 1447664 bytes total disk space 1447664 byt...

Страница 96: ...NTER when ready 3 Insert the diskette you want to format into drive A and press Enter 4 When the diskette is formatted you see this message Format complete 730112 bytes total disk space 730112 bytes available on disk Format another Y N At this point you can either format another diskette by pressing Y and Enter or return to the MS DOS command prompt by pressing N and Enter Note An easy way to perf...

Страница 97: ... through the MENU and XTREE programs See the sections on MENU and XTREE later in this chapter You can also use the MS DOS XCOPY command to copy whole subdirectories of fifes see your MS DOS manual for details Using the DISKCOPY Command The DISKCOPY command lets you copy an exact image of one diskette onto another diskette The two diskettes must be of the same size and type that is you cannot use D...

Страница 98: ...kette in the drive Press any key DISKCOPY checks to see if the new diskette is formatted If it is not DISKCOPY formats the diskette The copy operation begins when the format is complete When DISKCOPY has copied the files from memory to the target diskette it prompts you to reinsert the source diskette so it can copy the remaining data to the computer s memory Insert the source diskette in drive A ...

Страница 99: ...matically replaces the existing file There is no warning that the existing file is being replaced so be careful that you do not accidentally erase a file that you want to keep l If you are copying to a diskette the diskette must be formatted To use the COPY command type COPY at the command prompt followed by the drive identifiers and necessary filenames Then press Enter to execute the command For ...

Страница 100: ...current drive You can save a few keystrokes by omitting the drive identifier of the current drive but it is equally correct and safer to include all the drive identifiers An easy way to copy a group of files at once is by using wildcard characters in the filenames A wildcard character is a character that stands for some other single character or group of characters MS DOS recognizes two wildcard c...

Страница 101: ...KUP is able to split large files between two or more diskettes That is if the diskette to which you are copying has only 200KB of available space and the next file to be backed up occupies 300KB the BACKUP command copies the first part of the file to the current diskette and the remainder to the next backup diskette This results in more efficient diskette use The BACKUP command can be used to perf...

Страница 102: ...this chapter You can also use the MS DOS XCOPY command to copy one or more files see your MS DOS manual for derails Deleting Data To delete a file type DEL and then the full name including the extension if any of the file you wish to delete For example to delete the file named APRIL TXT from the current directory you would type the following and press Enter DEL APRIL TXT You may delete all the fil...

Страница 103: ... If you copy HELP COM to another directory on your hard disk or diskette you must also copy HELP TXT to the same directory To use the HELP menu follow these steps 1 Type HELP at the MS DOS command prompt and press Enter 2 The screen displays a menu of MS DOS commands Use the cursor keys to highlight the command you want information about then press Enter 3 If there is more than one page of informa...

Страница 104: ...n for more than one command Follow these steps 1 At the command prompt type HELP followed by the names of the commands you want information about Then press Enter Separate each command name with a space For example to see help information for the DISKCOPY FORMAT and COPY commands type the following and press Enter HELP DISKCOPY FORMAT COPY 2 The help information for the first command is displayed ...

Страница 105: ...gs Help Enter DOS Command To select an option use the arrow keys to highlight your selection then press Enter Most options contain submenus keep highlighting your selection and pressing Enter until you have selected the desired operation MENU Utility Options The MENU utility offers five options Here is a description of what each option does Step by step instructions for using each option are provi...

Страница 106: ...you access the Epson HELP utility Enter DOS Command Lets you run other MS DOS commands without leaving the MENU program Using the XTREE Utility Epson has included the XTREE program with MS DOS to make it easier for you to manage files and run other MS DOS programs XTREE is fast and easy to use It lets you do the work of many MS DOS commands using a convenient menu format and provides several featu...

Страница 107: ... the XTREE menu appears When a directory is highlighted in the upper window the DIR COMMANDS list is displayed at the bottom of the screen This list shows you the commands you can use to perform directory management operations When you press Enter to switch to the files in the bottom window the FILE COMMANDS list is displayed instead This list shows you the commands you can use to perform file man...

Страница 108: ...FILE COMMANDS normally appear To execute an Alt key command hold down the Alt key and press the highlighted letter of the command name Function keys control XTREE itself Press F1 to quit XTREE F2 to display a screen of help information or F3 to cancel a command XTREE displays the available function key commands and the key that executes each command on the lower right of your screen Cautions With ...

Страница 109: ...tomatically looks for this file If there is an AUTOEXEC BAT file in the root directory MS DOS executes the commands in that file Here are some suggestions for tasks you can perform using an AUTOEXEC BAT file Modify the PATH command to include the directories containing application programs you commonly use This reduces the number of times you need to change directories or specify pathnames Add the...

Страница 110: ...y file also called an ASCII text file you can use that program to create your AUTOEXEC BAT file Just be sure to name the file AUTOEXEC BAT and store it in the root directory of the hard disk Another way to create an AUTOEXEC BAT file is by using the MS DOS COPY command To do this follow the instructions below 1 At the MS DOS C prompt type the following and press Enter COPY CON C AUTOEXEC BAT 2 Typ...

Страница 111: ...MS DOS begins running the application program When you exit the program the MS DOS command prompt reappears Be sure to exit the application program properly and return to the command prompt before turning off your computer Using the LIGHTON Utility If you use memory resident programs such as desktop accessories or the MS DOS KEYB command you may find that you cannot turn on the screen s backlighti...

Страница 112: ...at interfere with the backlit screen s operation it is best to install them with a batch file that also includes LIGHTON as the last command See your MS DOS manual for information about batch files Using MS DOS With Your Equity LT 286 5 31 ...

Страница 113: ...well as any other peripherals are turned off Place your monitor near the Equity LT 286 It is easiest to connect the monitor cable if the backs of the monitor and computer face you If necessary connect the monitor cable to the monitor Some monitors come with permanently attached cables Connect the appropriate end of the monitor cable to the connector marked CRT at the back of the computer as shown ...

Страница 114: ...er cable into an electrical outlet 7 Turn off DIP switch 4 above the keyboard to let the computer know you will be using a monitor instead of the LCD screen See Setting the DIP Switches in Chapter 1 When you are ready to use the computer turn on the monitor and any other peripherals then turn on the computer Text will be displayed on the monitor screen instead of the computer screen A 2 Connecting...

Страница 115: ...ot he or she can refer you to an authorized Epson Customer Care Center If necessary call the Epson Customer Information number 1 800 922 8911 for the location of your nearest authorized Epson Customer Care Center When you contact your dealer or Customer Care Center be ready to provide the serial number of your computer located on the back of the computer its configuration including the type of dis...

Страница 116: ...ions are secure but your computer still won t start contact your Epson dealer The LCD Screen Is Blank If the computer starts up but no image appears on the LCD screen follow these steps to solve the problem 1 Use the contrast switch and the brightness switch to adjust the screen display 2 To save power the LCD screen turns off automatically after a specified period of time If this happens press an...

Страница 117: ...tness and contrast Remove any diskette from drive A then turn off the power switches on the monitor and the main unit Check that the monitor s power cable is securely connected to the monitor and to an electrical outlet and that the monitor cable is properly connected to both the monitor and the computer Then turn both power switches back on Check to see that DIP switch 4 above the keyboard is off...

Страница 118: ...the steps in Chapter 4 to reset the computer Note Changing the execution speed while running an application program could cause the computer to lock up Always exit the program you are working on before your change the execution speed Low Battery Problems If the battery runs low recharge it according to the instructions in Chapter 4 The battery inside the Equity LT 286 should last as long as the co...

Страница 119: ...maged To find out use DISKCOPY to make a copy of the diskette Using the copy repeat the operation that caused the problem If the operation works using the copy diskette the original diskette is probably damaged Discard the original diskette and use the copy instead If you have trouble copying the entire diskette some of the sectors may be bad Try using the COPY command to copy one file at a time I...

Страница 120: ...ing and pressing Enter DIR C COMMAND COM If MS DOS responds with the message File not found use the COPY command to copy COMMAND COM from the diskette to the root directory of the hard disk then restart your system If COMMAND COM is already in the root directory use the MENU utility see Chapter 5 or the FC command see your MS DOS manual to compare the COMMAND COM file on your diskette with the COM...

Страница 121: ...as an active bootable MS DOS partition on it If it doesn t back up all your files and then use FDISK to create an MS DOS partition If your hard disk does have an active MS DOS partition back up your files and then try reformatting your hard disk using FORMAT or SELECT Reformatting destroys all the data currently on your hard disk so do this only after careful consideration and after trying the pre...

Страница 122: ...een but the computer is inoperable Write down the error message and code number and call your Epson dealer If the error is not serious the computer displays an error message and waits for you to resume further checking You see this prompt Resume F1 key Write down the error message and code number and then press F1 to resume Report the error message and code number to your dealer System Device Chec...

Страница 123: ...Run SETUP in DIAGNOSTICS 162 System options not set Run SETUP in DIAGNOSTICS If the memory allocation has not been set you see this message 164 Memory size error Run SETUP in DIAGNOSTICS RAM Check The computer now begins to check the RAM installed on the main system board During this check this message is displayed xxxxxx KB Ok where xxxxxx indicates the amount of memory in which no malfunction ha...

Страница 124: ...for problems such as failure of one of the keys to release If there are any errors in the connection between the keyboard and computer you see this message 301 Keyboard error When this message is preceded by a number XX the number represents the key in hexadecimal that is the source of the error If another failure is found you see one of these messages 303 Keyboard or system unit error 304 Keyboar...

Страница 125: ... error Hard Disk Controller and Hard Disk Check The computer next checks the hard disk controller and drive unit If a malfunction is found in the hard disk controller you see this error number and message 1782 Disk controller failure If an error is found in the hard disk drive unit one of these error messages appears 1780 Disk 0 failure 1790 Disk 0 error C 4 Power On Diagnostics ...

Страница 126: ...m follow these steps 1 Insert the Reference diskette in drive A 2 Turn on or reset the computer Press Enter to respond to the DATE and TIME prompts The diagnostics program loads automatically and displays the main menu OPERATION MENU 1 Setup 2 System diagnostics 0 Exit to DOS for more utilities Enter selection number 3 Press 2 to select System diagnostics and then press Enter When you start the sy...

Страница 127: ...om the list or if you wish to change the list press N and Enter If DIP switch I on the rear panel of the computer is set in the off position the DEVICE LIST includes item 14 dot matrix printer whether or not a printer is physically connected to the system This is normal To perform the dot matrix printer test however you must have a dot matrix printer attached Modifying the DEVICE LIST If an instal...

Страница 128: ...o adapter 0 Exit Enter the number of the item to add Type the number of the item you wish to add and press Enter You can add as many devices as necessary When the DEVICE LIST is complete press 0 followed by Enter To remove a device from the list press 2 and Enter The screen displays the current DEVICE LIST and the prompt Enter the number of the item to delete Type the number of the item you wish t...

Страница 129: ...ly once is sufficient To perform the test only once press 1 and Enter Depending on the device you have selected the program may then display a submenu of more detailed tests for the device you are checking To perform the test multiple times press 2 and Enter You see this prompt Terminate checking if an error is detected Y N Press Y and Enter to terminate checking if the device produces an error or...

Страница 130: ...ing Correct the problem and press Y and Enter to continue printing or press N and Enter to cancel printing After printing the error message the program displays this prompt Printout is finished Press Enter to return to the menu The program continues after an error in one of the following ways l It returns to the DEVICE LIST or l If you are running multiple tests and are not terminating on an error...

Страница 131: ...anty agreement Memory Check Use this option to check the memory installed in your computer including expansion memory For this check the program writes specific data into memory and then reads it back The data is written and read in blocks of 64KB A parity check is also made on each block A count of memory is displayed after each block that is tested without an error The final message is usually 0...

Страница 132: ... Italian 6 Spanish 0 Exit Enter selection number Choose the appropriate option for your keyboard layout for example if you re using the Equity LT 286 in the United States choose option 1 and press Enter The screen then displays a diagram showing the layout of your keyboard To test the keyboard input press any key on your keyboard The character for the key you press appears in the appropriate recta...

Страница 133: ...hrome adapter and display This test includes several checks that allow you to identify particular problems related to the monochrome display To run this check you must be using a monochrome monitor attached to a monochrome display adapter in an expansion chassis DIP switches 5 and 6 on the rear panel must both be off You can select the individual checks from this menu MONOCHROME ADAPTER AND CRT CH...

Страница 134: ...es of all the possible display attributes normal intensity high intensity blinking reverse and underlining Check the information that appears on your screen and then respond to the prompt Is the display correct Y N Press Y and then Enter if the display is correct If the display attributes are not correct adjust the brightness and contrast on your display monitor If they are still incorrect press N...

Страница 135: ...n press any key to end this check You can use this display to adjust the size of the display on the screen The vertical and horizontal adjustments are located on your monitor Sync Check This test is provided for service purposes only If you accidentally select this option press any key to end the test Run All Above Checks To run all the tests on the menu in sequence press 6 and Enter When you choo...

Страница 136: ...ng check 8 Color video check 9 Sync check 10 Run all above checks 0 Exit Enter selection number If an error occurs during any of these tests write down the error message or print it out and then contact your Epson dealer When you are finished with the test press 0 and Enter to return to the DEVICE LIST Color Graphics Adapter Check To check the color graphics adapter press 1 and then Enter The comp...

Страница 137: ...en or monitor If they are still incorrect or if any of the other attributes are not correct press N and Enter Note On the LCD display this test is run with gray scale mode 2 in effect regardless of how the DIP switches are currently set Table 1 2 in Chapter 1 lists the mapping of colors to gray tones in mode 2 Contact your Epson dealer to verify any display problems Character Set Check To check yo...

Страница 138: ...racters on your screen to this illustration After checking the character fonts respond to the prompt Is the display correct Y N If the characters displayed match the illustration press Y and Enter If you find a problem with the characters on the screen press N and Enter to display the error message 320x200 Graphics Mode Check To check your 320x200 graphics mode press 5 and then Enter The screen di...

Страница 139: ...e currently set Table 1 2 in Chapter 1 lists the mapping of colors to gray tones in mode 2 If any colors are displayed incorrectly check the adjustment of your monitor if you are using an external monitor and be sure that both ends of the cable are plugged in firmly If a problem still exists press N and Enter to display the error message 640x200 Graphics Mode Check To check your 640x200 graphics m...

Страница 140: ...ry is divided into eight independent display pages This test checks the eight pages by first filling all eight with a number corresponding to the page and then displaying each page in turn You see this pattern for screen 0 When you have examined this screen press any key to display the next page The eight display pages numbered 0 through 7 are displayed sequentially After the eighth page is displa...

Страница 141: ...P switches are currently set Table 1 2 in Chapter 1 lists the mapping of colors to gray tones in mode 2 To start this test press 8 and then Enter Press any key to display each screen On the last screen this prompt appears Is the display correct Y N If all the colors are correct press Y and Enter to end the test If any color is displayed incorrectly check the adjustment of your monitor if you are u...

Страница 142: ...y particular problems related to your diskette drive To run these tests you need a formatted 1 44MB or 720KB diskette so the tests can write data on the diskette in the drive If you are testing an external 5 1 4 inch diskette drive you also need a formatted 5 1 4 inch diskette for that drive Start the tests by selecting option 6 from the DEVICE LIST menu After you choose the number of times to run...

Страница 143: ...f the diskette This action by a read write head is called a seek During this test each head seeks sequentially from the innermost track to the outermost track The innermost track is 39 for a 360KB 5 1 4 inch diskette and 79 for a 3 1 2 inch diskette or a 1 2MB 5 1 4 inch diskette Select option 1 from the menu to start this test The program displays the number of each track it finds counting down f...

Страница 144: ...ted Speed Check This test checks the revolution speed of the diskette drive Select option 4 from the menu to start this test You see a message similar to this The disk rotation speed should be more than 294 0 rpm and less than 306 0 rpm The computer spins the diskette for a few seconds then displays a message like this The disk rotation speed is now 300 8 rpm The rotation speed of a 3 1 2 inch dis...

Страница 145: ...E CHECK Remove the disk from drive A As soon as you remove the diskette you see the following message Re insert the disk into drive A Re insert the diskette If no errors occur the menu reappears An error occurs if the drive is malfunctioning or if you do not remove or replace the diskette within a certain time Run All Above Checks To run all the tests on the menu in sequence press 6 and Enter When...

Страница 146: ...s and handles exceptions Parallel Port Printer Interface Check Use this option to test the operation of the computer s primary parallel port To perform the test you must insert a special loop back connector into the parallel port so that the computer can check the individual pins of the port Contact your dealer if you need a loop back connector Note that a different connector is required to test t...

Страница 147: ...ort Contact your dealer if you need a loop back connector Note that a different loop back connector is required to test the parallel port When you select option 11 from the DEVICE LIST menu you see this message SERIAL PORT CHECK Attach loop back connector to serial port Enter Y to start this check when connector is attached or Enter N to return to the menu Insert the loop back connector Then press...

Страница 148: ...ich the port sends data to itself at 9600 baud using various data formats At the start of the test you see this message RS 232C echo back check with various data formats Current data format 5 data bits 1 stop bits parity NONE Current test data is 00 Once again if any data received does not match the data sent a verify error occurs and the computer reports the transmitted and received data at the t...

Страница 149: ...r checks to see whether the printer is responding correctly This test detects whether the printer is off line or whether an interface error exists If no errors occur the computer sends a repeating sequence of ASCII characters and dot graphics data to the printer until you press any key The pattern looks like this The text data includes all the characters commonly used by programs that require fore...

Страница 150: ...checks When you select option 17 from the DEVICE LIST you see this menu HARD DISK DRIVE AND CONTROLLER CHECK MENU 1 Seek check 2 Write read check 3 Read verify check 4 Run all above check 0 Exit Enter selection number Press the number corresponding to the test you want to run and press Enter When you are finished with all checks press 0 and Enter to return to the DEVICE LIST menu Seek Check This t...

Страница 151: ... disk drive This cylinder is reserved for diagnostics however and is never used for storage by MS DOS Therefore data created by MS DOS is not destroyed Select option 2 from the menu to start this test You see this message The data on the highest physical cylinder may be destroyed by this check Enter Y to start this check Enter N to return to the menu Press Y and then Enter to continue the test You...

Страница 152: ...and then Enter When you choose this option all checks for the hard disk drive and controller are performed automatically in sequence Although you do not start each test you must still supply the appropriate responses to progress from one test to the next When you see a prompt warning you that the data on the highest physical cylinder may be destroyed press Y and then Enter to continue with the tes...

Страница 153: ...e computer can check the port s individual pins This test is identical to the check for the primary parallel port For details see the section describing the parallel port check earlier in this appendix Exiting System Diagnostics When you finish running the system diagnostics press 0 and Enter to return to the OPERATION MENU Then press 0 and Enter to reset the computer When the OPERATION MENU appea...

Страница 154: ...OUNTER REGISTER ERROR 8254 TIMER COUNTER ERROR 8237 DMA CONTROLLER REGISTER ERROR 8237 DMA REFRESH ERROR 612 DMA PAGE REGISTER ERROR 8042 TIMEOUT ERROR 8042 SELF DIAGNOSTIC ERROR 8042 WRITE COMMAND ERROR 8259 INTERRUPT CONTROLLER ERROR 146818 CMOS SHUTDOWN BYTE ERROR 146818 CMOS BATTERY ERROR 146818 CMOS CHECKSUM ERROR 80286 INSTRUCTION ERROR 80286 PROTECT MODE ERROR 1 80286 PROTECT MODE ERROR 2 M...

Страница 155: ...SET ERROR COLOR GRAPHICS ERROR 640x200 GRAPHICS MODE ERROR SCREEN PAGING ERROR COLOR VIDEO ERROR FLOPPY DISK CONTROLLER ERROR SEQUENTIAL SEEK ERROR RANDOM SEEK ERROR WRITE ERROR READ ERROR DISK CHANGE CHECK REMOVE ERROR DISK CHANGE CHECK INSERT ERROR NOT INSTALLED COPROCESSOR INITIALIZE ERROR COPROCESSOR INVALID OPERATION MASK ERROR COPROCESSOR ST FIELD ERROR COPROCESSOR COMPARISON ERROR COPROCESS...

Страница 156: ... control signal ALWAYS LOW 1201 control signal ALWAYS HIGH 1202 TIMEOUT ERROR 1203 VERIFY ERROR Dot matrix printer 1401 status Hard disk drive and controller 1701 SEEK ERROR 1702 WRITE ERROR 1703 READ ERROR 1704 HEAD ERROR 1705 ERROR DETECTION ERROR 1706 ERROR CORRECTION ERROR Alternate gy llel port ERROR PIN p Performing System Diagnostics D 31 ...

Страница 157: ...or use at 8 MHz Standard 8 bit parallel 25pin D type female connector RS 232C programmable asynchronous 9 pin D type male connector RGB color monitor support CGA compatible Internal non adjustable One 8 bit slot signal compatible with IBM XT Attached 88 89 sculpted keys 58 key QWERTY main keyboard 17 key numeric cursor keypad 12 user definable function keys Esc Print Screen Sys Rq Scroll Lock Paus...

Страница 158: ...nch 360KB or 1 2MB diskette drive supported High contrast paper white LCD display with fluorescent backlighting CGA compatible with four switch selectable gray scale modes continuous brightness and contrast controls power saving feature External RGB monitor supported CGA compatible Internal rechargeable NiCad battery pack 4400 milliamperes approximately 1 25 hour usage 15 volt AC adapter can recha...

Страница 159: ...ents Temperature Operating 41 to 95 F 5 to 35 C Non operating 4 to 122 20 to 50 C Humidity Operating 20 to 50 non condensing Non operating 10 to 90 non condensing Altitude Operating 0 to 9800 ft 0 to 3000 m Non operating 0 to 32 000 ft 0 to 10 000 m When traveling by airplane it is best to take your LT 286 into the passenger compartment as carry on luggage to prevent it from being stored in an unp...

Страница 160: ...e Internal 300 1200 baud or 1200 2400 baud Hayes compatible auto dial 2MB expansion modules SIMMs up to 4MB expansion memory supported on system board One 8 bit expansion slot One 16 bit expansion slot Soft case for carrying computer E 4 Specifications ...

Страница 161: ...ery pack while you operate the computer Application program A software program designed to perform a specific task such as word processing spreadsheet analysis or database management ASCII American Standard Code for Information Interchange A standard system for encoding text characters such as letters numbers and punctuation symbols An ASCII character occupies one byte of storage Files stored unde...

Страница 162: ... original is damaged or lost Batch file A text file containing one or more MS DOS commands each stored on a separate line Batch files are used to automate MS DOS operations When you type the name of the batch file with or without its BAT extension each command in the file is executed in sequence Baud rate A measure of the speed of data transmission Usually equivalent to bits per second Bit A binar...

Страница 163: ...ide Semiconductor A method of making integrated circuits chips CMOS RAM A special type of low power memory in your Equity LT 286 used to record information about your system s configuration as well as the current date and time Unlike ordinary RAM CMOS RAM is backed up by a small battery and therefore is not erased when the computer s power switch is turned off Code A system of symbols for represen...

Страница 164: ...nfiguration for example might include a printer and an internal modem as well as your built in hard disk and diskette drive Control code A command generated by holding down the Ctrl key and pressing another key on the keyboard that instructs the computer to perform a specific function Controller A hardware component of your computer that oversees the operation of the hard disk or diskette drive Co...

Страница 165: ... the screen and moves as you enter and delete data Cylinder A storage area on a hard disk A cylinder on a hard disk is analogous to a track on a diskette Data Information stored or processed by a computer Data diskette A formatted diskette used to store data files Data file This term usually refers to files you create by means of an application program for example a memo created by a word processo...

Страница 166: ...stands for Dual Inline Package Directory A logical subdivision of a hard disk or diskette Generally synonymous with subdirectory See Chapter 5 Disk A general term meaning either a diskette or a hard disk Disk drive The physical device either a hard disk drive or a diskette drive that allows the computer to read from and write to a disk A diskette drive has a slot into which you insert a diskette A...

Страница 167: ...tructions In MS DOS executable files must have an extension of BAT COM or EXE To execute an executable file type its name at the command prompt with or without the extension Execution speed The speed at which the CPU can execute commands The Equity LT 286 can run at 8 MHz or 12 MHz Also called clock speed or operating speed Expansion chassis An optional device containing two expansion slots The sl...

Страница 168: ...st of code and are used by computers to perform instructions Filename A name of up to eight characters that MS DOS uses to identify a file Floppy disk See Diskette Format To prepare a new disk or erase an old one so that it can store information Formatting a disk divides it into tracks and sectors and creates addressable locations on it Graphics Lines angles curves and other non alphanumeric data ...

Страница 169: ...listed by the DIR command MS DOS stores two hidden files in the root directory of your hard disk Some application programs also create hidden files High density A type of diskette High density 3 1 2 inch diskettes can be formatted to store 1 44MB of data Input output I O port See Port Interface A hardware or software connection that is used to transmit data between equipment or programs Internal c...

Страница 170: ...tory Main unit The part of the computer that houses the central processing unit the random access memory the disk drives and other supporting circuitry Megabyte MB A unit used to measure storage space in a computer s memory or on a disk One megabyte equals 1 048 576 bytes Megahertz MHz A unit used to measure the oscillation frequency of a computer s internal timing clock One megahertz is one milli...

Страница 171: ...or The piece of hardware that contains the screen and displays information Motherboard The main circuit board of your computer Also called the system board MS DOS An operating system from Microsoft that comes with your computer See Operating system NiCad The type of battery used by your Equity LT 286 NiCad stands for nickel cadmium Numeric keypad The number keys grouped on the right side of the ke...

Страница 172: ...interface in which bits are transmitted one at a time Parameter A term added to a command that tells the computer how to perform the command for example what data file to use or what particular conditions to look for Parity Data signals sent during communications to detect transmission errors Partition To divide a hard disk into logical sections for use by one or more operating systems A hard disk...

Страница 173: ...andom Access Memory The portion of the computer s memory used to run programs and store data while you work All data stored in RAM is erased when you turn off the computer so you must store any data you want to save on a diskette or hard disk Read To copy data from one area to another For example when you open a text file stored on disk the computer reads the data from the disk and displays it on ...

Страница 174: ...disk The root directory is designated by a backslash All other directories are subdirectories of the root directory or of other subdirectories RS 232C A standard serial interface You can easily connect an RS 232C compatible device to your Equity LT 286 Sector A contiguous section of a disk track that provides an address at which the computer can access data Self test A diagnostic procedure perform...

Страница 175: ...dix D System diskette A diskette from which the operating system can be booted An MS DOS system diskette must contain the file COMMAND COM plus two hidden MS DOS program files To create a system diskette use the S switch with the FORMAT command for example FORMAT A S Target diskette The diskette that you are copying files to as opposed to the source diskette which is the diskette you are copying f...

Страница 176: ...rmat a diskette and create a volume label use the V switch with the FORMAT command or use the SELECT program To add or change a volume label for a diskette or hard disk that has already been formatted use the MS DOS LABEL command or the XTREE program Wildcard character A character that represents an unknown character or group of characters MS DOS recognizes two wildcard characters and The asterisk...

Страница 177: ...tches See DIP switches BACKUP command 5 20 21 Backup copies 1 19 21 5 16 21 Battery charging 1 3 4 4 2 3 using 4 2 3 Booting MS DOS 1 15 19 3 12 5 2 See also Resetting Brightness adjusting 1 17 Button diskette drive release 4 14 RESET 4 21 See also Switch C Cable adapter 1 2 3 external monitor A 1 2 power 1 2 3 printer 1 4 6 Caring for diskettes 4 13 14 Caring for hard disk drive 4 16 Centronics c...

Страница 178: ...guration 1 2 1 Connecting AC adapter 1 2 3 external monitor A 1 2 power cord 1 2 3 printer 1 4 7 Connector AC adapter 1 2 CRT A 1 parallel 1 5 serial 1 7 Contrast adjusting 1 17 Control code 4 9 Ctrl Alt Del 4 21 Ctrl C 4 21 Controllers floppy disk C 4 D 17 20 hard disk C 4 D 25 27 Coprocessor math 1 2 6 D 21 COPY command 5 18 20 Copying data 5 16 21 disks 5 16 21 files 5 16 21 operating system 1 ...

Страница 179: ...h coprocessor check D 21 memory check D 6 modifying DEVICE LIST D 2 3 parallel port check D 21 22 D 27 28 power on self test C 1 4 RAM check C 2 D 6 resuming from error D 5 running system diagnostics D 1 31 selecting a test D 4 serial port check D 22 23 starting system diagnostics D 1 2 system board check D 6 system device check C 1 video display and adapter checks C 3 D 8 17 DIP switches 1 8 14 b...

Страница 180: ...nostics check C 4 D 17 20 indicator LED 4 4 inserting and removing diskettes 4 14 15 release button 4 14 back cover foldout setup program 2 7 8 Disk operating system See MS DOS Display See LCD screen and Monitor DOS See MS DOS Dot matrix printer See Printer Double density diskettes 4 11 12 Double dot single dot select 1 12 13 Double sided diskettes 4 11 12 Drive changing 5 2 3 See also Hard disk E...

Страница 181: ... H Handle using 4 6 Hard disk backing up 3 1 4 17 5 16 5 18 21 booting from 3 12 caring for 4 16 creating extended partition 3 5 6 creating primary partition 3 3 4 diagnostics check C 4 D 25 27 formatting 3 2 3 7 10 improving performance 4 17 indicator LED 4 4 4 17 modifying AUTOEXEC BAT file 3 11 partitioning 3 2 6 power switch 4 17 20 preparing for use 3 1 12 problems B 6 7 protecting data 4 17 ...

Страница 182: ...cifications E 1 Keyboard DIP switches See DIP switches L LCD screen backlighting period 1 19 2 9 10 4 5 5 30 31 B 2 brightness 1 17 contrast 1 17 double dot single dot select 1 12 13 gray scale mode 1 10 11 2 10 12 initial display 1 18 19 LIGHTON utility 5 30 31 opening and closing 4 4 5 reverse display 1 10 selecting 1 10 11 setup program options 2 4 6 LED indicators 4 3 4 Caps Lock 4 4 4 8 FDD f...

Страница 183: ...5 28 30 booting 1 15 19 3 12 5 2 copying 1 19 21 command prompt 1 18 19 5 2 commands 5 3 4 exiting 5 2 HELP utility 5 22 23 LIGHTON utility 5 30 31 loading 1 15 19 3 12 5 2 MENU utility 5 24 25 preparing hard disk 3 1 12 system diskette 1 14 15 1 18 21 using 5 1 31 XTREE utility 5 25 28 O Operating system See MS DOS Options 2 P Panel back back cover foldout Parallel cable 1 46 diagnostics check D ...

Страница 184: ...Printer cable 1 4 7 connecting 1 4 7 connector 1 5 1 7 diagnostics check D 21 23 D 24 25 D 27 28 parallel 1 4 6 D 21 22 D 27 28 serial 1 7 1 12 13 D 22 23 Printing graphic characters D 24 25 Protecting data 4 17 R RAM Random access memory 1 17 C 2 D 6 Read only memory ROM D 6 Read write heads C 4 D 17 20 D 25 27 Removing diskette 4 14 Resetting computer 4 20 21 RS 232C serial port See Serial Runni...

Страница 185: ...ray scale 2 10 12 mass storage 2 7 8 memory 2 3 4 running 2 1 14 starting 2 2 3 Software starting programs 5 30 Special keys 4 8 10 Specifications Equity LT 286 E 1 4 Speed See CPU speed Starting MS DOS 1 15 19 3 12 5 2 Starting setup program 2 2 3 Starting system diagnostics D 1 2 Storing diskettes 4 13 14 Support customer 4 Switch CPU SPEED 4 7 DIP See DIP switches HDD POWER 4 17 20 power 1 16 S...

Страница 186: ...computer 1 15 17 U Unpacking computer 1 1 2 Using computer 4 1 21 Using diskettes 4 11 16 Using hard disk drive 4 16 20 V VGA 2 6 Video diagnostics check C 3 D 8 17 Video monitor See Monitor W Write protecting diskettes 4 15 16 Write protect switch 4 15 16 X XTREE utility 5 25 28 10 Index ...

Страница 187: ...Diskette drive Hard disk drive AC adapter cover Back panel DIP switches Serial interface Parallel connector interface ...

Страница 188: ......

Отзывы: